¶ WeChat web page authorization
¶ Scenario introduction
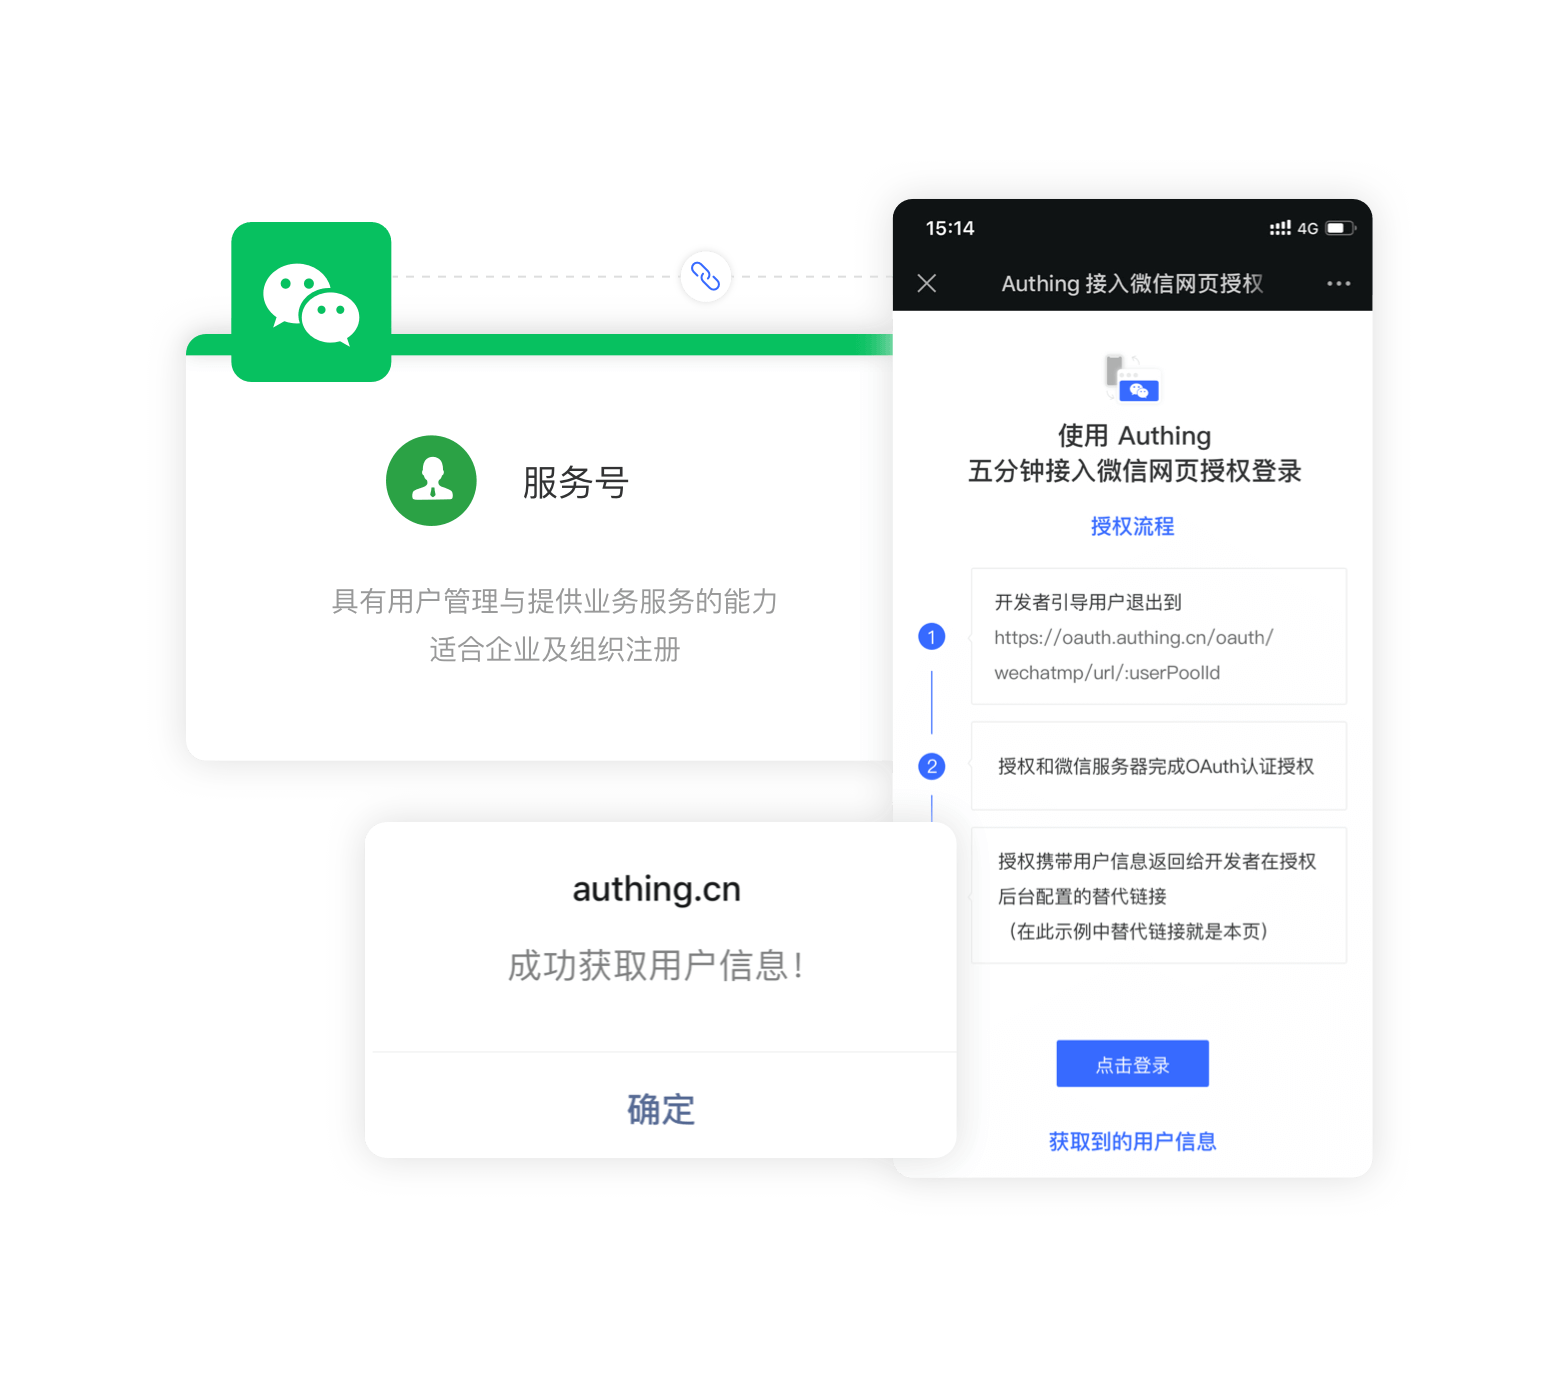
- Overview: GenAuth provides developers with a method to quickly obtain user information and complete login on the WeChat web page through the SDK. If a user visits a third-party web page or public account in the WeChat client, the WeChat web page authorization mechanism can be used to obtain basic user information and implement business logic.
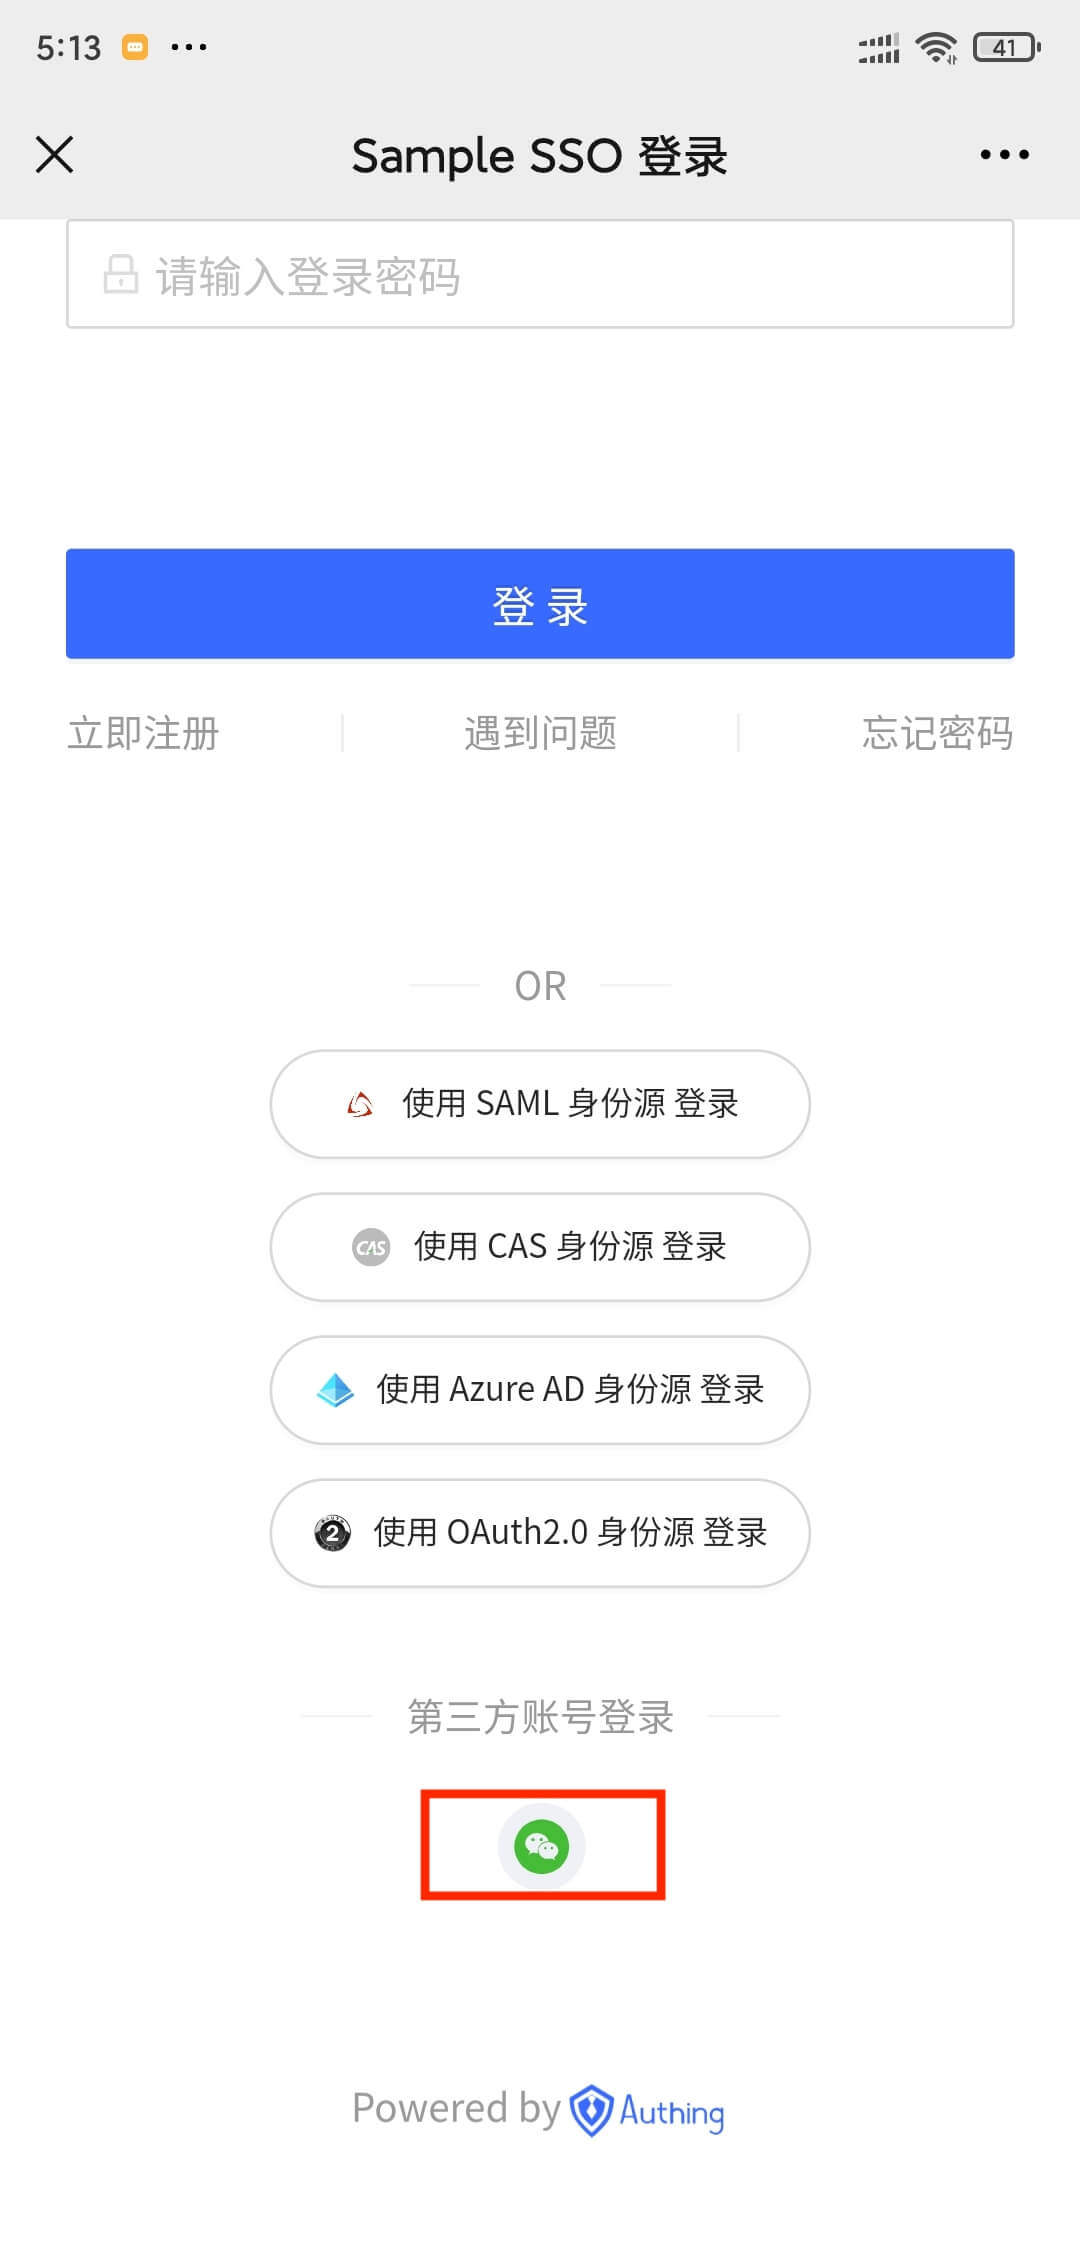
- Application scenario: WeChat browser
- End user preview:
¶ Notes
- If you have not opened a GenAuth console account, please go to GenAuth console (opens new window) to register a developer account;
¶ Step 1: Create a WeChat service account on WeChat public platform
Go to WeChat public platform (opens new window) to create a WeChat service account. 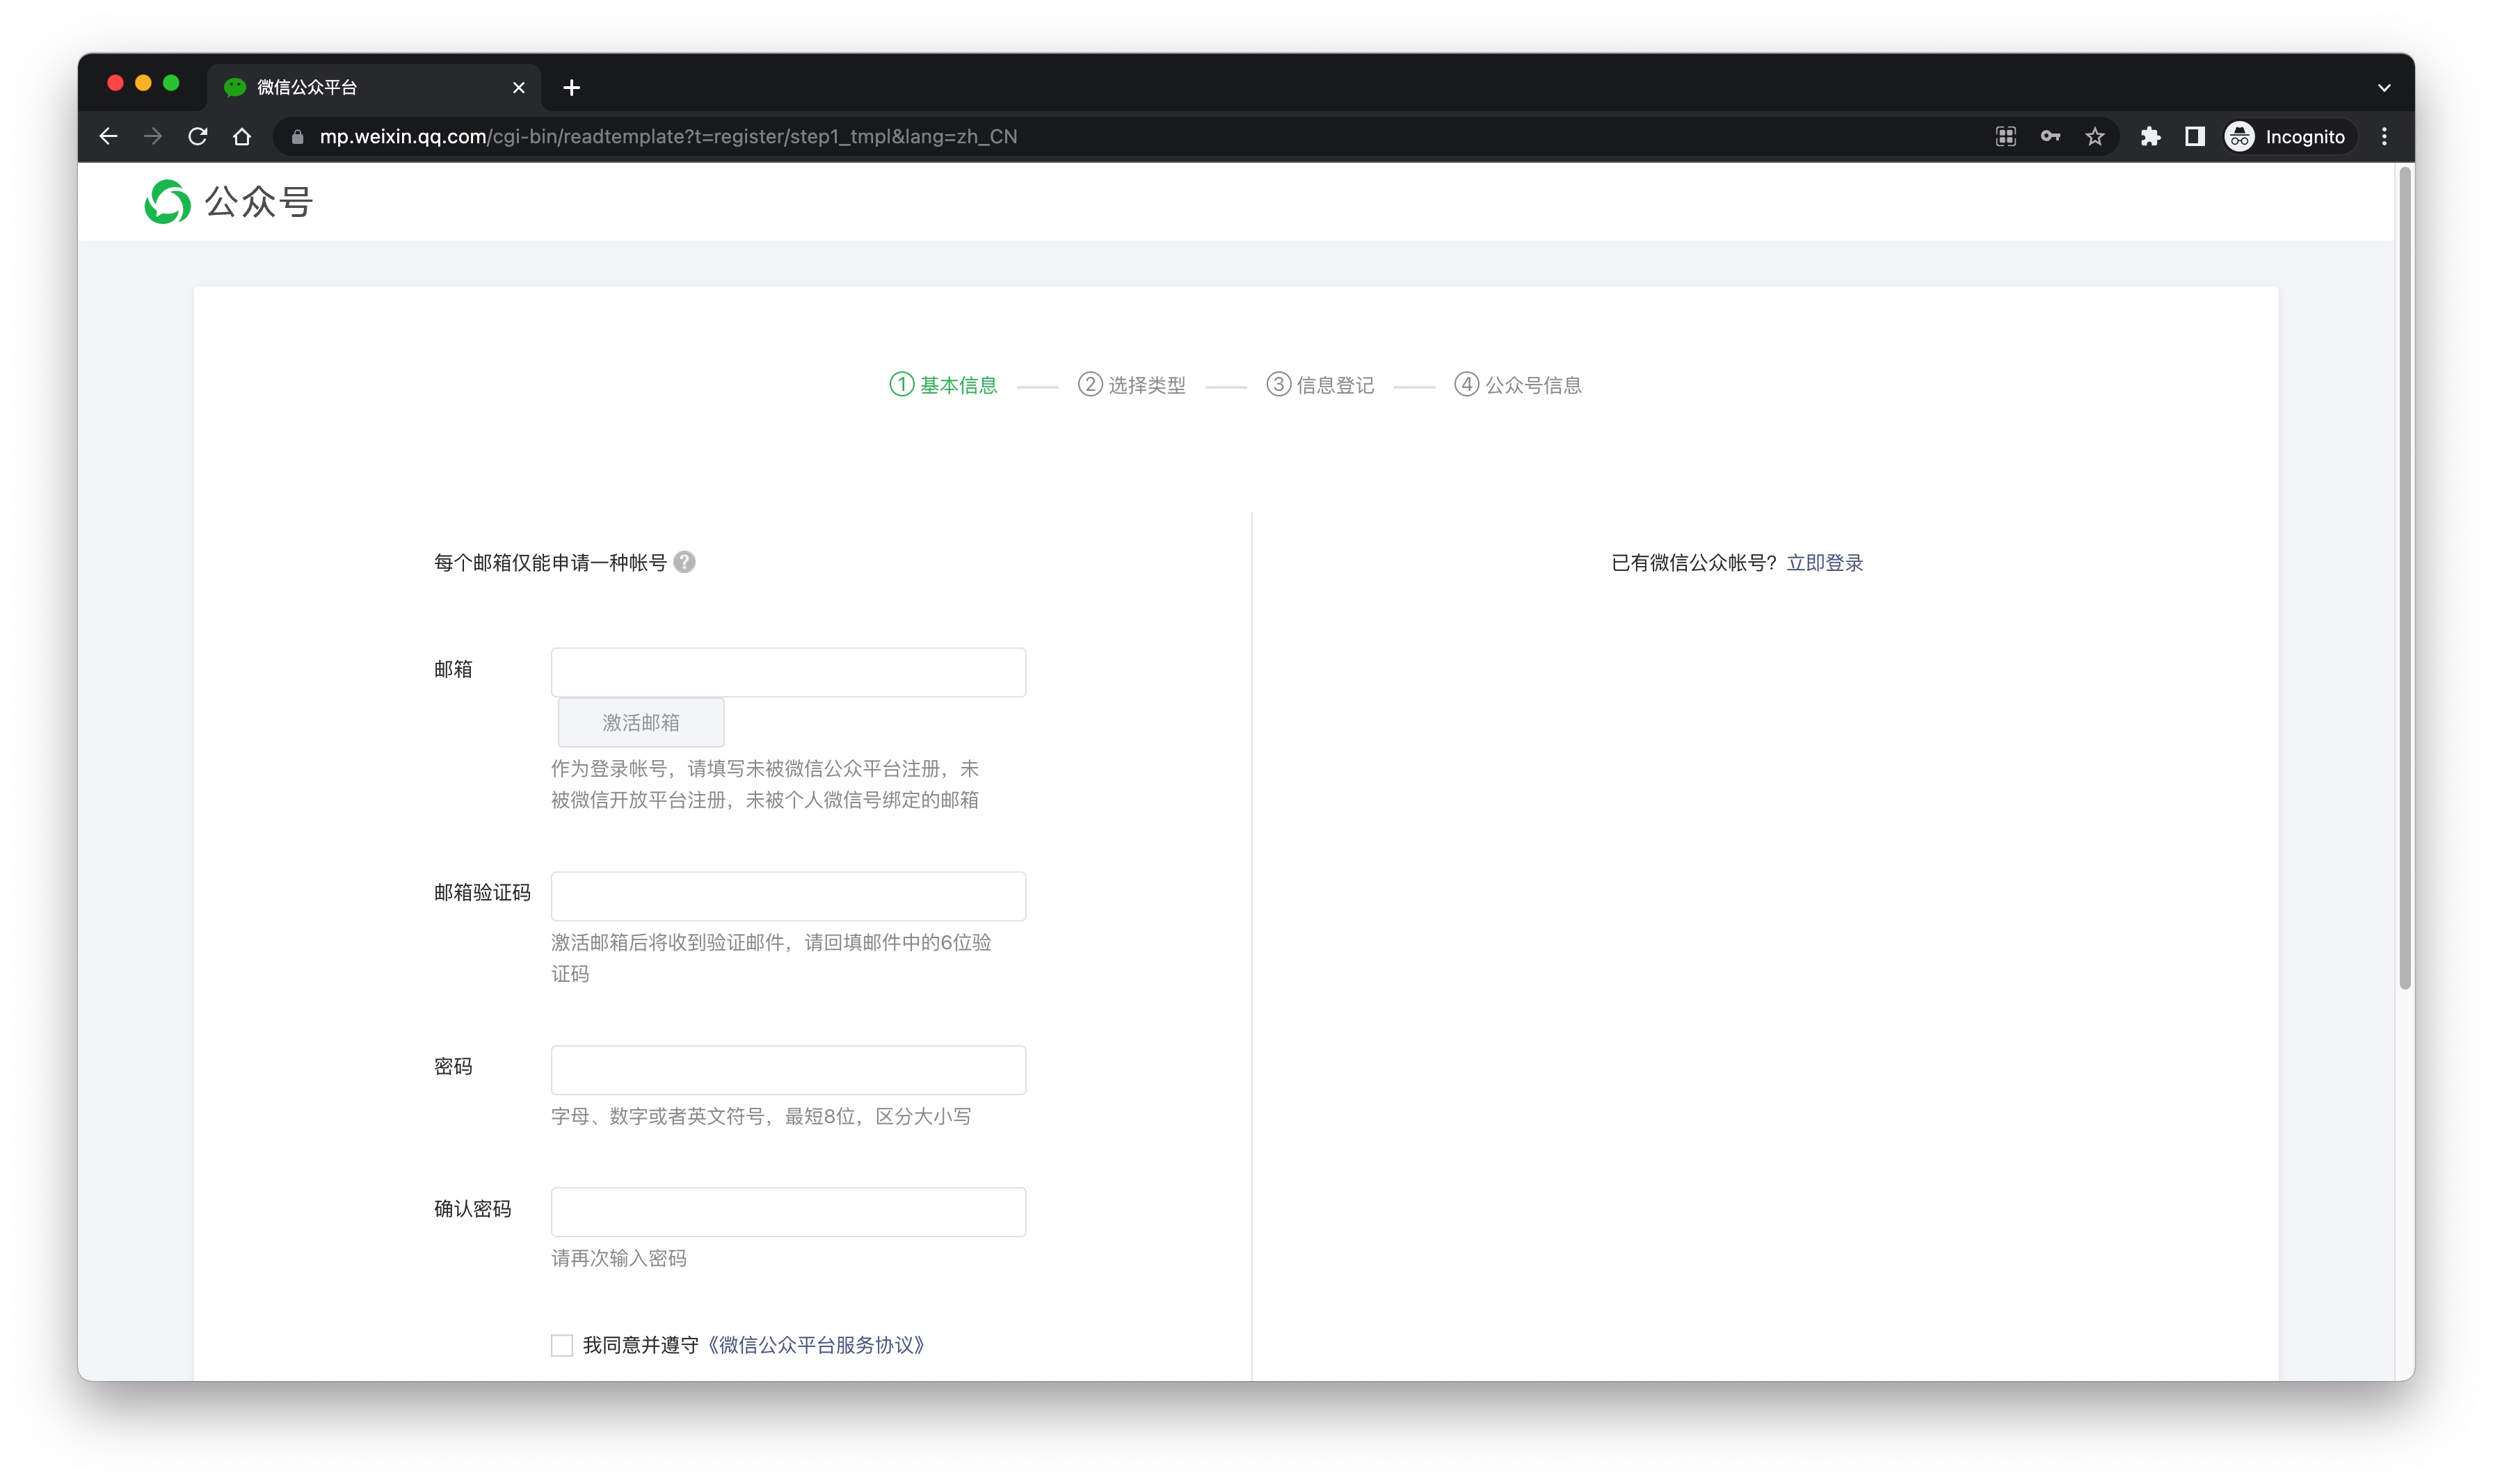
After the creation is complete, you need to record the AppID and AppSecret of the application, which will be used later. 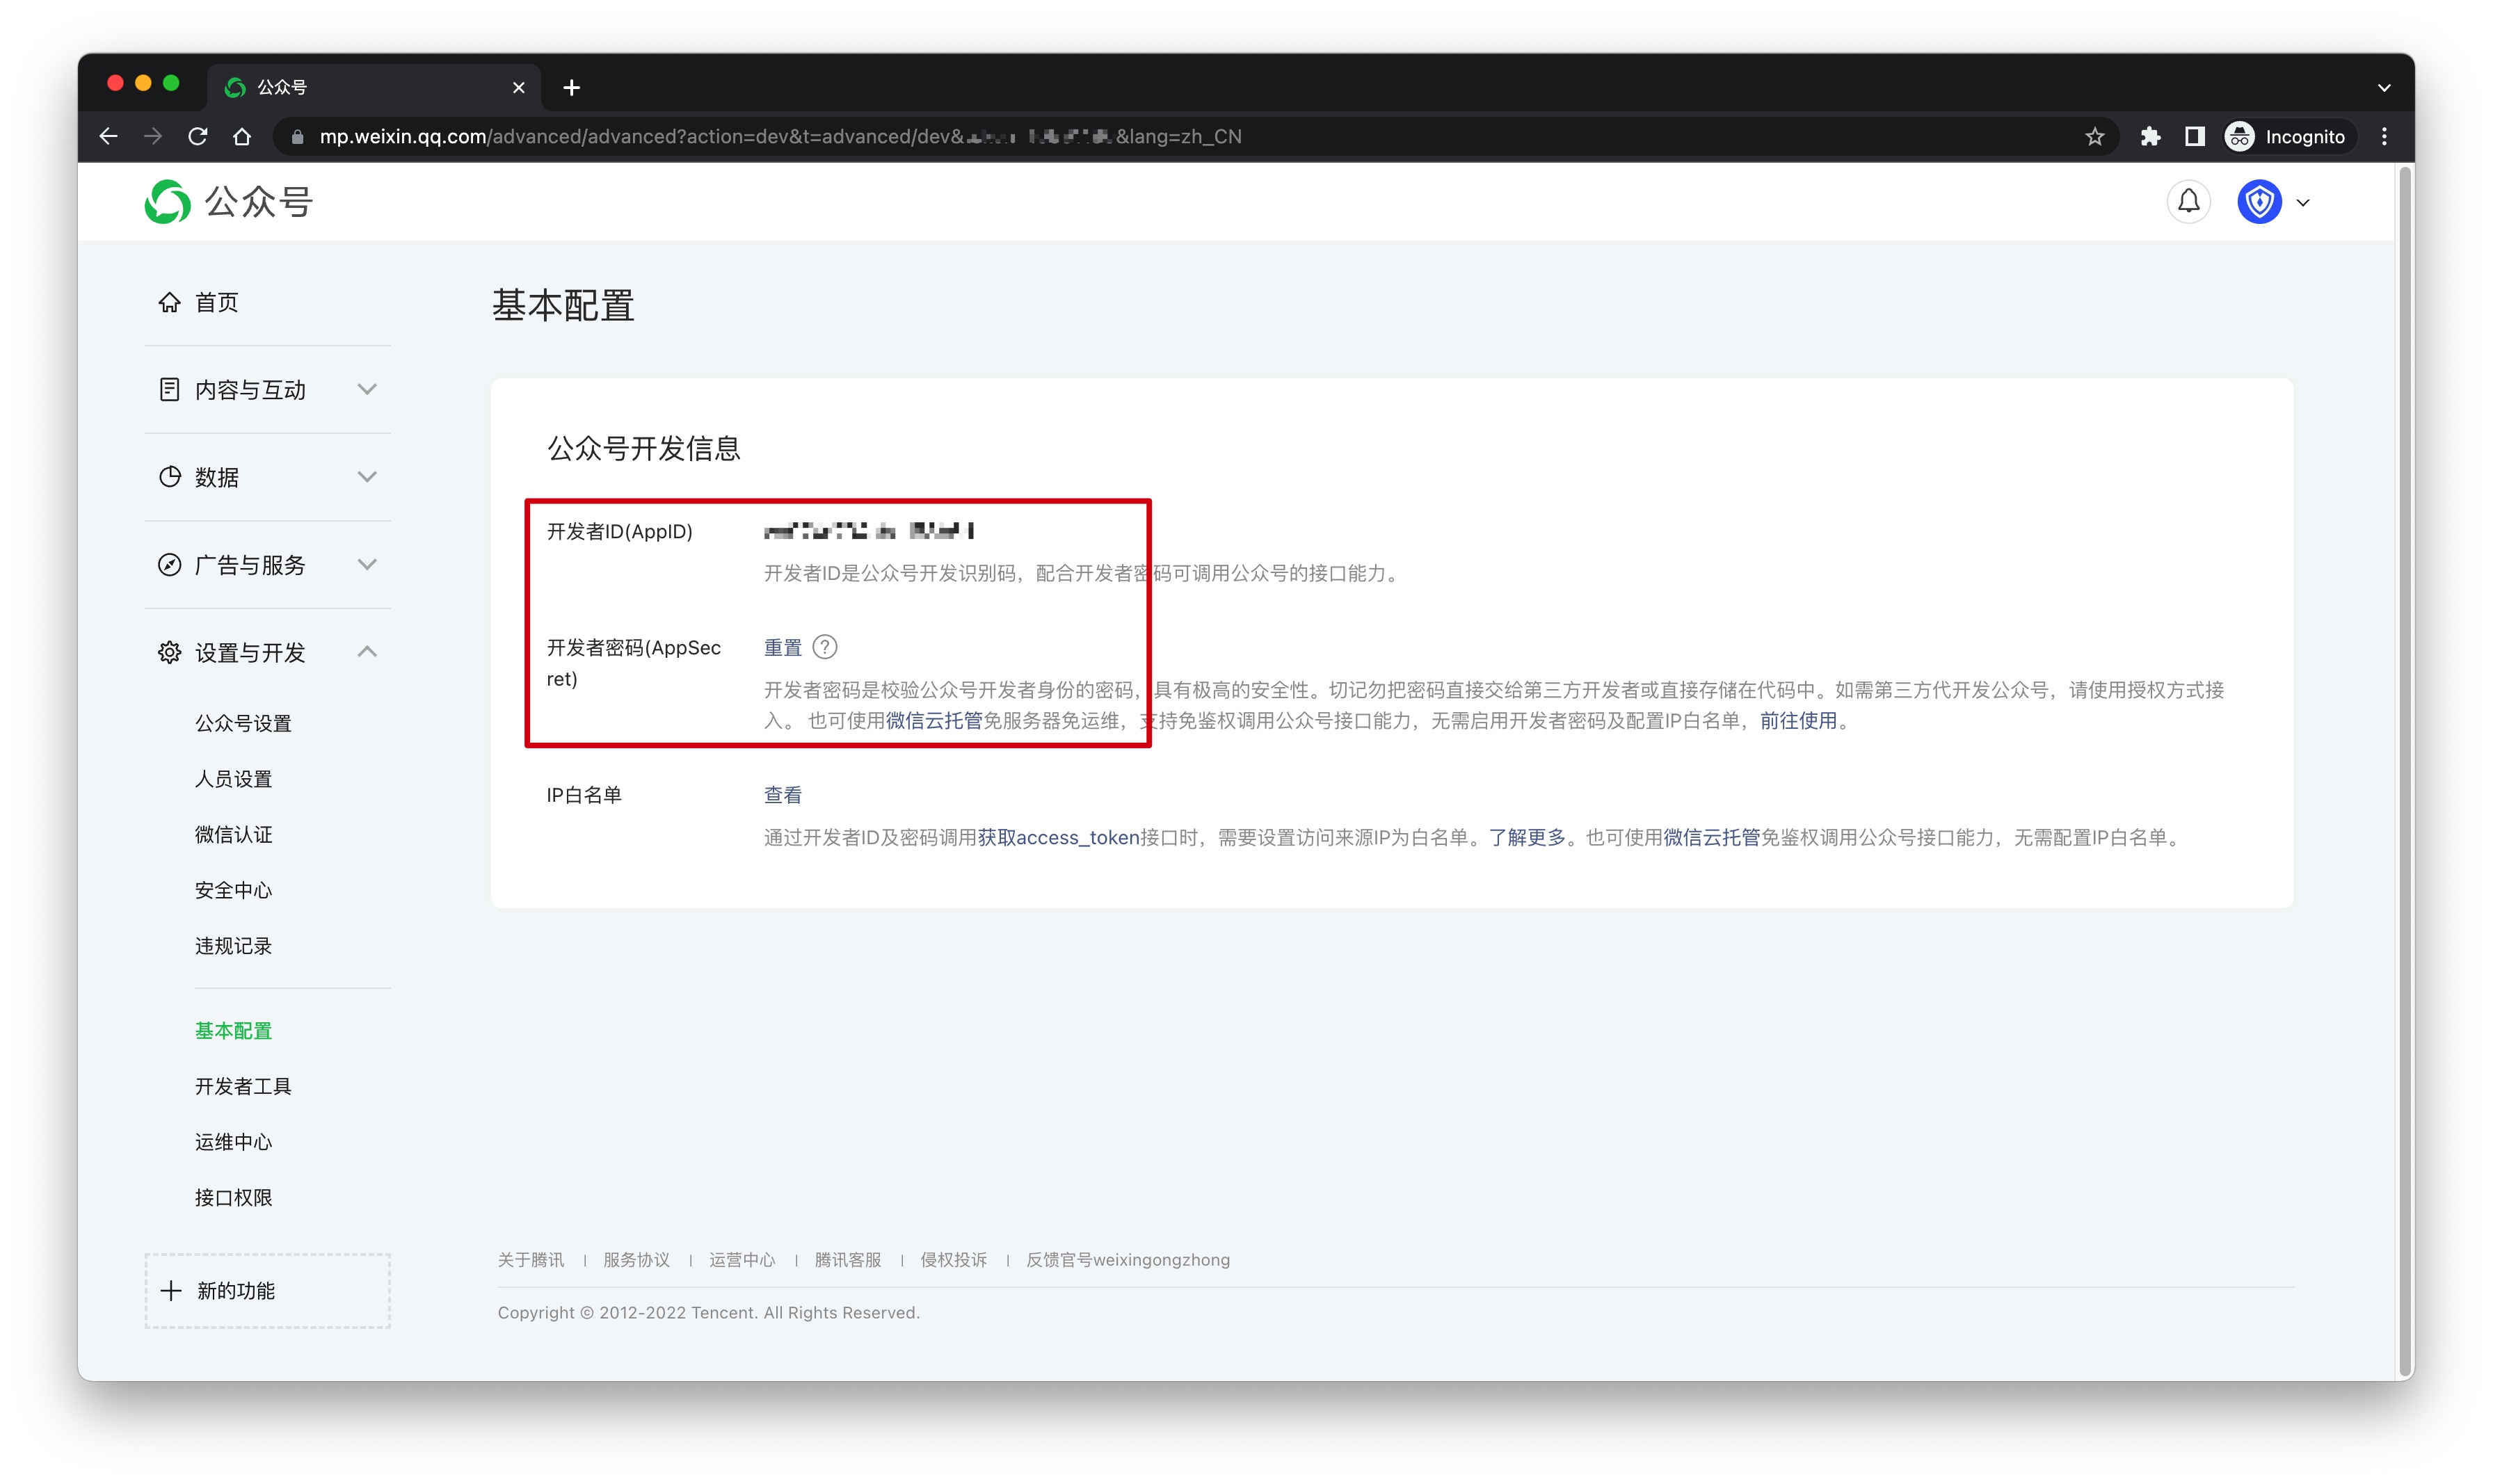
After that, you need to set the web authorization domain name to core.genauth.ai in the Settings and Development -> Public Account Settings -> Function Settings page of the WeChat public platform backend. For security verification, the WeChat server needs to make a request verification with the GenAuth server. Developers need to download the txt file and record the file name and text content. 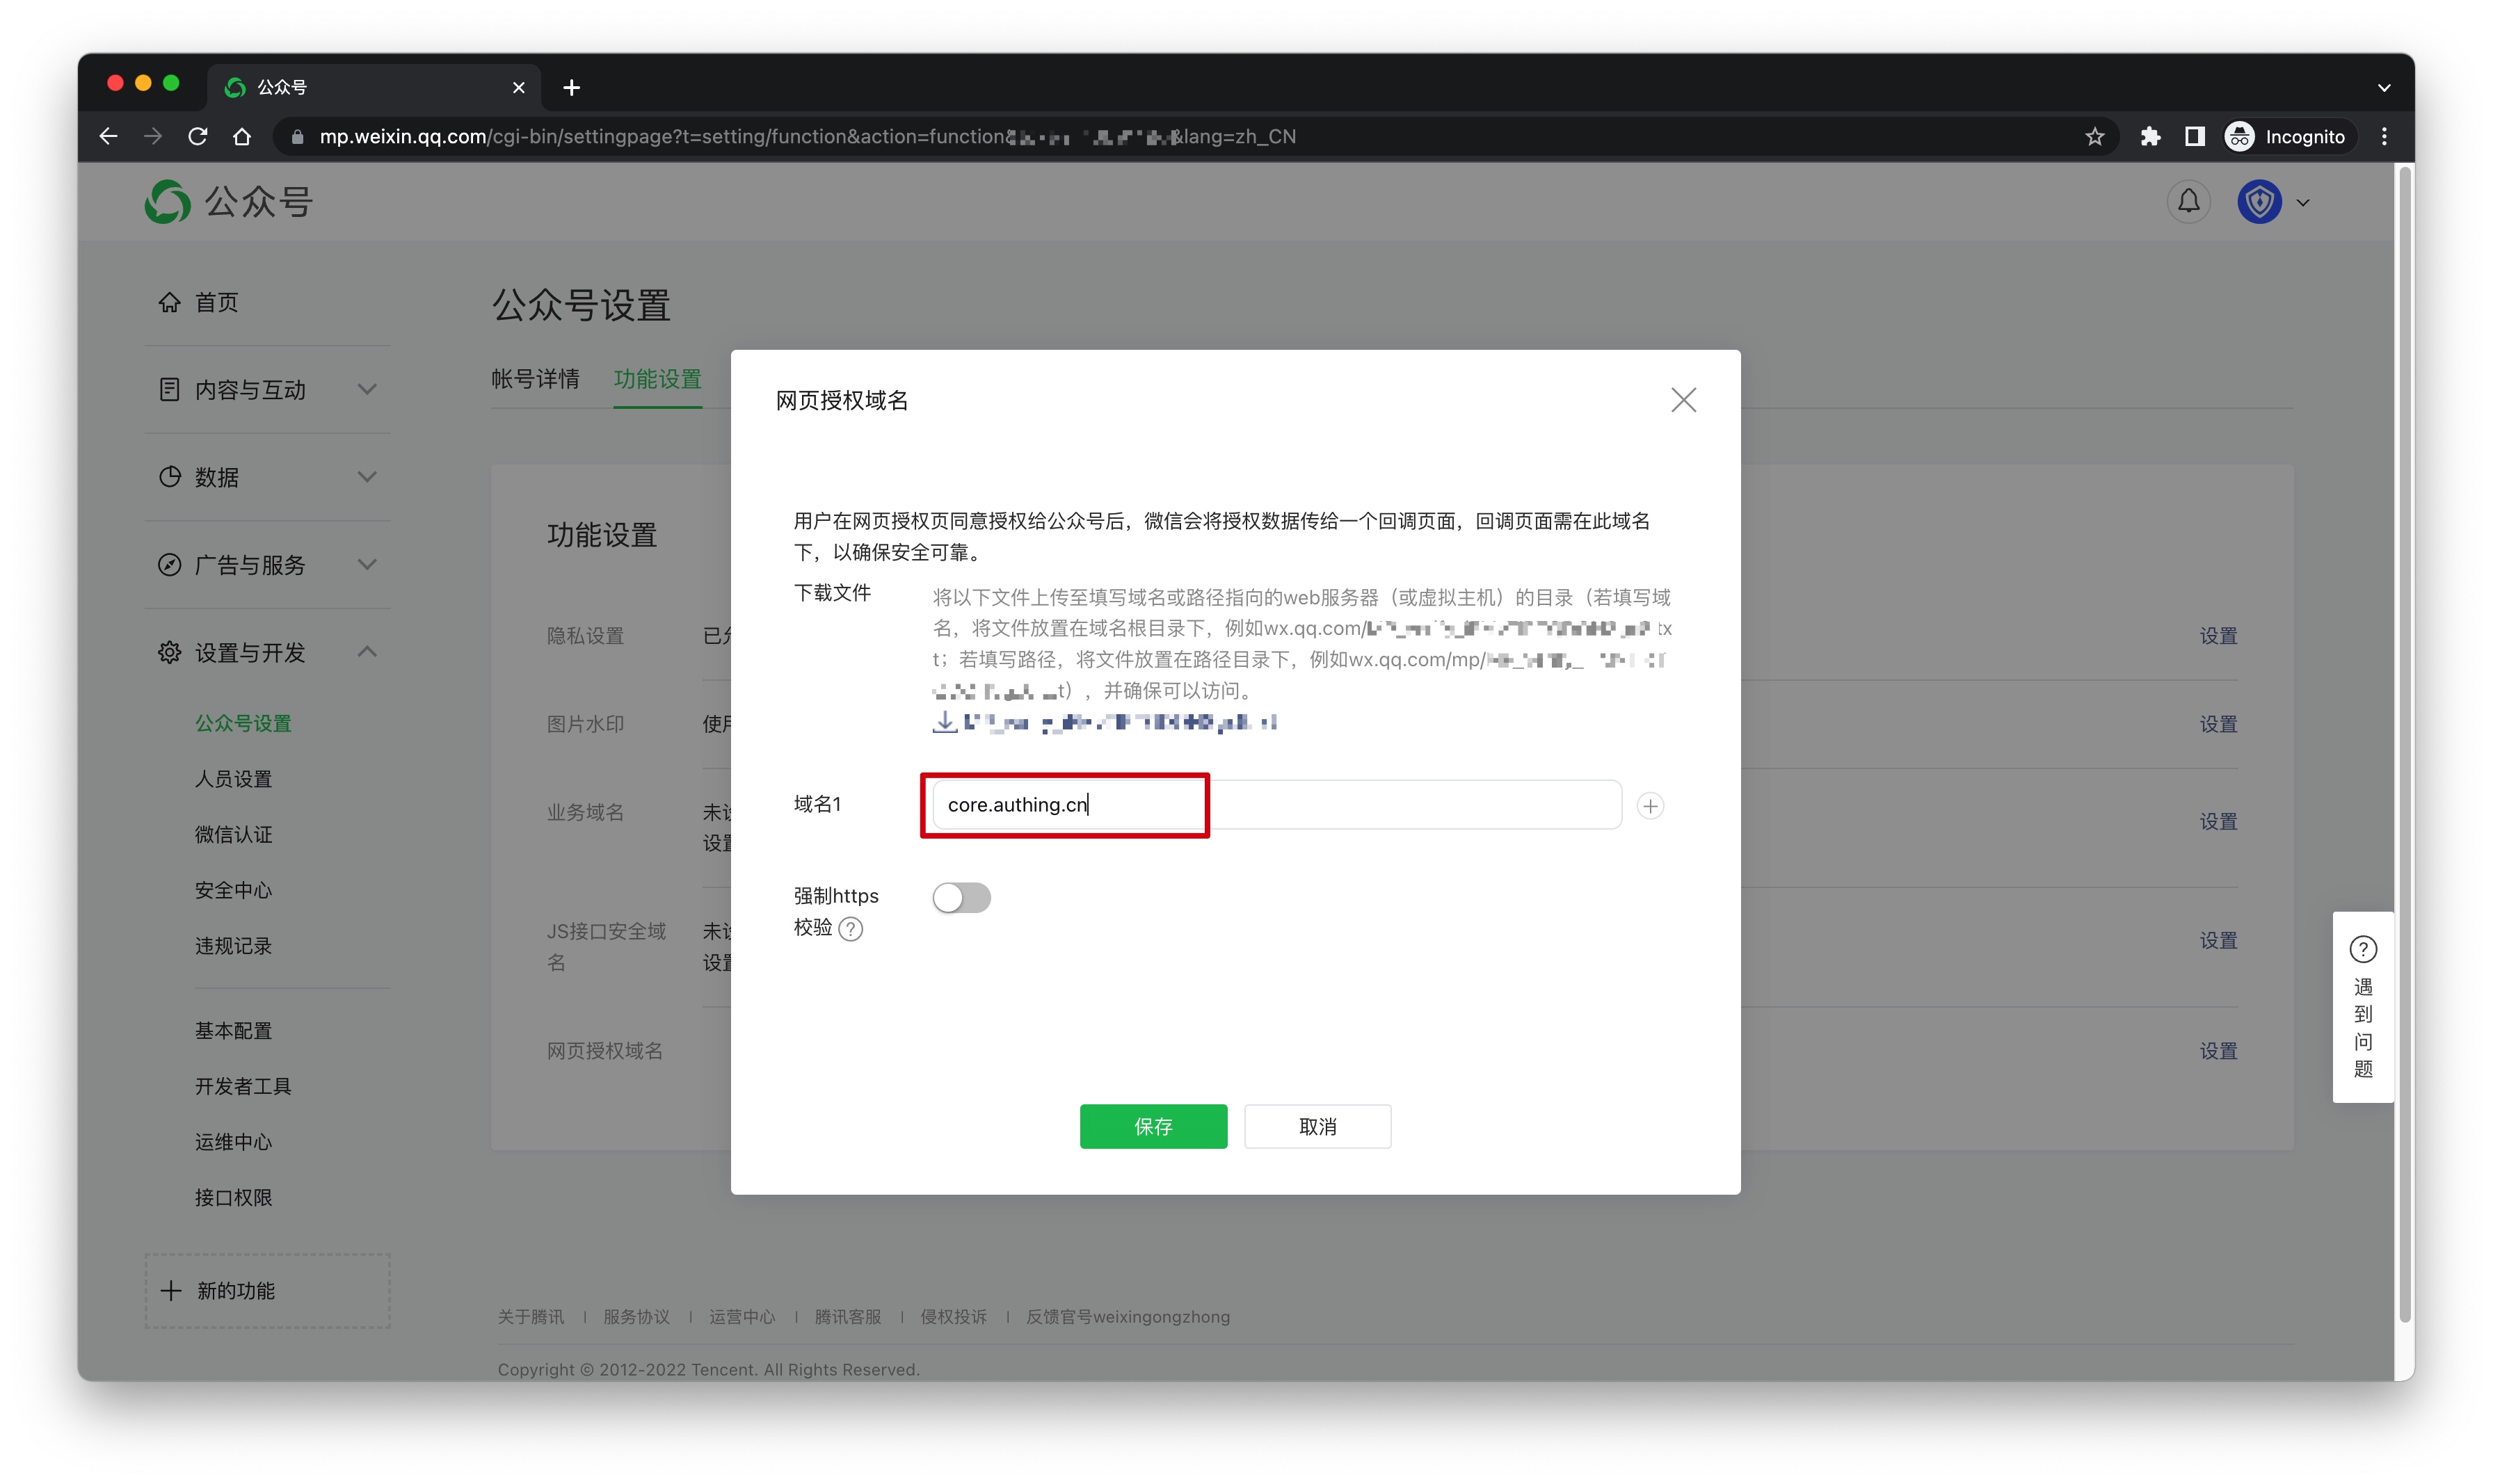
¶ Step 2: Configure WeChat web authorization application in the GenAuth console
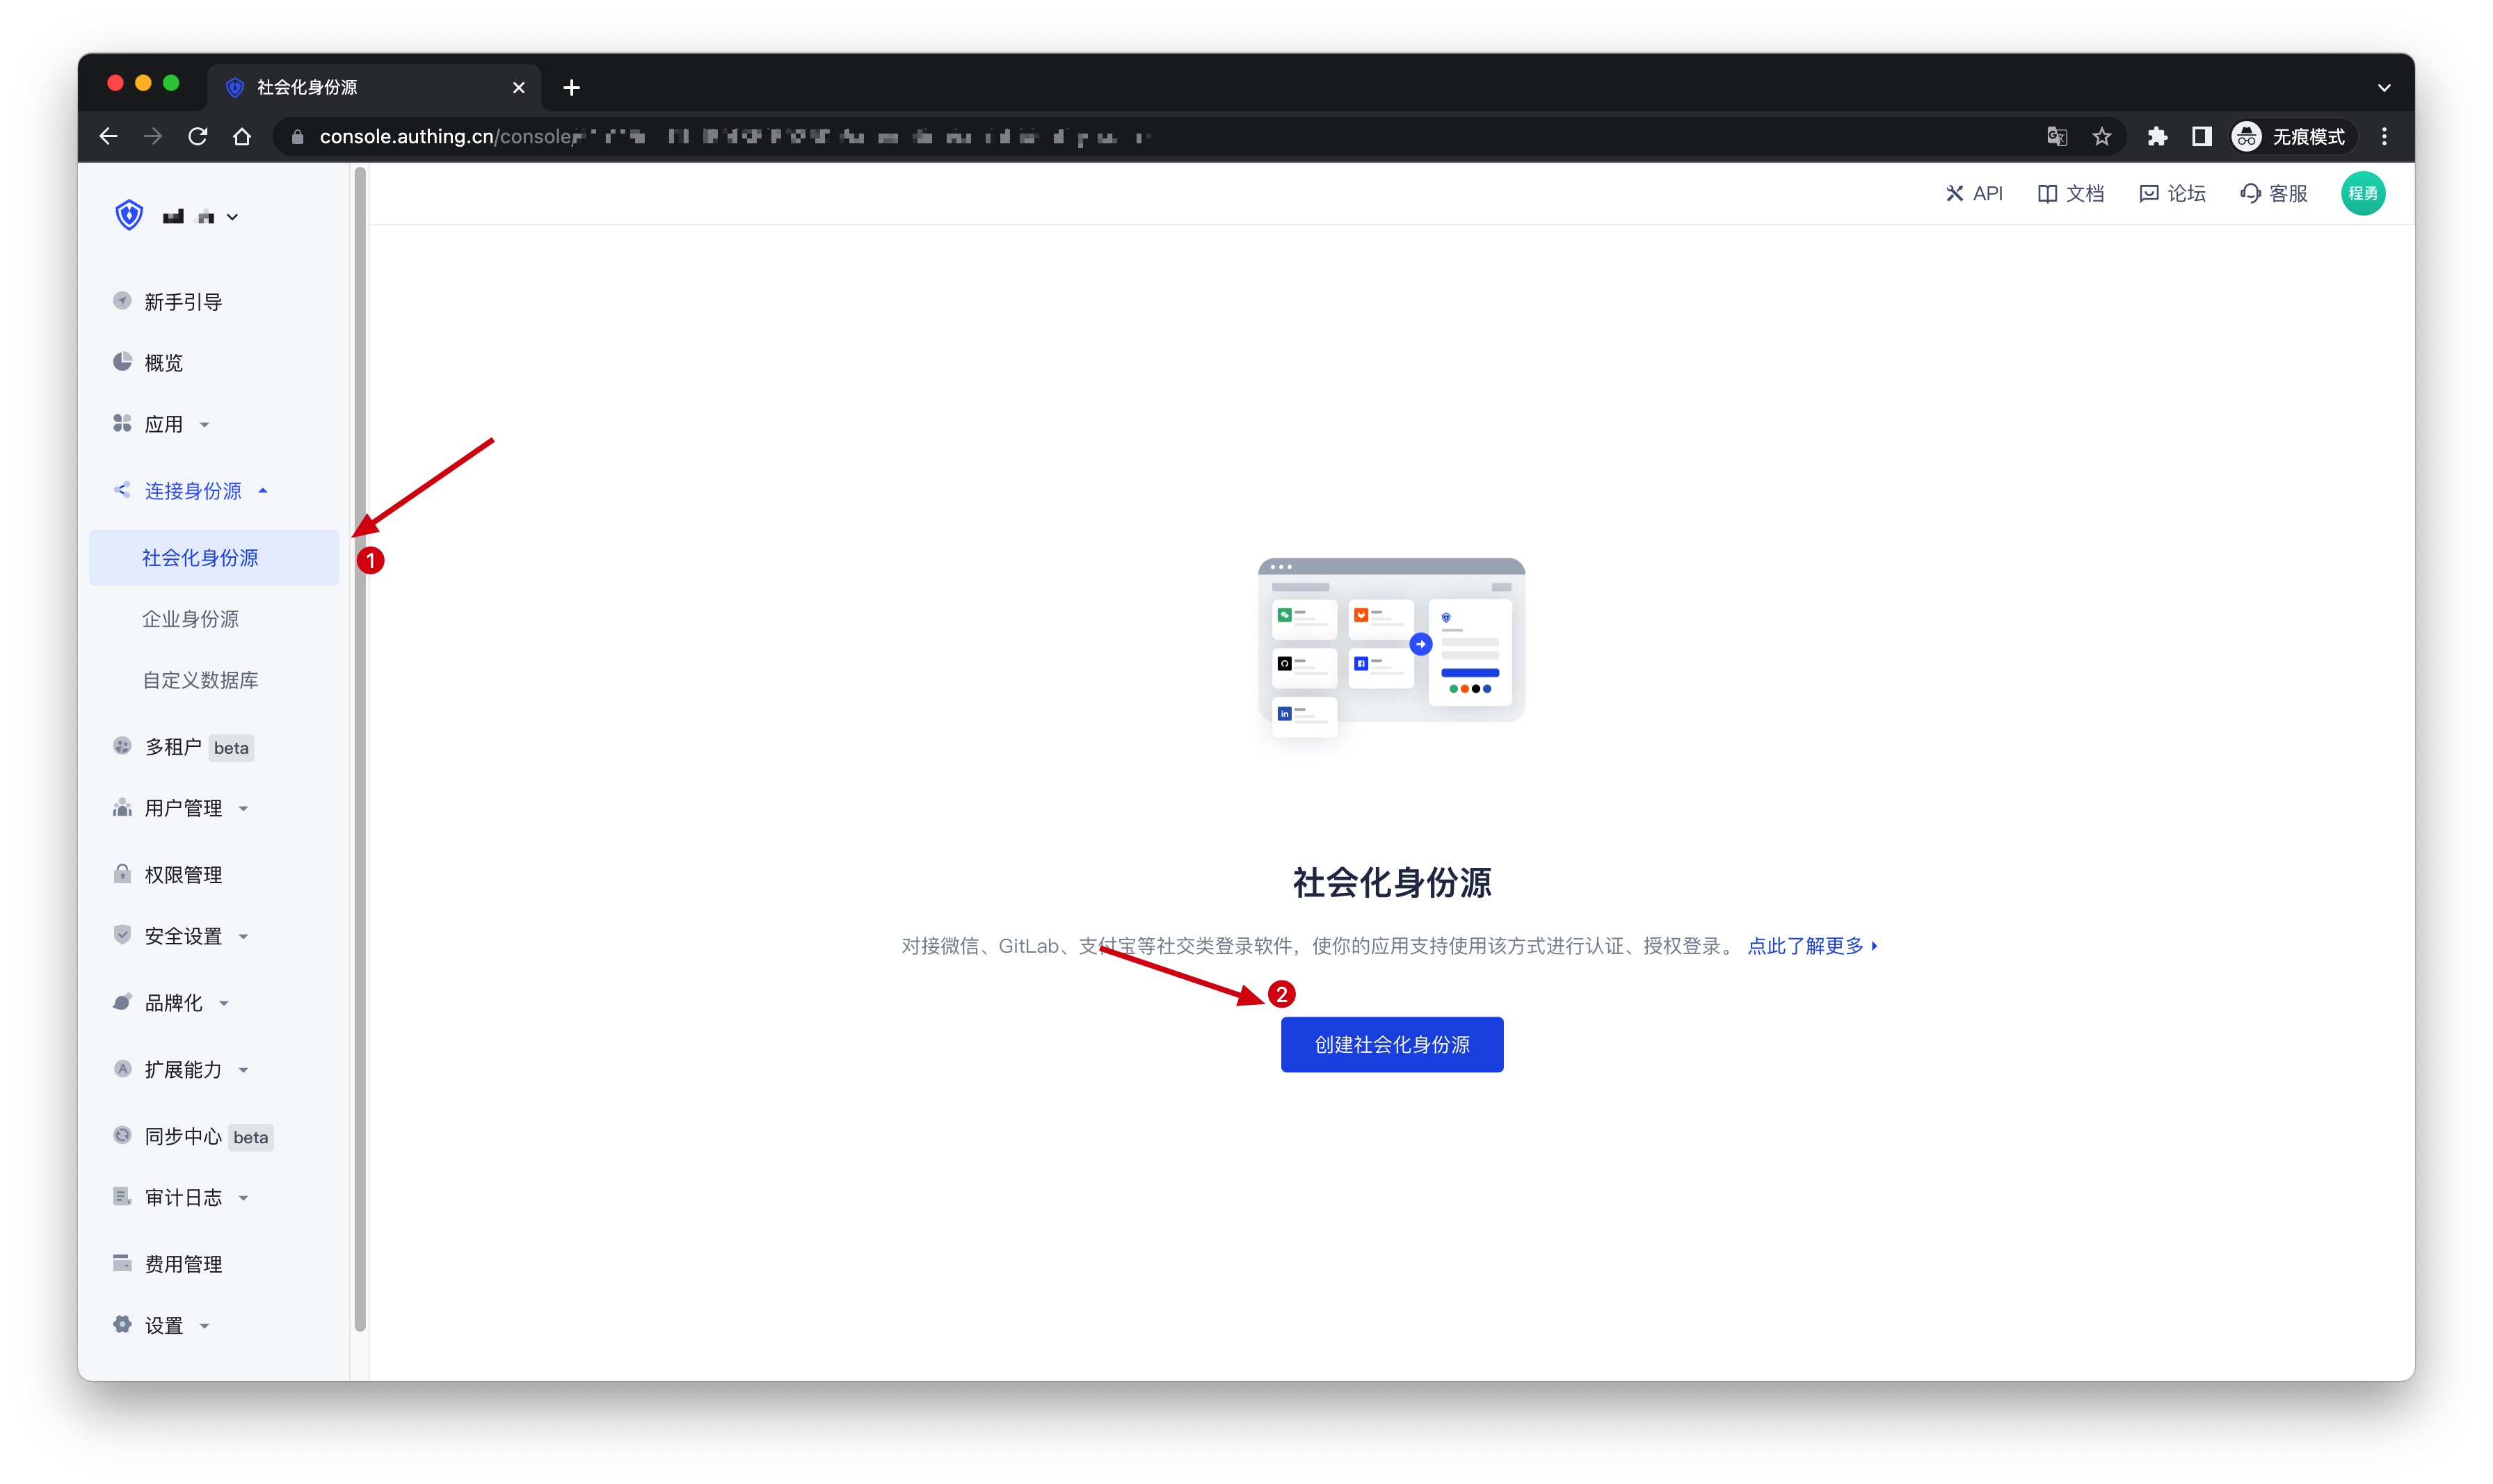
2.1 Please click the "Create Social Identity Source" button on the "Social Identity Source" page of the GenAuth console to enter the "Select Social Identity Source" page.
2.2 On the "Select Social Identity Source" page, click the "WeChat" card to enter the "WeChat Login Mode" page. 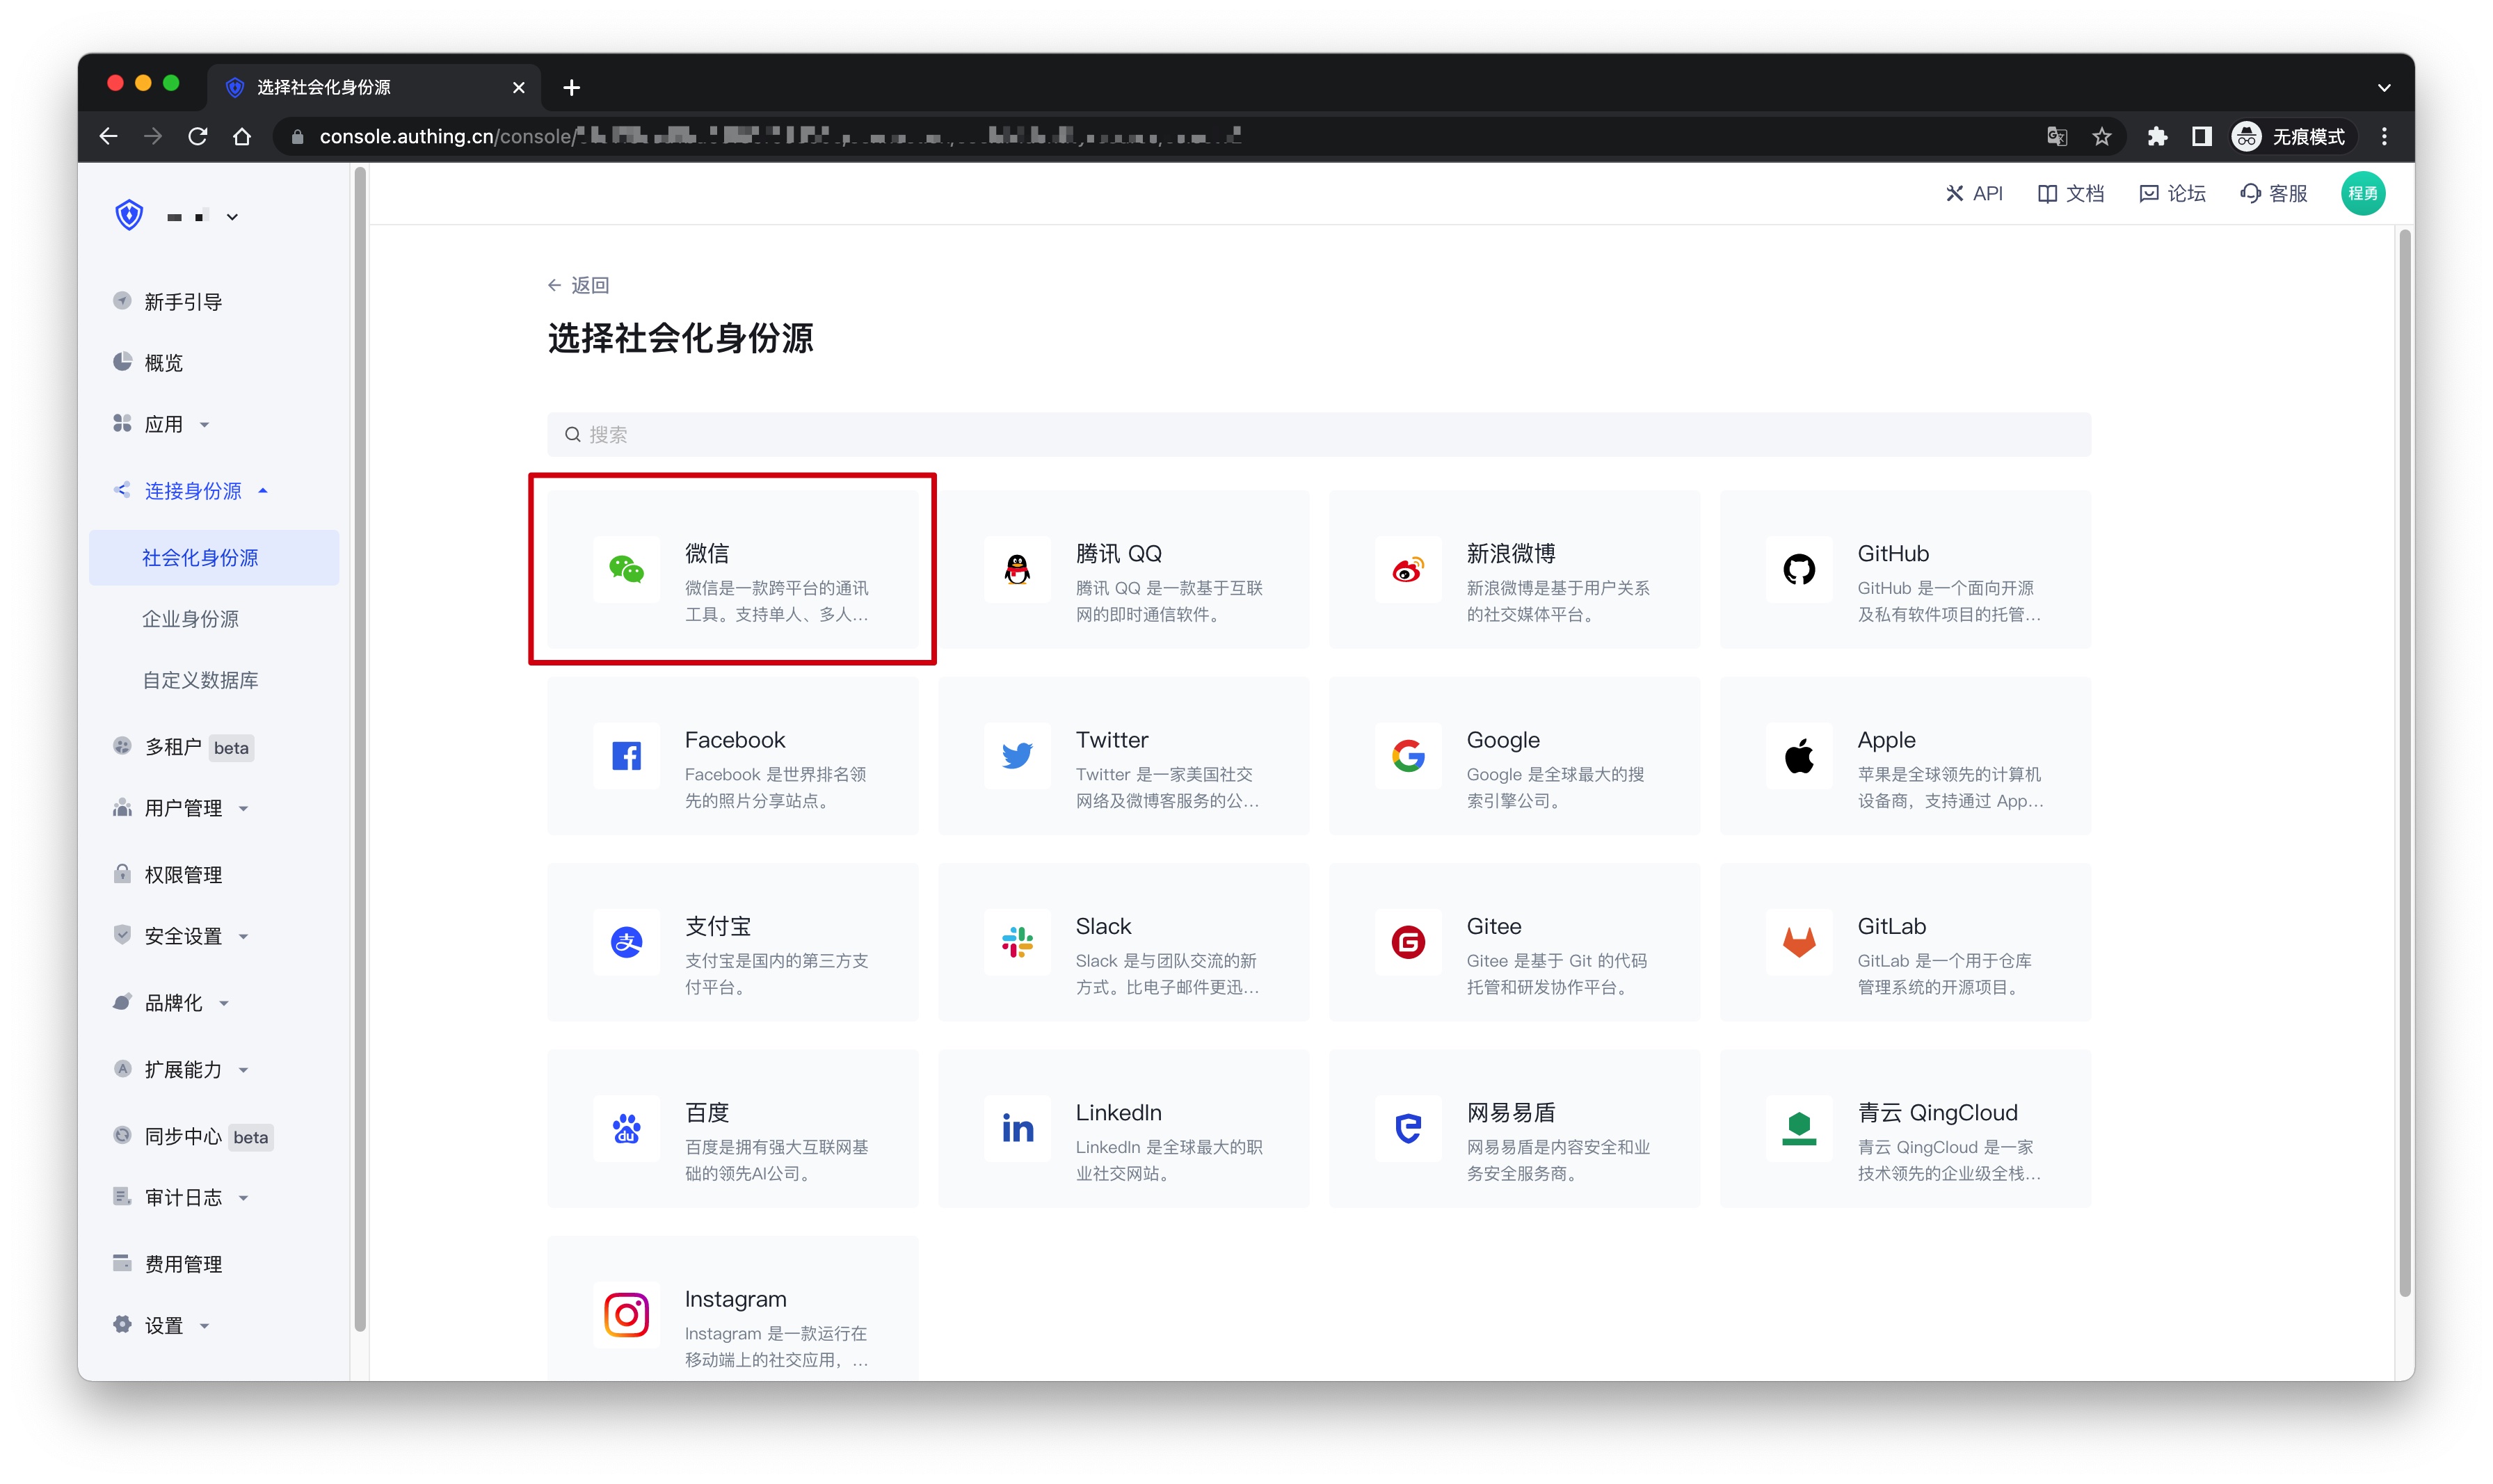
2.3 Continue to click the "WeChat Web Authorization" login mode, or click … Add to open the "WeChat Web Authorization" configuration page. 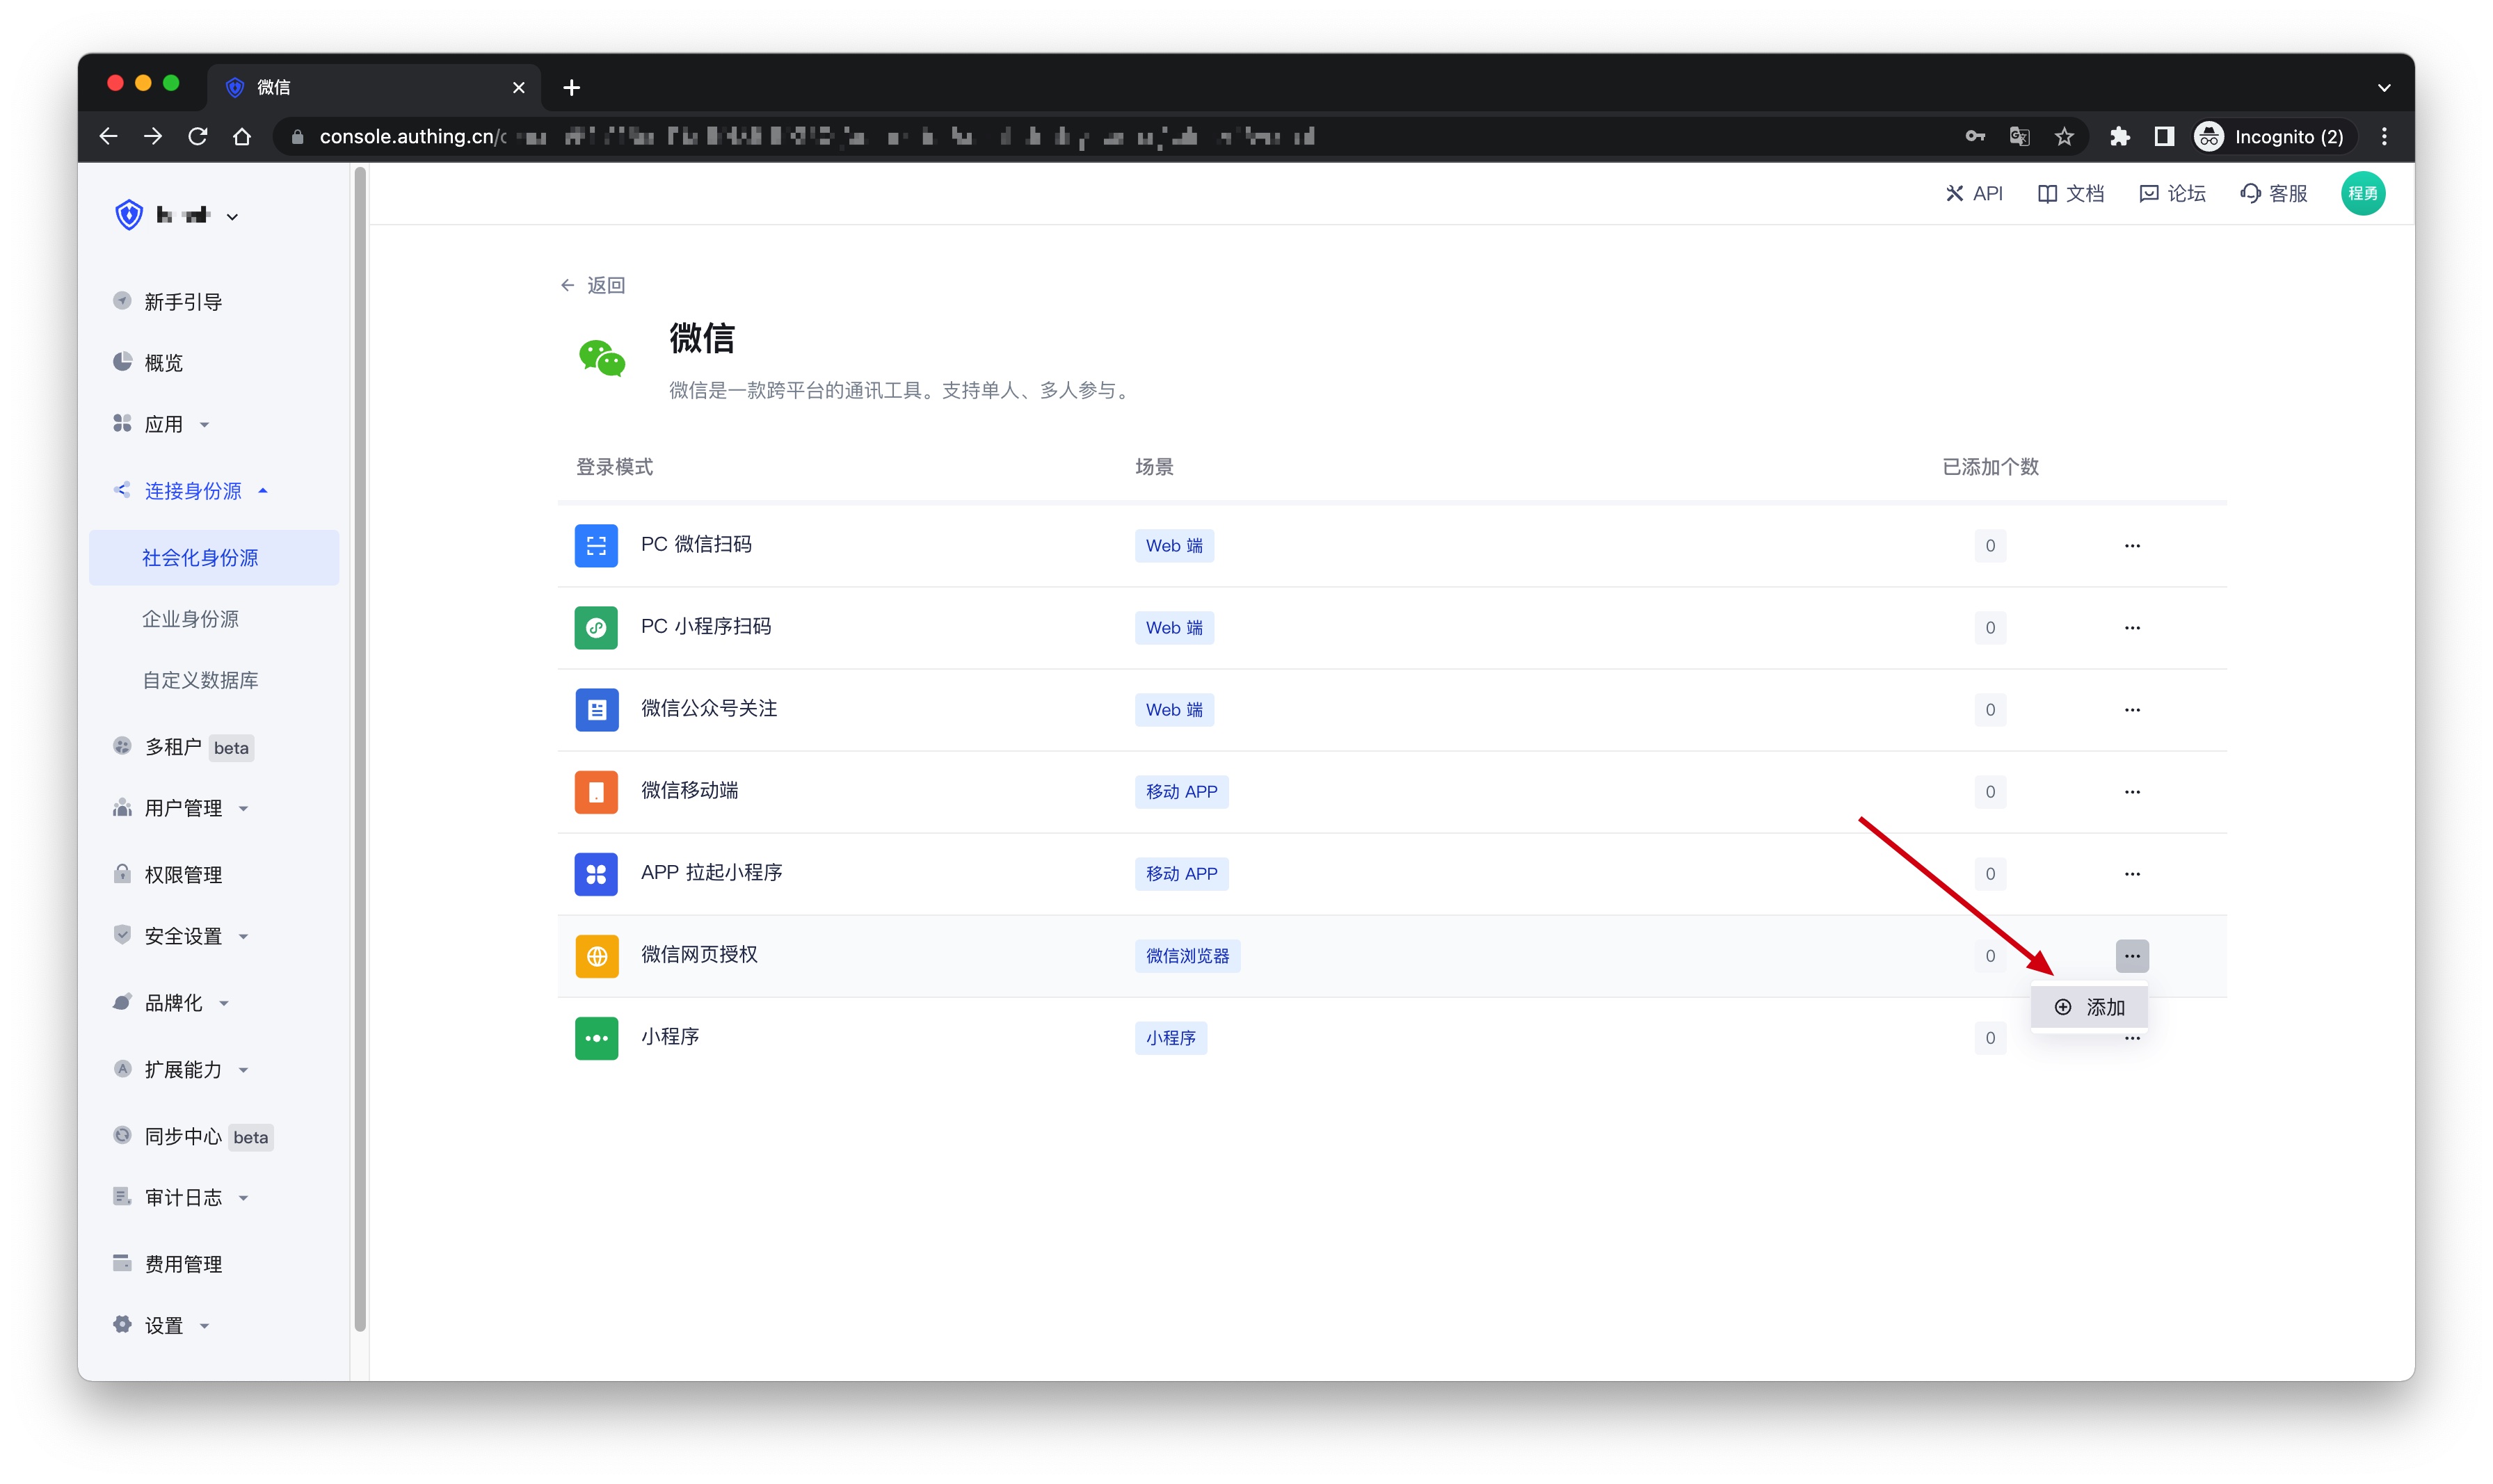
2.4 On the "WeChat Web Authorization" configuration page, fill in the relevant field information. 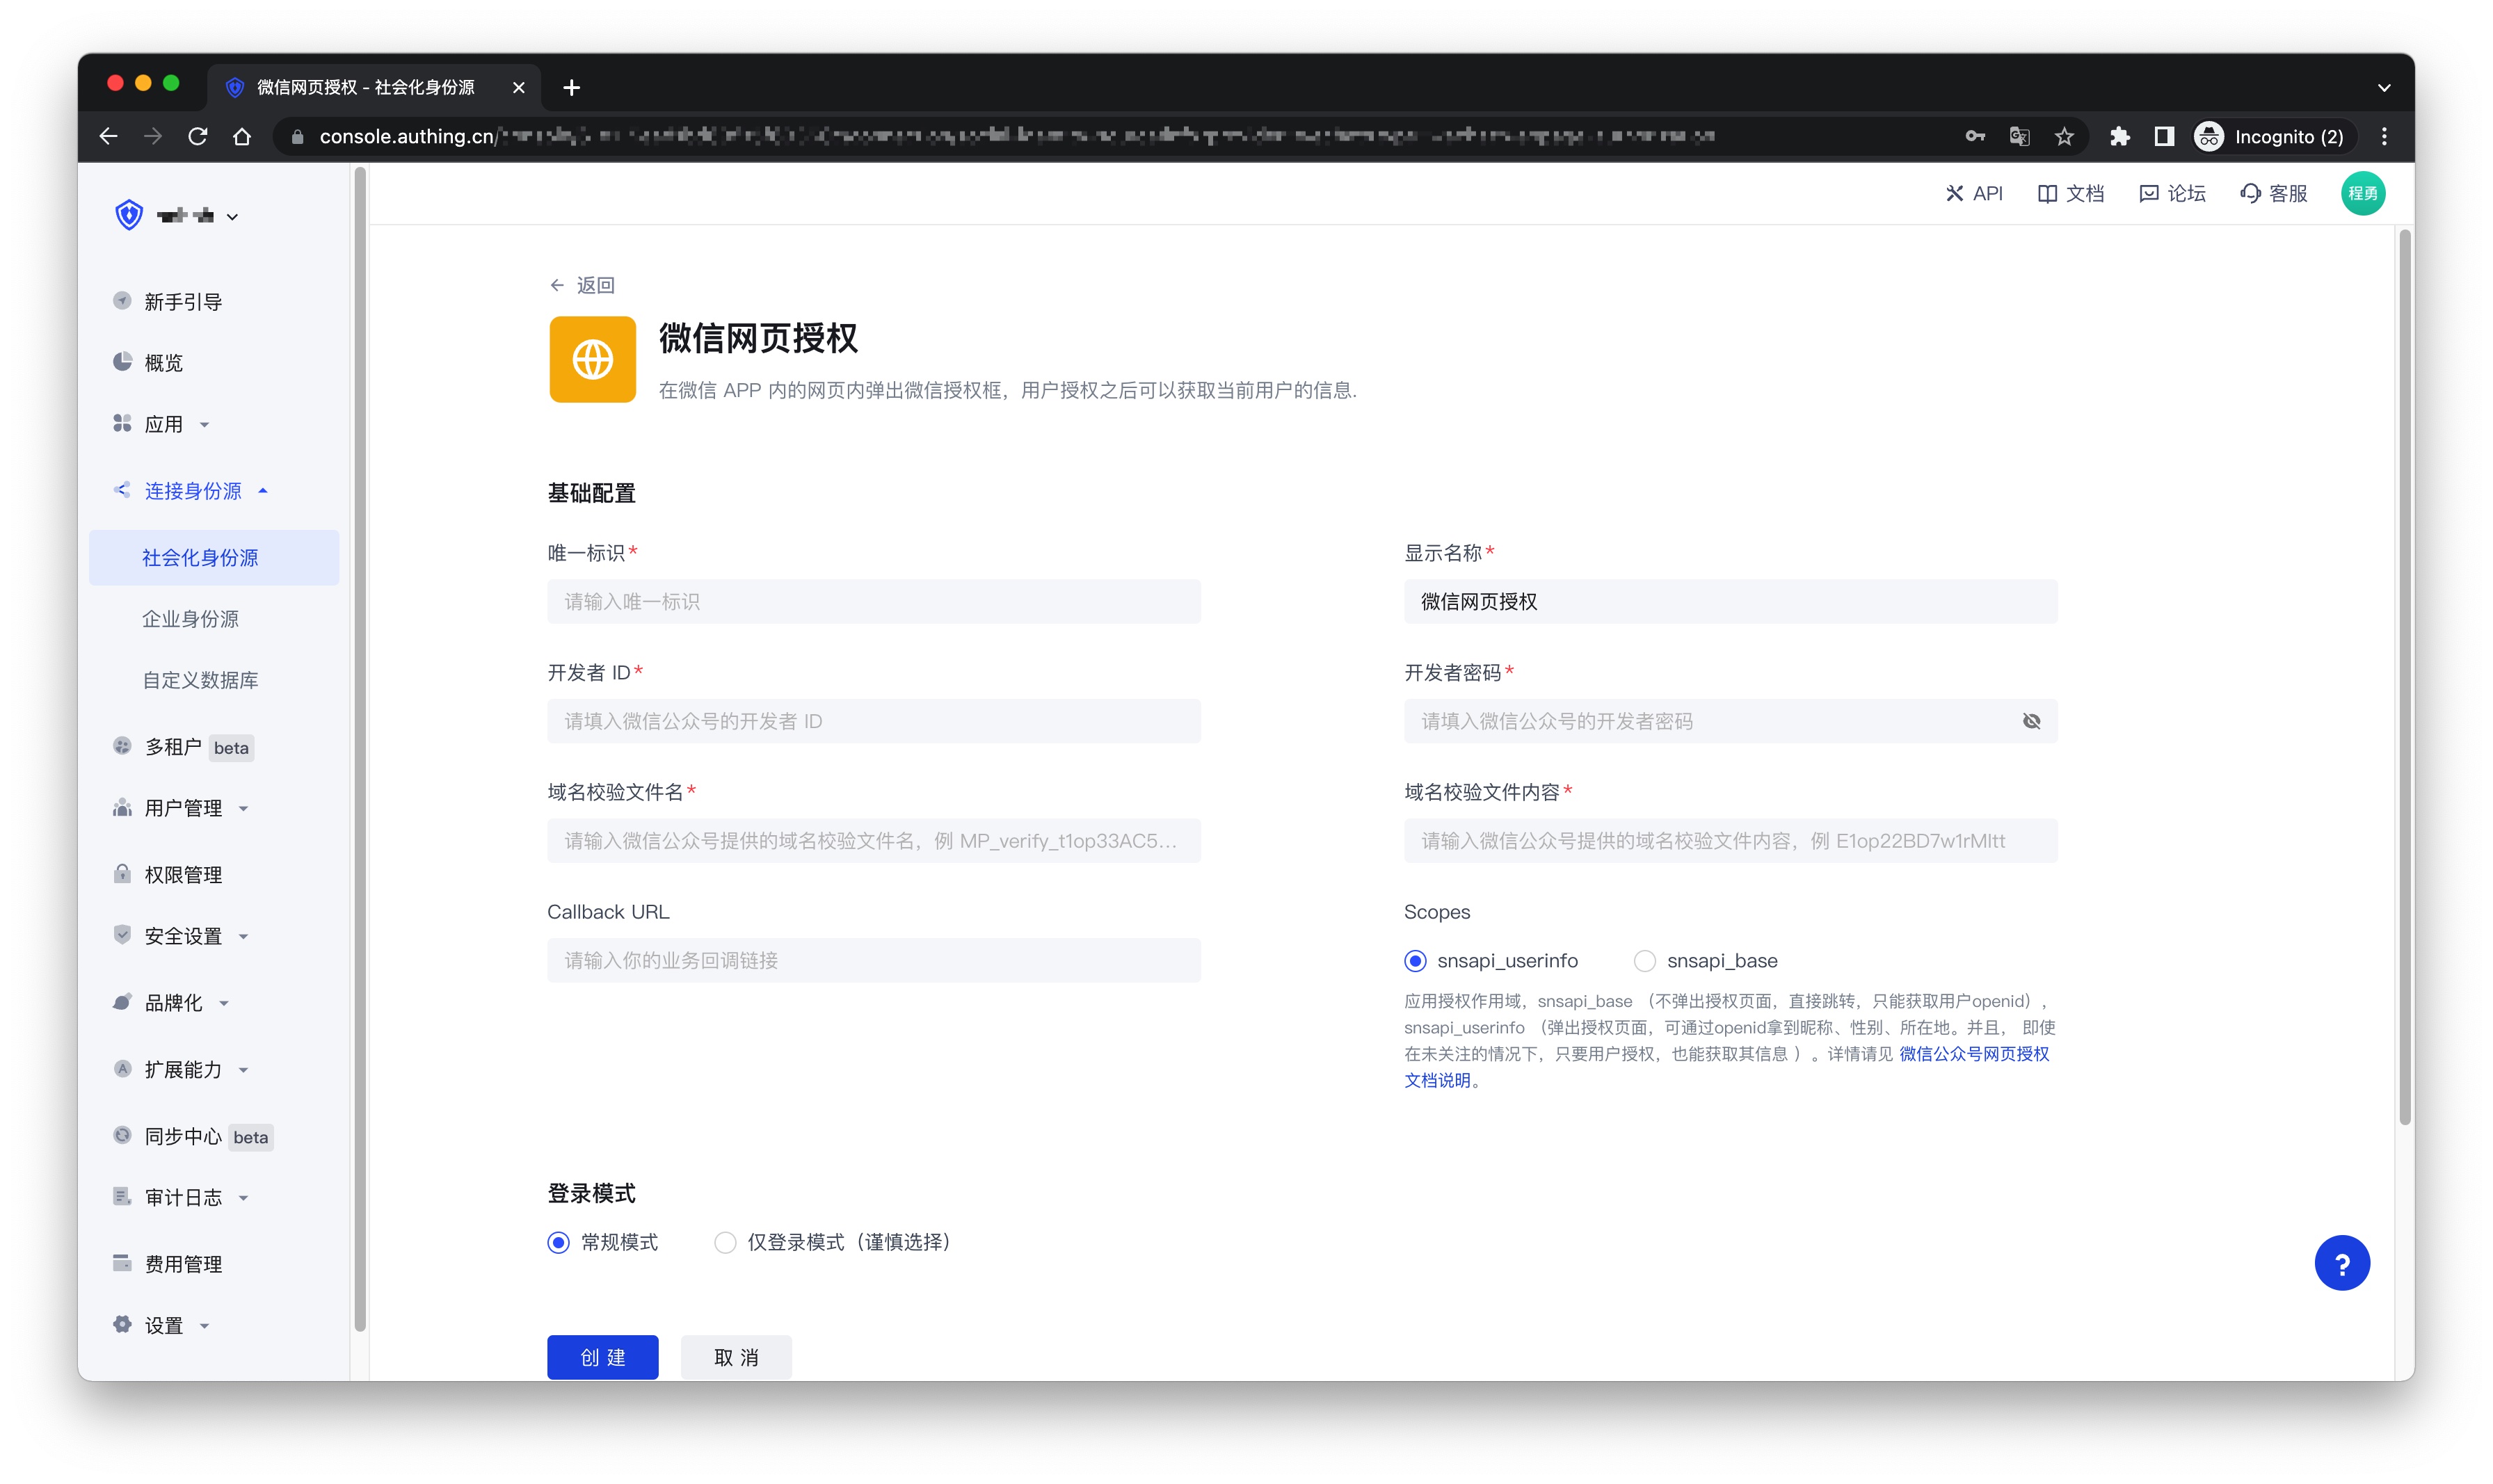
| Field | Description |
|---|---|
| Unique ID | a. The unique ID consists of lowercase letters, numbers, and -, and its length is less than 32 bits. b. This is the unique ID of this connection and cannot be modified after setting. |
| Display Name | This name will be displayed on the button of the end user's login interface. |
| Developer ID | The AppID obtained in step 1. |
| Developer password | AppSecret obtained in step 1 |
| Domain verification file name | Domain verification file name obtained in step 1, for example: MP_verify_t1op33AC5w4rNIwE.txt |
| Domain verification file content | Domain verification file content obtained in step 1, for example: E1op22BD7w1rMItt |
| Callback URL | Your business callback link |
| Scopes | Application authorization scope, snsapi_base (no pop-up authorization page, direct jump, can only obtain user openid), snsapi_userinfo (pop-up authorization page, nickname, gender, location can be obtained through openid. And, even if you don’t follow it, as long as the user authorizes, you can get its information). For details, please see WeChat Official Account Webpage Authorization Documentation (opens new window). |
| Login mode | After turning on "Login only mode", you can only log in to existing accounts and cannot create new accounts. Please choose carefully. |
| Account identity association | When "Account identity association" is not turned on, a new user is created by default when a user logs in through an identity source. After turning on "Account identity association", users can be allowed to log in directly to an existing account through "Field matching" or "Query binding". |
2.5 After the configuration is completed, click the "Create" or "Save" button to complete the creation.
¶ Step 3: Development access
You can get the sample code here: https://github.com/authing/wechat-eco-solution (opens new window), and visit the online sample application (opens new window).
¶ Access using SDK
First, use CDN to import authing-wxmp-sdk
<script src="https://cdn.authing.co/packages/authing-wxmp-sdk/<latest-version>/authing-wxmp-sdk.min.js"></script>
Please replace <latest-version> with the latest version, which can be found at https://www.npmjs.com/package/@authing/wxmp (opens new window).
For detailed documentation on authing-wxmp-sdk, please see: WeChat Web Authorization Login SDK.
¶ Initialize SDK
Use user pool ID to initialize SDK:
const authingWx = new AuthingWxmp({
  userPoolId: "YOUR_USERPOOLID",
});
¶ Initiate WeChat authorization
Call getAuthorizationUrl method to obtain WeChat authorization login link, modify window.location to jump to WeChat login authorization page:
window.location = authingWx.getAuthorizationUrl();
¶ Get user information
After jumping back to the business callback link, use getUserInfo method to get user information:
// If authingWx is not initialized on the callback page, it needs to be initialized first. For specific initialization methods, refer to the above
const { ok, userinfo, message } = authingWx.getUserInfo();
if (ok) {
  console.log(userinfo);
} else if (message) {
  // message contains an error message
  alert(message);
}
¶ Access using the embedded login component
Take React as an example.
¶ Install @authing/react-ui-components
$ yarn add @authing/react-ui-components

# OR

$ npm install @authing/react-ui-components --save
¶ Initialization
import React from "react";
import ReactDOM from "react-dom";
import { AuthingGuard } from "@authing/react-ui-components";
//Introduce css file
import "@authing/react-ui-components/lib/index.min.css";

const App = () => {
  const appId = "GEN_AUTH_APP_ID";
  const onLogin = (userInfo) => {
    console.log(userInfo);
  };
  return <AuthingGuard appId={appId} onLogin={onLogin} />;
};

ReactDOM.render(<App />, root);
¶ Usage
After initialization, open the page in WeChat and you will see the following button. Click it to authorize. After authorization, you will be redirected to the application callback link, and you can use AuthenticationClient to obtain user information.