¶ GenAuth - Java SDK
GenAuth Java SDK consists of two parts: user authentication module (AuthenticationClient) and management module (ManagementClient).
The user authentication module (AuthenticationClient) makes requests as an end user, providing all user self-service operations such as login, registration, logout, management of user information, and obtaining authorized resources. This module also provides SDKs for various identity protocols, such as OpenID Connect (opens new window), OAuth 2.0 (opens new window), SAML (opens new window) and CAS (opens new window).
The ManagementClient module makes requests as an administrator to manage user pool resources and perform management tasks. It provides methods for managing users, roles, applications, resources, etc. Generally speaking, all operations that you can do in the GenAuth console (opens new window) can be completed with this module.
In a project, ManagementClient should only be initialized once, while an instance of AuthenticationClient corresponds to one end user and should be initialized once in each request.
¶ GitHub / Maven address
| Item | Description |
|---|---|
| Supported versions | Java 8 + |
| GitHub address | https://github.com/GenAuth-Official/gen-auth-java-sdk (opens new window) |
| Maven repository address | https://search.maven.org/artifact/cn.authing/authing-java-sdk (opens new window) |
¶ Installation
¶ Gradle
implementation "cn.authing:authing-java-sdk:<{version}>"
¶ Maven
<dependency>
<groupId>cn.authing</groupId>
<artifactId>authing-java-sdk</artifactId>
<version>{version}</version>
</dependency>
For the specific version number, please go to https://search.maven.org/artifact/cn.authing/authing-java-sdk (opens new window) to check.
¶ Use the user authentication module
The user authentication module (AuthenticationClient) makes requests as an end user, providing all user self-service operations such as login, registration, logout, management of user information, and obtaining authorized resources. This module also provides SDKs for various identity protocols, such as OpenID Connect (opens new window), OAuth 2.0 (opens new window), SAML (opens new window) and CAS (opens new window).
¶ Initialization
¶ Get application information
Initializing the user authentication module (AuthenticationClient) requires obtaining the relevant configuration information of the GenAuth application, such as the application ID, application key, and application domain name.
Click here to expand the details
First, you need to create a standard web application or backend application in the GenAuth console (opens new window):
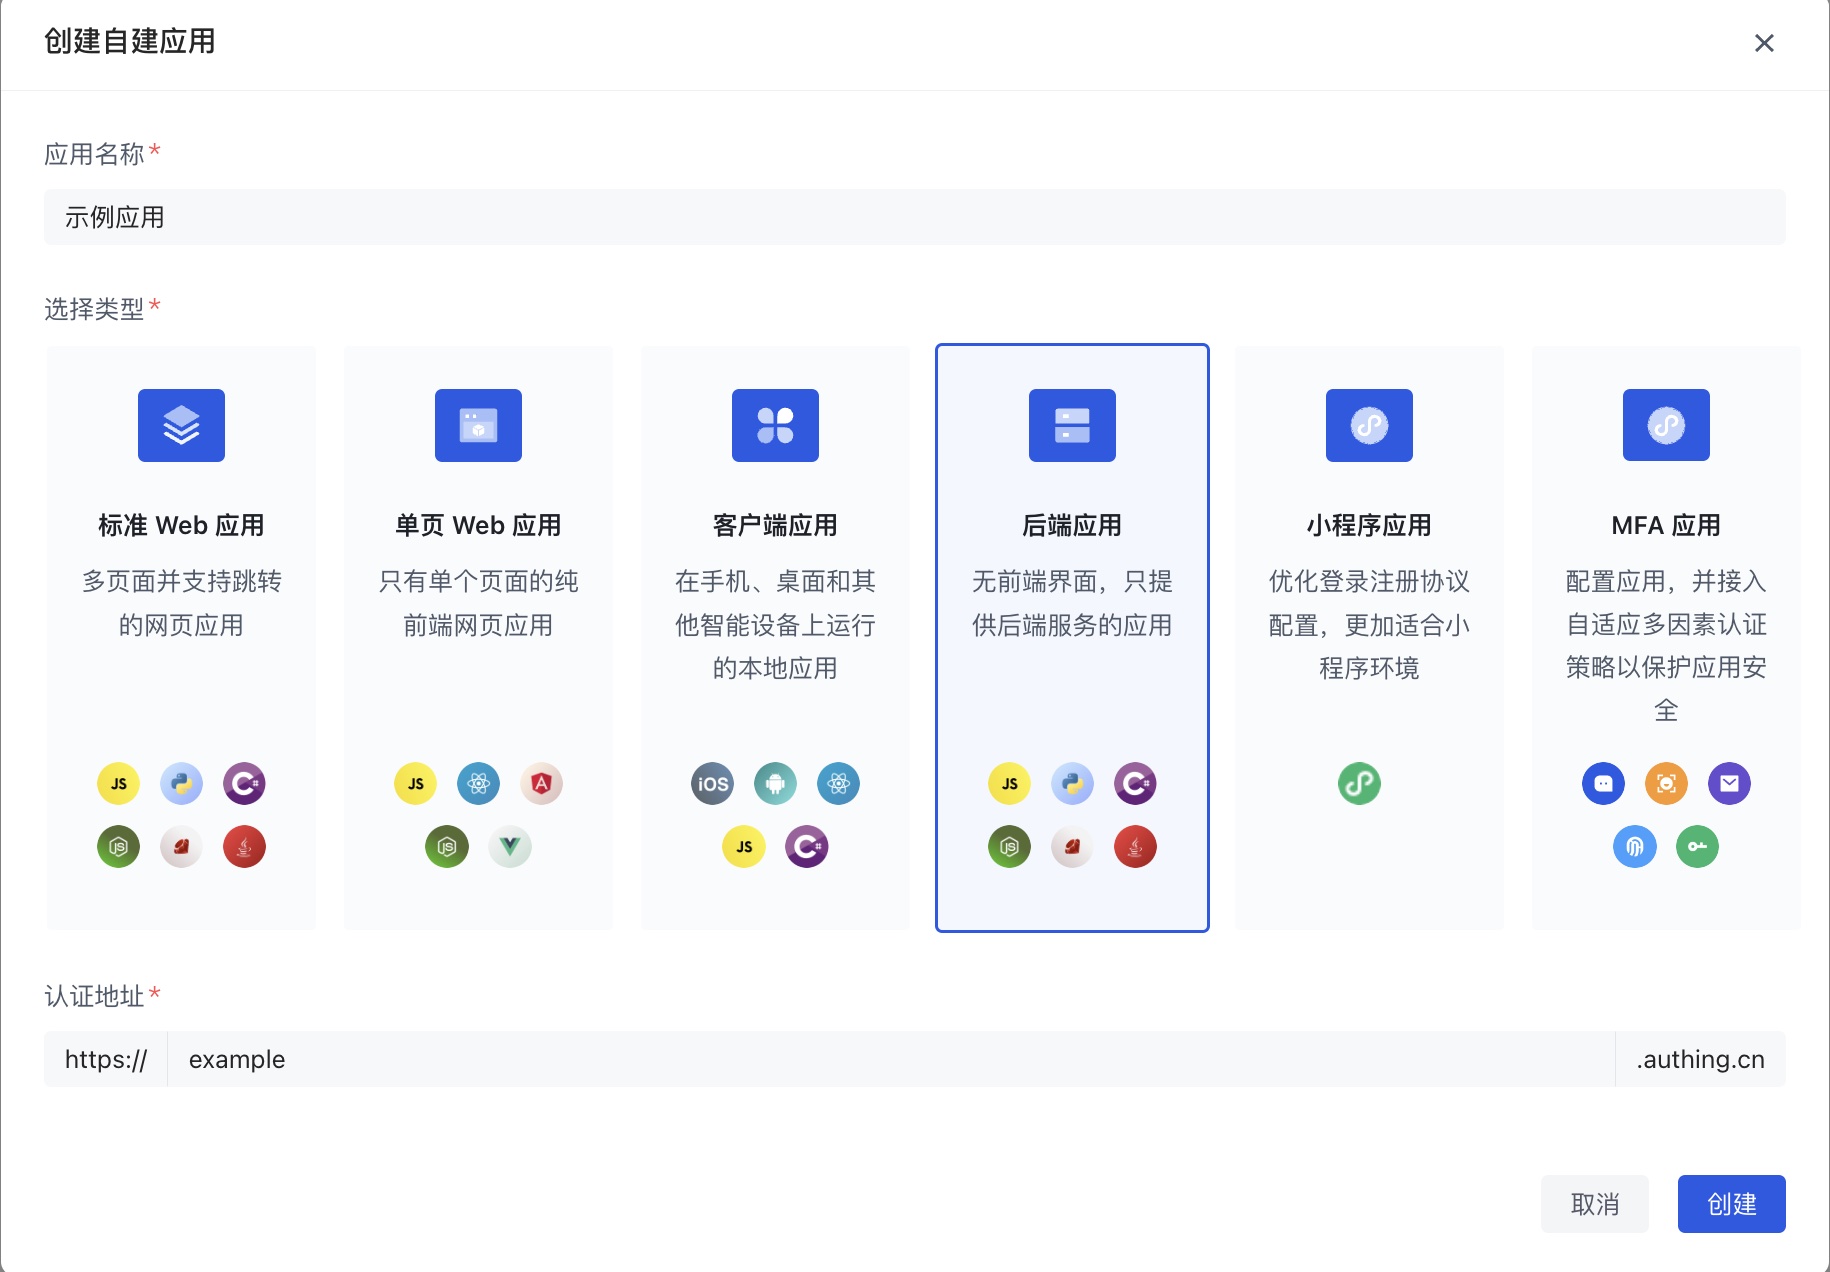
After the creation is completed, you can get the relevant information in the Application Details page of this application. The following are several configuration items that you will often use:
Application ID (App ID): The unique identifier of the application. It can be obtained in Application Settings - Endpoint Information in Application Details.
Application Key (App Secret): Used to verify the legitimacy of the client request. It can be obtained in Application Settings - Endpoint Information in Application Details.
Application Domain Name (App Host): The application domain name, such as https://example.genauth.ai. Note: The Host address is a sample style. The application Host address styles of different versions of user pools are different. The actual address is based on the Authentication Address field in Application Configuration - Authentication Configuration in Application Details.
Login callback URL (Redirect Uri): When a user uses GenAuth's hosted login page for authentication, after authentication is completed, it will be redirected to this address through the browser
302. Multiple addresses can be configured, and any one can be selected when initiating login.Logout callback URL (Logout Redirect Uri): When a user logs out on the browser side, it can be redirected to this address through the browser
302. Multiple addresses can be configured, and any one can be selected when initiating logout.Token Endpoint Auth Method: The verification method that the client needs to provide when calling OIDC to obtain the Token interface or the Signin interface.
Introspection Endpoint Auth Method: The verification method that the client needs to provide when calling OIDC to verify the legitimacy of the Token.
Revoke Endpoint Auth Method: The verification method that the client needs to provide when calling OIDC to verify the legitimacy of the Token.
¶ Initialization
The initialization sample code is as follows:
import cn.authing.sdk.java.client.AuthenticationClient;
import cn.authing.sdk.java.dto.*;
import cn.authing.sdk.java.model.AuthenticationClientOptions;

// Set initialization parameters
AuthenticationClientOptions clientOptions = new AuthenticationClientOptions();
clientOptions.setAppId("GEN_AUTH_APP_ID"); // GenAuth application ID
clientOptions.setAppSecret("GEN_AUTH_APP_SECRET"); // GenAuth application secret key
clientOptions.setAppHost("GEN_AUTH_APP_HOST"); // GenAuth application domain name, such as https://example.genauth.ai. Note: The Host address is an example style. The application Host address format of different versions of user pools is different. The actual address is based on the `Authentication Address` field under Self-built Application->Application Configuration->Authentication Configuration.
clientOptions.setRedirectUri("GEN_AUTH_APP_REDIRECT_URI"); // Login callback address configured by GenAuth application

// Initialize AuthenticationClient
AuthenticationClient authenticationClient = new AuthenticationClient(clientOptions);
Click here to expand the complete parameters and definitions of AuthenticationClient
appId: GenAuth application ID, required.appSecret: GenAuth application secret, required.appHost: GenAuth application domain name, such as https://example.genauth.ai, required. Note: The Host address is an example style. The application Host address format of different versions of user pools is different. The actual address is based on theAuthentication Addressfield under Self-built Application->Application Configuration->Authentication Configuration.redirectUri: The redirection target URL after authentication is completed, optional. The GenAuth server will verify this link, which needs to be consistent with the settings of the console.logoutRedirectUri: The redirection target URL after logout is completed, optional. The GenAuth server will verify this link, which needs to be consistent with the settings of the console.scope: The permissions requested by the application side to GenAuth, separated by spaces, optional. The default is'openid profile', and the successfully obtained permissions will appear in thescopefield ofaccess_token. Below are some examples. For more scope definitions, see the GenAuth related documentation (opens new window).openid: The permissions specified by the OIDC standard must be included.profile: Get the user's basic identity information.offline_access: Getrefresh_tokenduring authentication. You can request a newaccess_tokenthroughrefresh_token.protocol: Application protocol type, default isoidc. Optional values areoidc,oauth,cas,saml.tokenEndPointAuthMethod: Get token endpoint authentication method, default isclient_secret_post. Optional values areclient_secret_post,client_secret_basicandnone. It needs to be consistent with the Exchange token authentication method configuration in Application - Self-built application - Application details - Application configuration - Other settings - Authorization configuration in the GenAuth console (opens new window).introspectionEndPointAuthMethod: Verify token status endpoint authentication method, default isclient_secret_post. Optional values areclient_secret_post,client_secret_basicandnone. It needs to be consistent with the configuration of Verify token authentication method in Application - Self-built application - Application details - Application configuration - Other settings - Authorization configuration in the GenAuth console (opens new window).revocationEndPointAuthMethod: The authentication method of revocation token endpoint, which defaults toclient_secret_post. The optional values areclient_secret_post,client_secret_basicandnone. It needs to be consistent with the configuration of Revoke token authentication method in Application - Self-built application - Application details - Application configuration - Other settings - Authorization configuration in the GenAuth console (opens new window).timeout: The request timeout, optional, in milliseconds, defaults to 10000 (10 seconds).lang: The interface Message returns the language format (optional). The optional values are zh-CN, en-US, ja-JP and zh-TW. The default is zh-CN.
¶ Quick Start
After initializing the user authentication module (AuthenticationClient), you can get an instance of AuthenticationClient and then call methods on this instance.
¶ Login using an online hosted login page
GenAuth provides all developers with an out-of-the-box online hosted login page. The Java SDK provides methods such as automatically generating login links and processing login callbacks.
Click here to expand the detailed introduction of GenAuth hosted login page
GenAuth hosted login page is the simplest and most secure way to integrate. This is because the login process is maintained by GenAuth and kept secure by GenAuth. For most integrations, it is recommended to use the login process hosted by GenAuth. Your business system redirects the user to GenAuth, where the user authenticates and then redirects back to the application callback connection configured in the console. This design is considered a security best practice. In terms of custom configuration, the hosted mode provides a moderate degree of login registration form customization, which can be customized through console configuration and CSS. Click here to experience it online (opens new window).
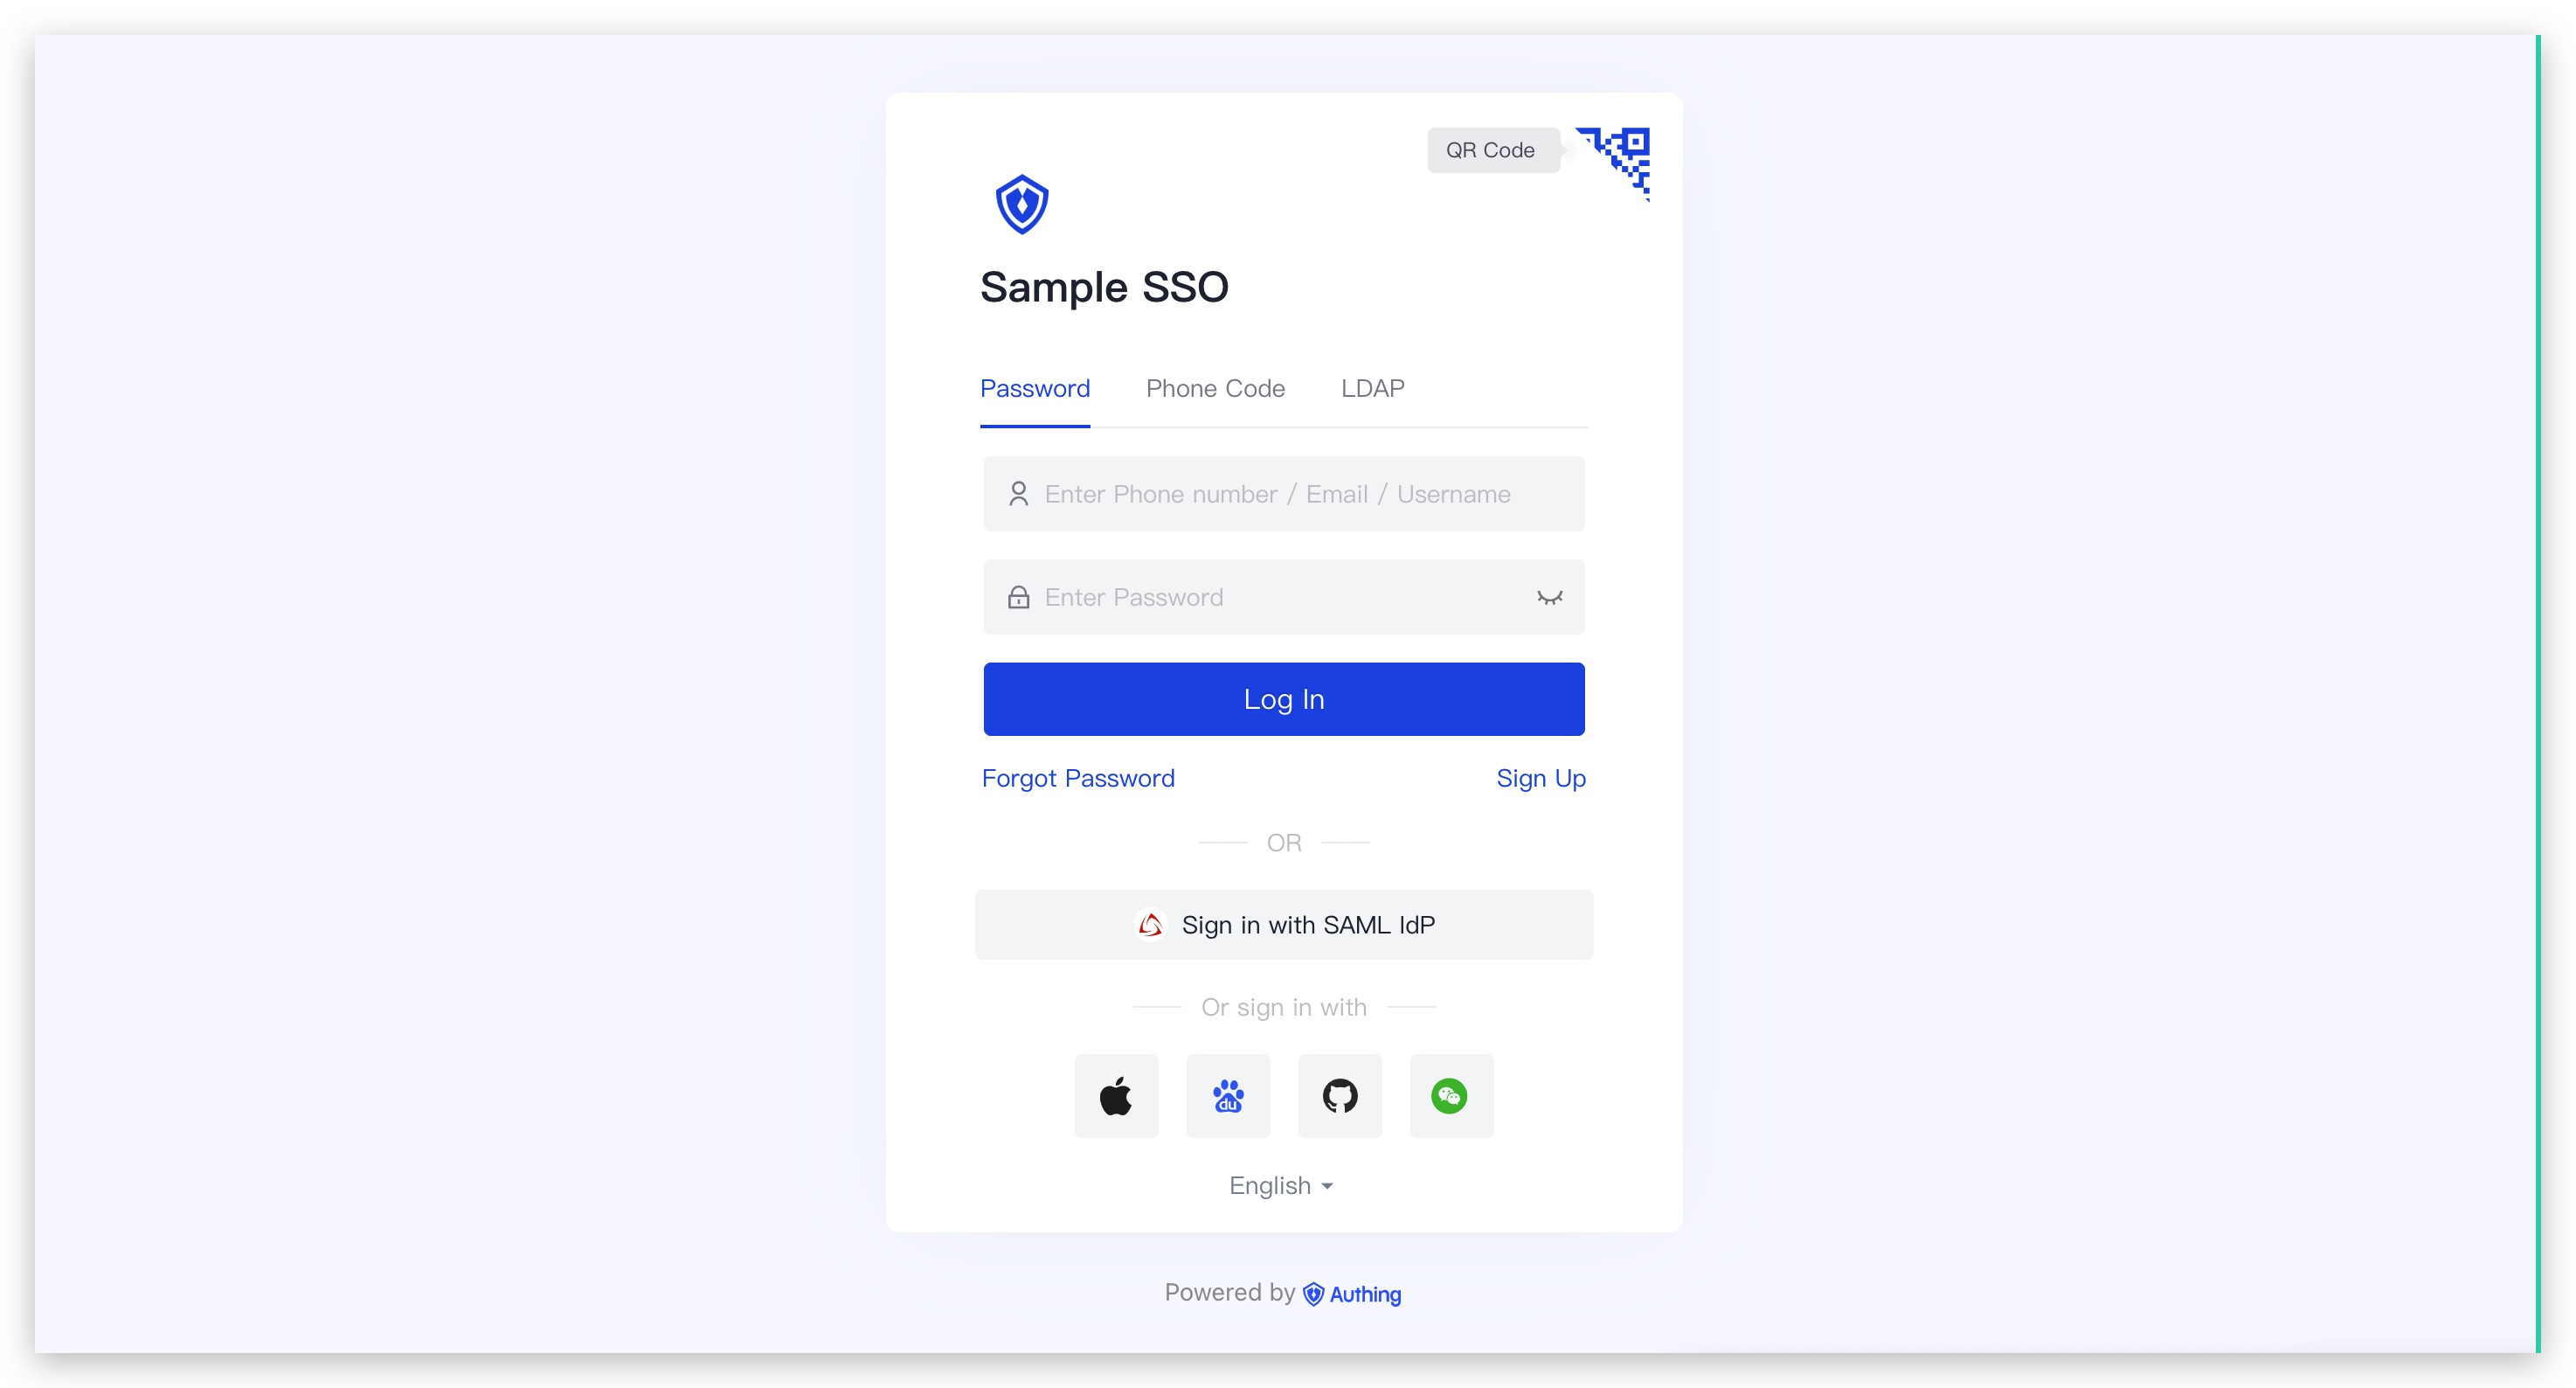
Using this method, after the Java SDK generates the login address, you can guide the user to visit this link in the browser. When the end user clicks this link, the browser will redirect to your online login page hosted by GenAuth for authentication through 302 redirection, and call back to your application system after the authentication is completed. GenAuth hosted login page supports GenAuth now supports all authentication capabilities, including password authentication, social login authentication, scan code login, etc. This is also our most recommended authentication method.
¶ Generate a one-time login link
Generate a one-time address for login and guide the user to visit this link.
import cn.authing.sdk.java.client.AuthenticationClient;
import cn.authing.sdk.java.dto.*;
import cn.authing.sdk.java.model.AuthenticationClientOptions;

public static void main(String[] args) {
// Set initialization parameters
AuthenticationClientOptions clientOptions = new AuthenticationClientOptions();
clientOptions.setAppId("GEN_AUTH_APP_ID"); // GenAuth application ID
clientOptions.setAppSecret("GEN_AUTH_APP_SECRET"); // GenAuth application key
clientOptions.setAppHost("GEN_AUTH_APP_HOST"); // GenAuth application domain name, such as https://example.genauth.ai. Note: The Host address is an example style. The application Host address format of different versions of user pools is different. The actual address is based on the `Authentication Address` field under Self-built Application->Application Configuration->Authentication Configuration.
clientOptions.setRedirectUri("GEN_AUTH_APP_REDIRECT_URI"); // Login callback address configured by GenAuth application

// Initialize AuthenticationClient
AuthenticationClient authenticationClient = new AuthenticationClient(clientOptions);

// Generate a one-time address for login, which can then be used to guide users to access this address
String url = authenticationClient.buildAuthorizeUrl();
System.out.println(url);
}
¶ Handle login callback
When the user completes the login on the hosted login page of GenAuth, the callback will be called back to the login callback address you configured (and the redirectUri passed in when initializing AuthenticationClient), and the one-time temporary credential code will be carried in the Query parameter of the URL. You can use this code to exchange for an access_token.
import cn.authing.sdk.java.client.AuthenticationClient;
import cn.authing.sdk.java.dto.*;
import cn.authing.sdk.java.model.AuthenticationClientOptions;

public static void main(String[] args) {
  // Set initialization parameters
  AuthenticationClientOptions clientOptions = new AuthenticationClientOptions();
  clientOptions.setAppId("GEN_AUTH_APP_ID"); // GenAuth application ID
  clientOptions.setAppSecret("GEN_AUTH_APP_SECRET"); // GenAuth application key
  clientOptions.setAppHost("GEN_AUTH_APP_HOST"); // GenAuth application domain name, such as https://example.genauth.ai. Note: The Host address is an example style. The application Host address format of different versions of user pools is different. The actual address is based on the `Authentication Address` field under Self-built Application->Application Configuration->Authentication Configuration.
  clientOptions.setRedirectUri("GEN_AUTH_APP_REDIRECT_URI"); // Login callback address configured by GenAuth application

  // Initialize AuthenticationClient
  AuthenticationClient authenticationClient = new AuthenticationClient(clientOptions);

  String code = "REPLACE_ME_WITH_REAL_CODE";
  // Use code to exchange for access_token
  OIDCTokenResponse resp = authenticationClient.getAccessTokenByCode(code);
  System.out.println(resp);
}
¶ Email + Password Login
In addition to the above authentication method using the hosted login page, if you need to build your own login page, GenAuth also provides an authentication method in the form of an interface. If the authentication is successful, you can also get the user's access_token. After getting the access_token, you can call methods such as modifying user information.
import cn.authing.sdk.java.client.AuthenticationClient;
import cn.authing.sdk.java.dto.*;
import cn.authing.sdk.java.model.AuthenticationClientOptions;

public static void main(String[] args) {
  // Set initialization parameters
  AuthenticationClientOptions clientOptions = new AuthenticationClientOptions();
  clientOptions.setAppId("GEN_AUTH_APP_ID"); // GenAuth application ID
  clientOptions.setAppSecret("GEN_AUTH_APP_SECRET"); // GenAuth application key
  clientOptions.setAppHost("GEN_AUTH_APP_HOST"); // GenAuth application domain name, such as https://example.genauth.ai. Note: The Host address is an example style. The application Host address format of different versions of user pools is different. The actual address is based on the `Authentication Address` field under Self-built Application->Application Configuration->Authentication Configuration.
  clientOptions.setRedirectUri("GEN_AUTH_APP_REDIRECT_URI"); // Login callback address configured by GenAuth application

  // Initialize AuthenticationClient
  AuthenticationClient authenticationClient = new AuthenticationClient(clientOptions);

  // Call the login method of AuthenticationClient, such as signInByEmailPassword
  LoginTokenRespDto signInresp = authenticationClient.signInByEmailPassword(
  "test@example.com",
  "passw0rd",
  new SignInOptionsDto()
  );

  // You can get the user's access_token from LoginTokenRespDto. This access_token represents the user's credential for accessing the interface
  String accessToken = signInresp.getData().getAccessToken();
  // Then use this accessToken to call the setAccessToken method of AuthenticationClient. AuthenticationClient can call interfaces that require login to access, such as obtaining user information, modifying user information, and obtaining role lists.
  authenticationClient.setAccessToken(accessToken)

  // Call other interfaces that require login to access, such as modifying user information
  UpdateUserProfileDto updateProfileDto = new UpdateUserProfileDto();
  updateProfileDto.setNickname("Zhang San"); // Modify the nickname to Zhang San
  UserSingleRespDto resp = authenticationClient.updateProfile(updateProfileDto);
  System.out.println(resp);
}
¶ Using the Management Module
The Management Client makes requests as an administrator to manage user pool resources and perform management tasks. It provides methods for managing users, roles, applications, resources, etc. Generally speaking, all operations you can do in the GenAuth console (opens new window) can be completed with this module.
¶ Initialization
¶ Get AK/SK
The GenAuth Java SDK uses AK/SK to sign the digest of the request data locally. When the client calls the API, the SDK uses AK/SK to calculate the signature of the digest of the request data and transmits the signature result to the server for signature verification.
In GenAuth, there are currently two types of AK/SK:
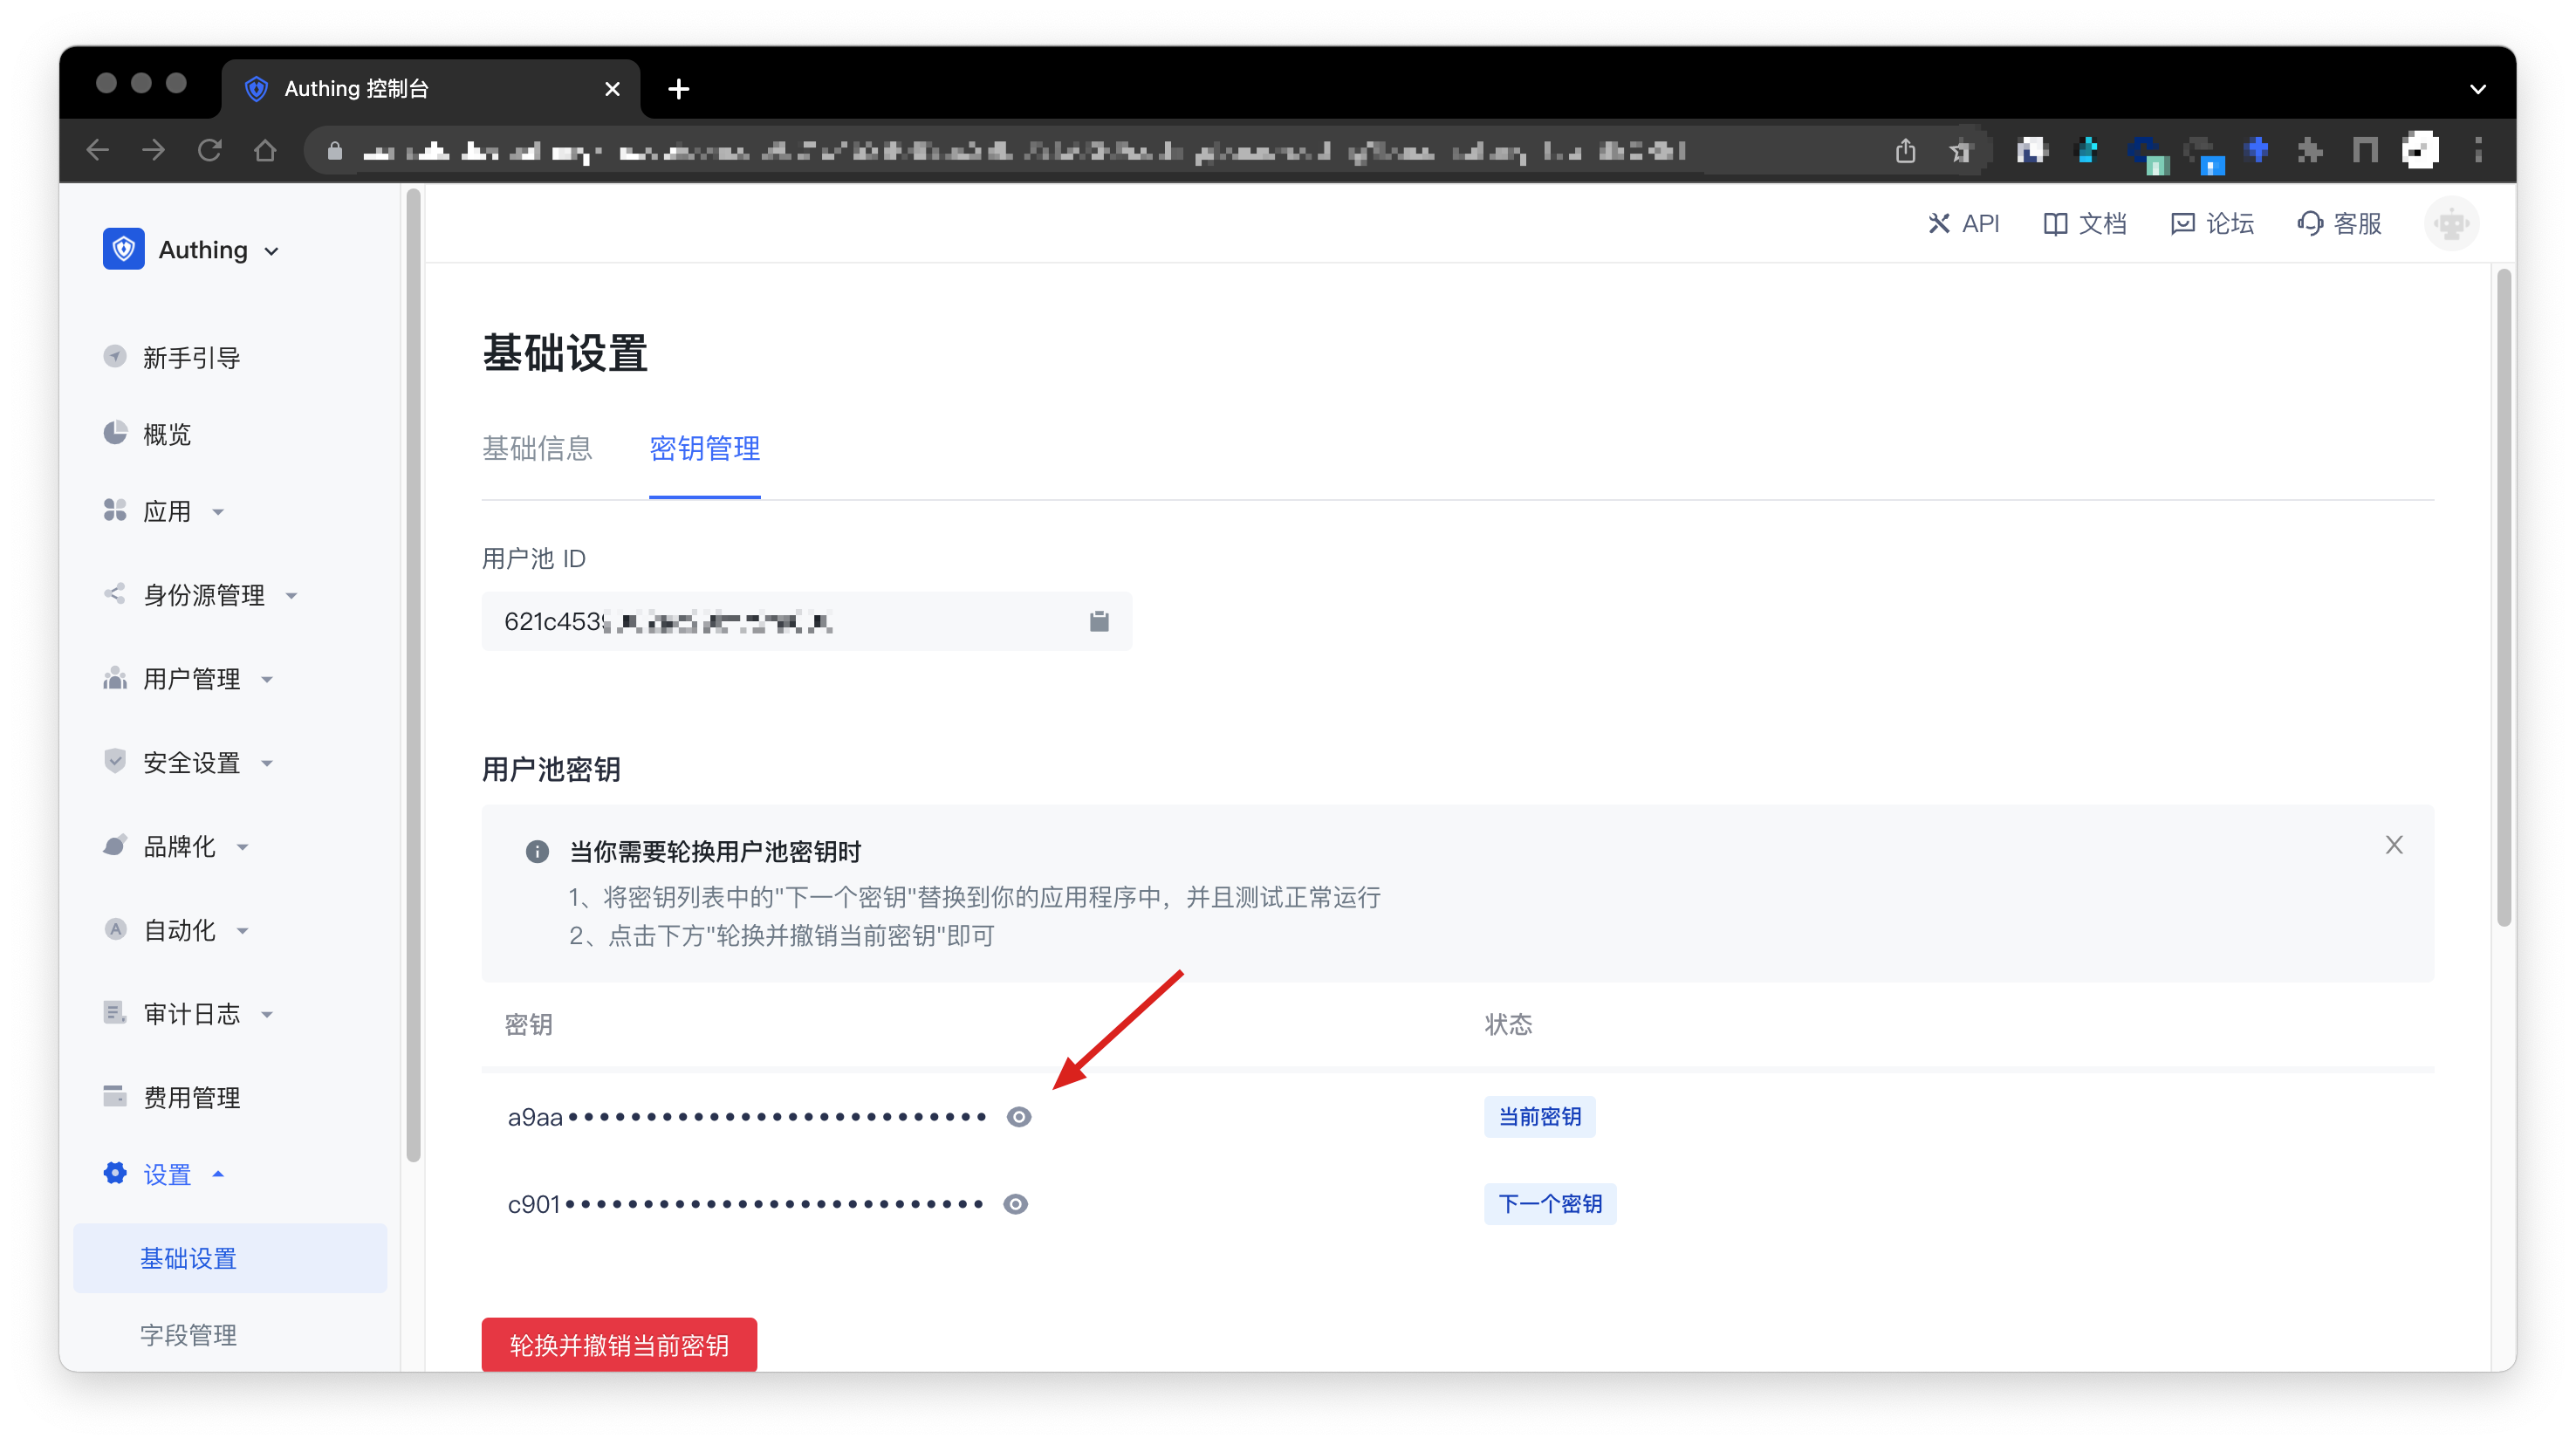
- User pool global AK/SK: has global operation permissions for all resources in the user pool. You can get the User Pool ID and User Pool Key in Settings - Basic Settings - Key Management in the GenAuth console (opens new window), where User Pool ID is AK (Access Key ID) and User Pool Key is SK (Access Key Secret).
- Collaborative Administrator AK/SK: Fine-grained authorization can be performed for resources in the user pool. The collaborative administrator's AK/SK can only call its authorized APIs. (Under development, stay tuned)
You can choose the appropriate AK/SK according to your needs.
Click here to expand how to obtain the user pool ID and user pool key
In the GenAuth console (opens new window)Settings -> Basic Settings -> Key Management page, you can obtain the user pool ID (UserPool Id) and user pool key (UserPool Secret), as shown below:
¶ Initialization
The initialization sample code is as follows:
import cn.authing.sdk.java.client.ManagementClient;
import cn.authing.sdk.java.model.ManagementClientOptions;

// Set initialization parameters
ManagementClientOptions clientOptions = new ManagementClientOptions();
clientOptions.setAccessKeyId("GEN_AUTH_ACCESS_KEY_ID"); // GenAuth Access Key ID
clientOptions.setAccessKeySecret("GEN_AUTH_ACCESS_KEY_SECRET"); // GenAuth Access Key Secret

// Init ManagementClient
ManagementClient managementClient = new ManagementClient(clientOptions);
Click here to expand the complete parameters and explanations of ManagementClient
accessKeyId: GenAuth user pool ID or Access Key ID of collaborative administrator.accessKeySecret: GenAuth user pool key or Access Key Secret of collaborative administrator.host: GenAuth server address, default ishttps://api.genauth.ai. If you are using the public cloud version of GenAuth, please ignore this parameter. If you are using the private deployment version, this parameter is required, the format is as follows: https://authing-api.my-authing-service.com (without the last slash /).timeout: request timeout, optional, in milliseconds, default is 10000 (10 seconds).lang: interface Message return language format (optional), optional values are zh-CN, en-US, ja-JP and zh-TW, default is zh-CN.
¶ Quick Start
After initializing ManagementClient, you can get an instance of ManagementClient and call methods on it.
¶ Get a list of users
import cn.authing.sdk.java.dto.*;
import cn.authing.sdk.java.client.ManagementClient;
import cn.authing.sdk.java.model.ManagementClientOptions;

public static void main(String[] args) {
    // Set initialization parameters
    ManagementClientOptions clientOptions = new ManagementClientOptions();
    clientOptions.setAccessKeyId("GEN_AUTH_ACCESS_KEY_ID");
    clientOptions.setAccessKeySecret("GEN_AUTH_ACCESS_KEY_SECRET");

    // Init ManagementClient
    ManagementClient managementClient = new ManagementClient(clientOptions);

    // Get User List
    ListUsersRequestDto dto = new ListUsersRequestDto();
    UserPaginatedRespDto resp = managementClient.listUsers(dto);
    System.out.println(resp);
}
¶ Create a role
import cn.authing.sdk.java.dto.*;
import cn.authing.sdk.java.client.ManagementClient;
import cn.authing.sdk.java.model.ManagementClientOptions;

public static void main(String[] args) {
    // Set initialization parameters
    ManagementClientOptions clientOptions = new ManagementClientOptions();
    clientOptions.setAccessKeyId("GEN_AUTH_ACCESS_KEY_ID");
    clientOptions.setAccessKeySecret("GEN_AUTH_ACCESS_KEY_SECRET");

    // Init ManagementClient
    ManagementClient managementClient = new ManagementClient(clientOptions);

    // Create a role
    CreateRoleDto dto = new CreateRoleDto();
    dto.setCode("admin");
    dto.setDescription("admin");
    RoleSingleRespDto resp = client.createRole(dto);
    System.out.println(resp);
}
¶ Error handling
GenAuth Java SDK methods will not throw Exceptions (except for network errors) when requesting interfaces. Unless otherwise specified, all method return values will contain two status codes: statusCode and apiCode:
statusCode:statusCodeis the request status code and does not contain specific business error information. When and only whenstatusCodeis200, it means that the interface request is successful, and there will be noapiCodeat this time. WhenstatusCodeis not200, it means that the interface request failed or additional operations are required (such as MFA secondary verification is required for the login interface). You need to pay attention to this and perform necessary error handling. EachstatusCodecorresponds to a type of error. See below for specific error classifications. In most cases, unless you need to respond to certain specific exceptions, you only need to pay attention tostatusCodeand notapiCode.apiCode:apiCodeis a business status code. EachapiCodehas a specific error meaning. The specificapiCodelist is shown below.apiCodeis only returned whenstatusCodeis not 200 and the error reason has business meaning.requestId: Request ID, which is returned when the request fails. If you encounter an error while using the Node SDK, you can use thisrequestIdto consult GenAuth developers.
For a detailed list of statusCode and apiCode, please see error code.
import cn.authing.sdk.java.dto.*;
import cn.authing.sdk.java.client.ManagementClient;
import cn.authing.sdk.java.model.ManagementClientOptions;

public static void main(String[] args) {
    // Set initialization parameters
    ManagementClientOptions clientOptions = new ManagementClientOptions();
    clientOptions.setAccessKeyId("GEN_AUTH_ACCESS_KEY_ID");
    clientOptions.setAccessKeySecret("GEN_AUTH_ACCESS_KEY_SECRET");

    // Init ManagementClient
    ManagementClient managementClient = new ManagementClient(clientOptions);

    // Create a role
    CreateRoleDto dto = new CreateRoleDto();
    dto.setCode("admin");
    dto.setDescription("admin");
    RoleSingleRespDto resp = client.createRole(dto);
    if (resp.getCode() != 200) {
        throw new RuntimeException(response.getMessage()); // Throw an exception, and the global exception catching middleware will catch the exception
    }
    // Continue with your business logic ...
}
¶ Private deployment
If you are using the privately deployed GenAuth IDaaS service, you need to specify the API address of the GenAuth private instance during initialization, as shown below:
import cn.authing.sdk.java.dto.*;
import cn.authing.sdk.java.model.ManagementClientOptions;

public static void main(String[] args) {
    // Set initialization parameters
    ManagementClientOptions clientOptions = new ManagementClientOptions();
    clientOptions.setAccessKeyId("GEN_AUTH_ACCESS_KEY_ID");
    clientOptions.setAccessKeySecret("GEN_AUTH_ACCESS_KEY_SECRET");
    // Set the address of the private GenAuth service
    clientOptions.setHost("https://api.your-authing-service.com")

    // Init ManagementClient
    ManagementClient managementClient = new ManagementClient(clientOptions);
}
If you don't know how to get it, you can contact the GenAuth IDaaS service administrator.
¶ Get help
If you have any suggestions or feedback, please raise them in the GenAuth forum (opens new window).