¶ Spring Security 集成 GenAuth CAS 快速开始
本文以 Spring 生态中用于提供认证及访问权限控制的 Spring Security 5 为例,详细介绍 Spring Security 5 如何接入 GenAuth CAS
Spring Security 是一个提供安全访问控制解决方案的安全框架。它提供了一组可以在 Spring 应用上下文中配置的 Bean,充分利用了 Spring IOC(控制反转)、DI(依赖注入)和 AOP(面向切面编程)功能,为应用系统提供声明式的安全访问控制功能,增强了企业系统的安全性,也减轻了编写大量重复代码的负担。
Spring Security 的主要功能主要包括:
- 认证
- 授权
- 攻击防护
¶ 集成介绍
单点登录 (Single Sign On),英文名称缩写 SSO,SSO 的意思就是在多系统的环境中,登录单方系统,就可以不用再次登录的情况下访问相关受信任的系统。也就是说只要登录一次单体系统就可以。
GenAuth CAS 就是 SSO 解决方案的一种具体实现方式,即在多个系统中,用户只需要到一个中央服务器登录一次即可访问这些系统中的任何一个,无须多次登录。 并且支持多种认证机制、安全策略、支持授权以及提供高可用性的方式。不需要客户关注于如何实现 CAS Server、配置 HTTPS 以及提供个性化的登录、登出的页面等等。 GenAuth 简化配置流程,为用户提供一站式应用集成,用户只需要在平台自行配置各种需要的方式即可
下面以 GenAuth 提供的 CAS 服务为例,将详细介绍使用 Spring Security 5 集成 GenAuth CAS 单点登录的方法
- 开发工具:IDEA
- 项目管理工具:Maven
- JDK 版本:1.8
- 版本控制工具:Git
¶ 配置 GenAuth
¶ 获取 GenAuth 平台信息
首先要在 GenAuth 注册一个账号,然后进入控制台,按照引导步骤新建一个用户池。
点击左侧的「应用」 菜单项,在右侧会看到一个默认创建好的应用。

点击「配置」,在应用页下找到认证配置,并配置自己的登录回调 URL,并且将默认协议类型改为 CAS。 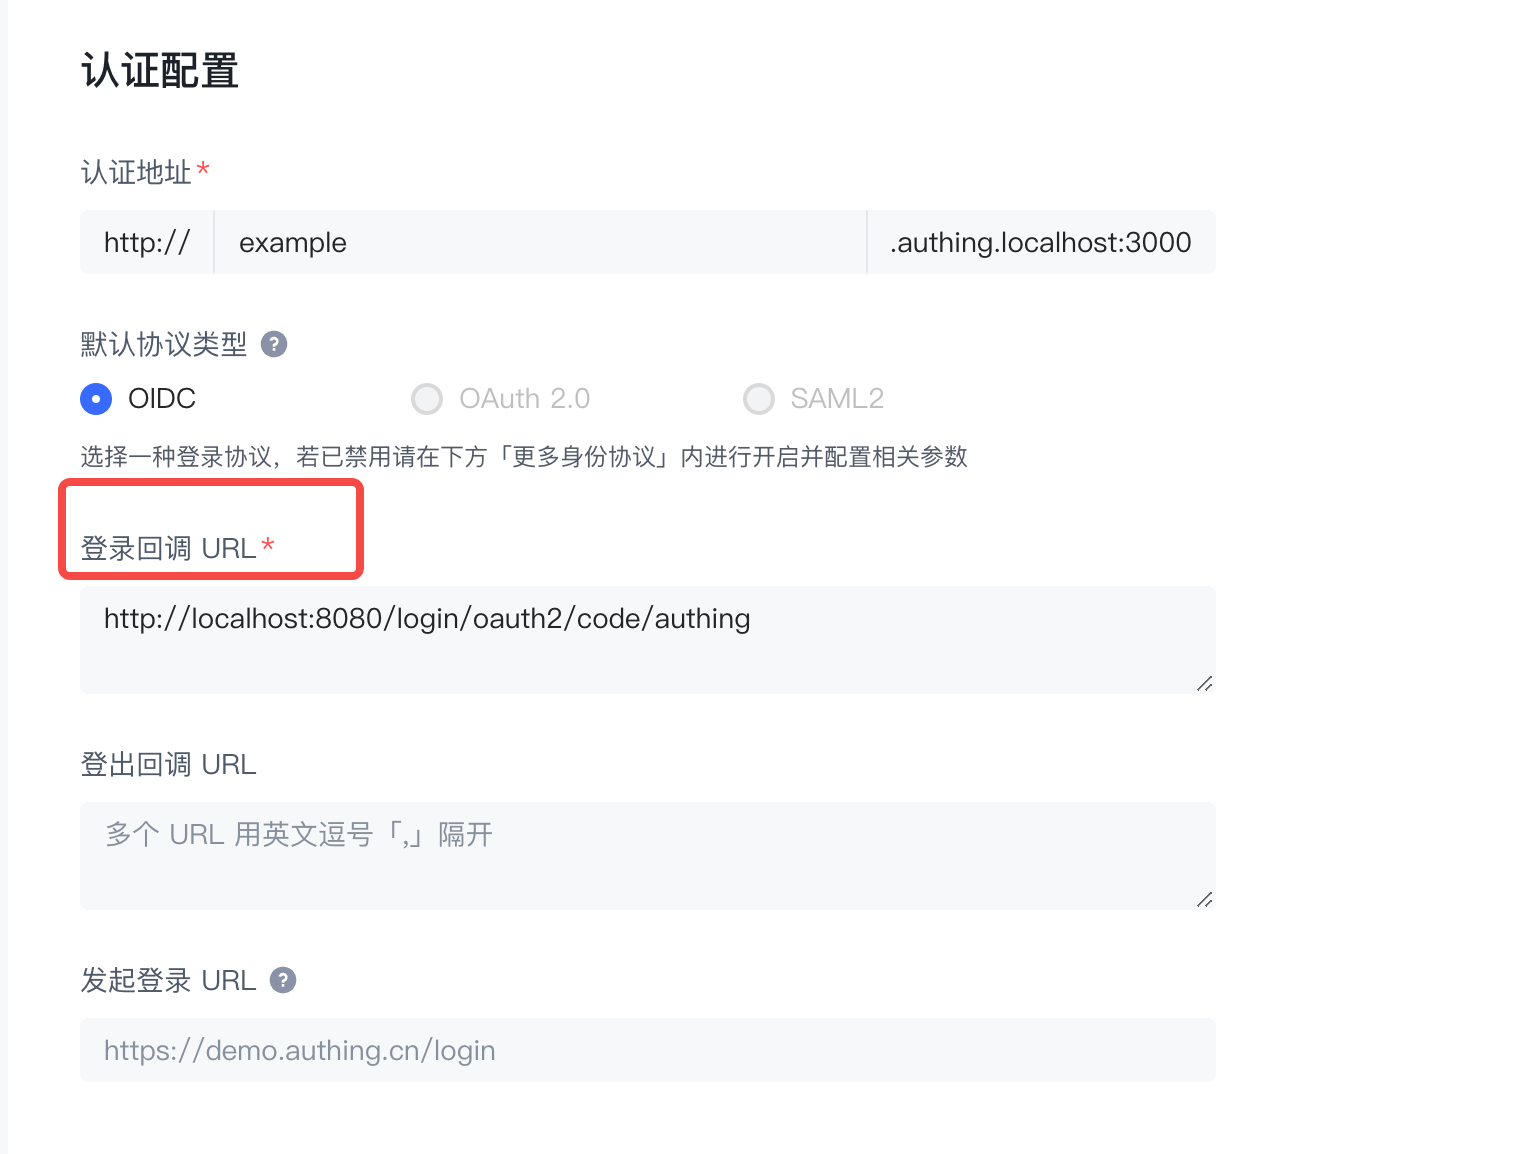
配置完上述,继续往下配置,你会看到更多身份协议,点击展开。 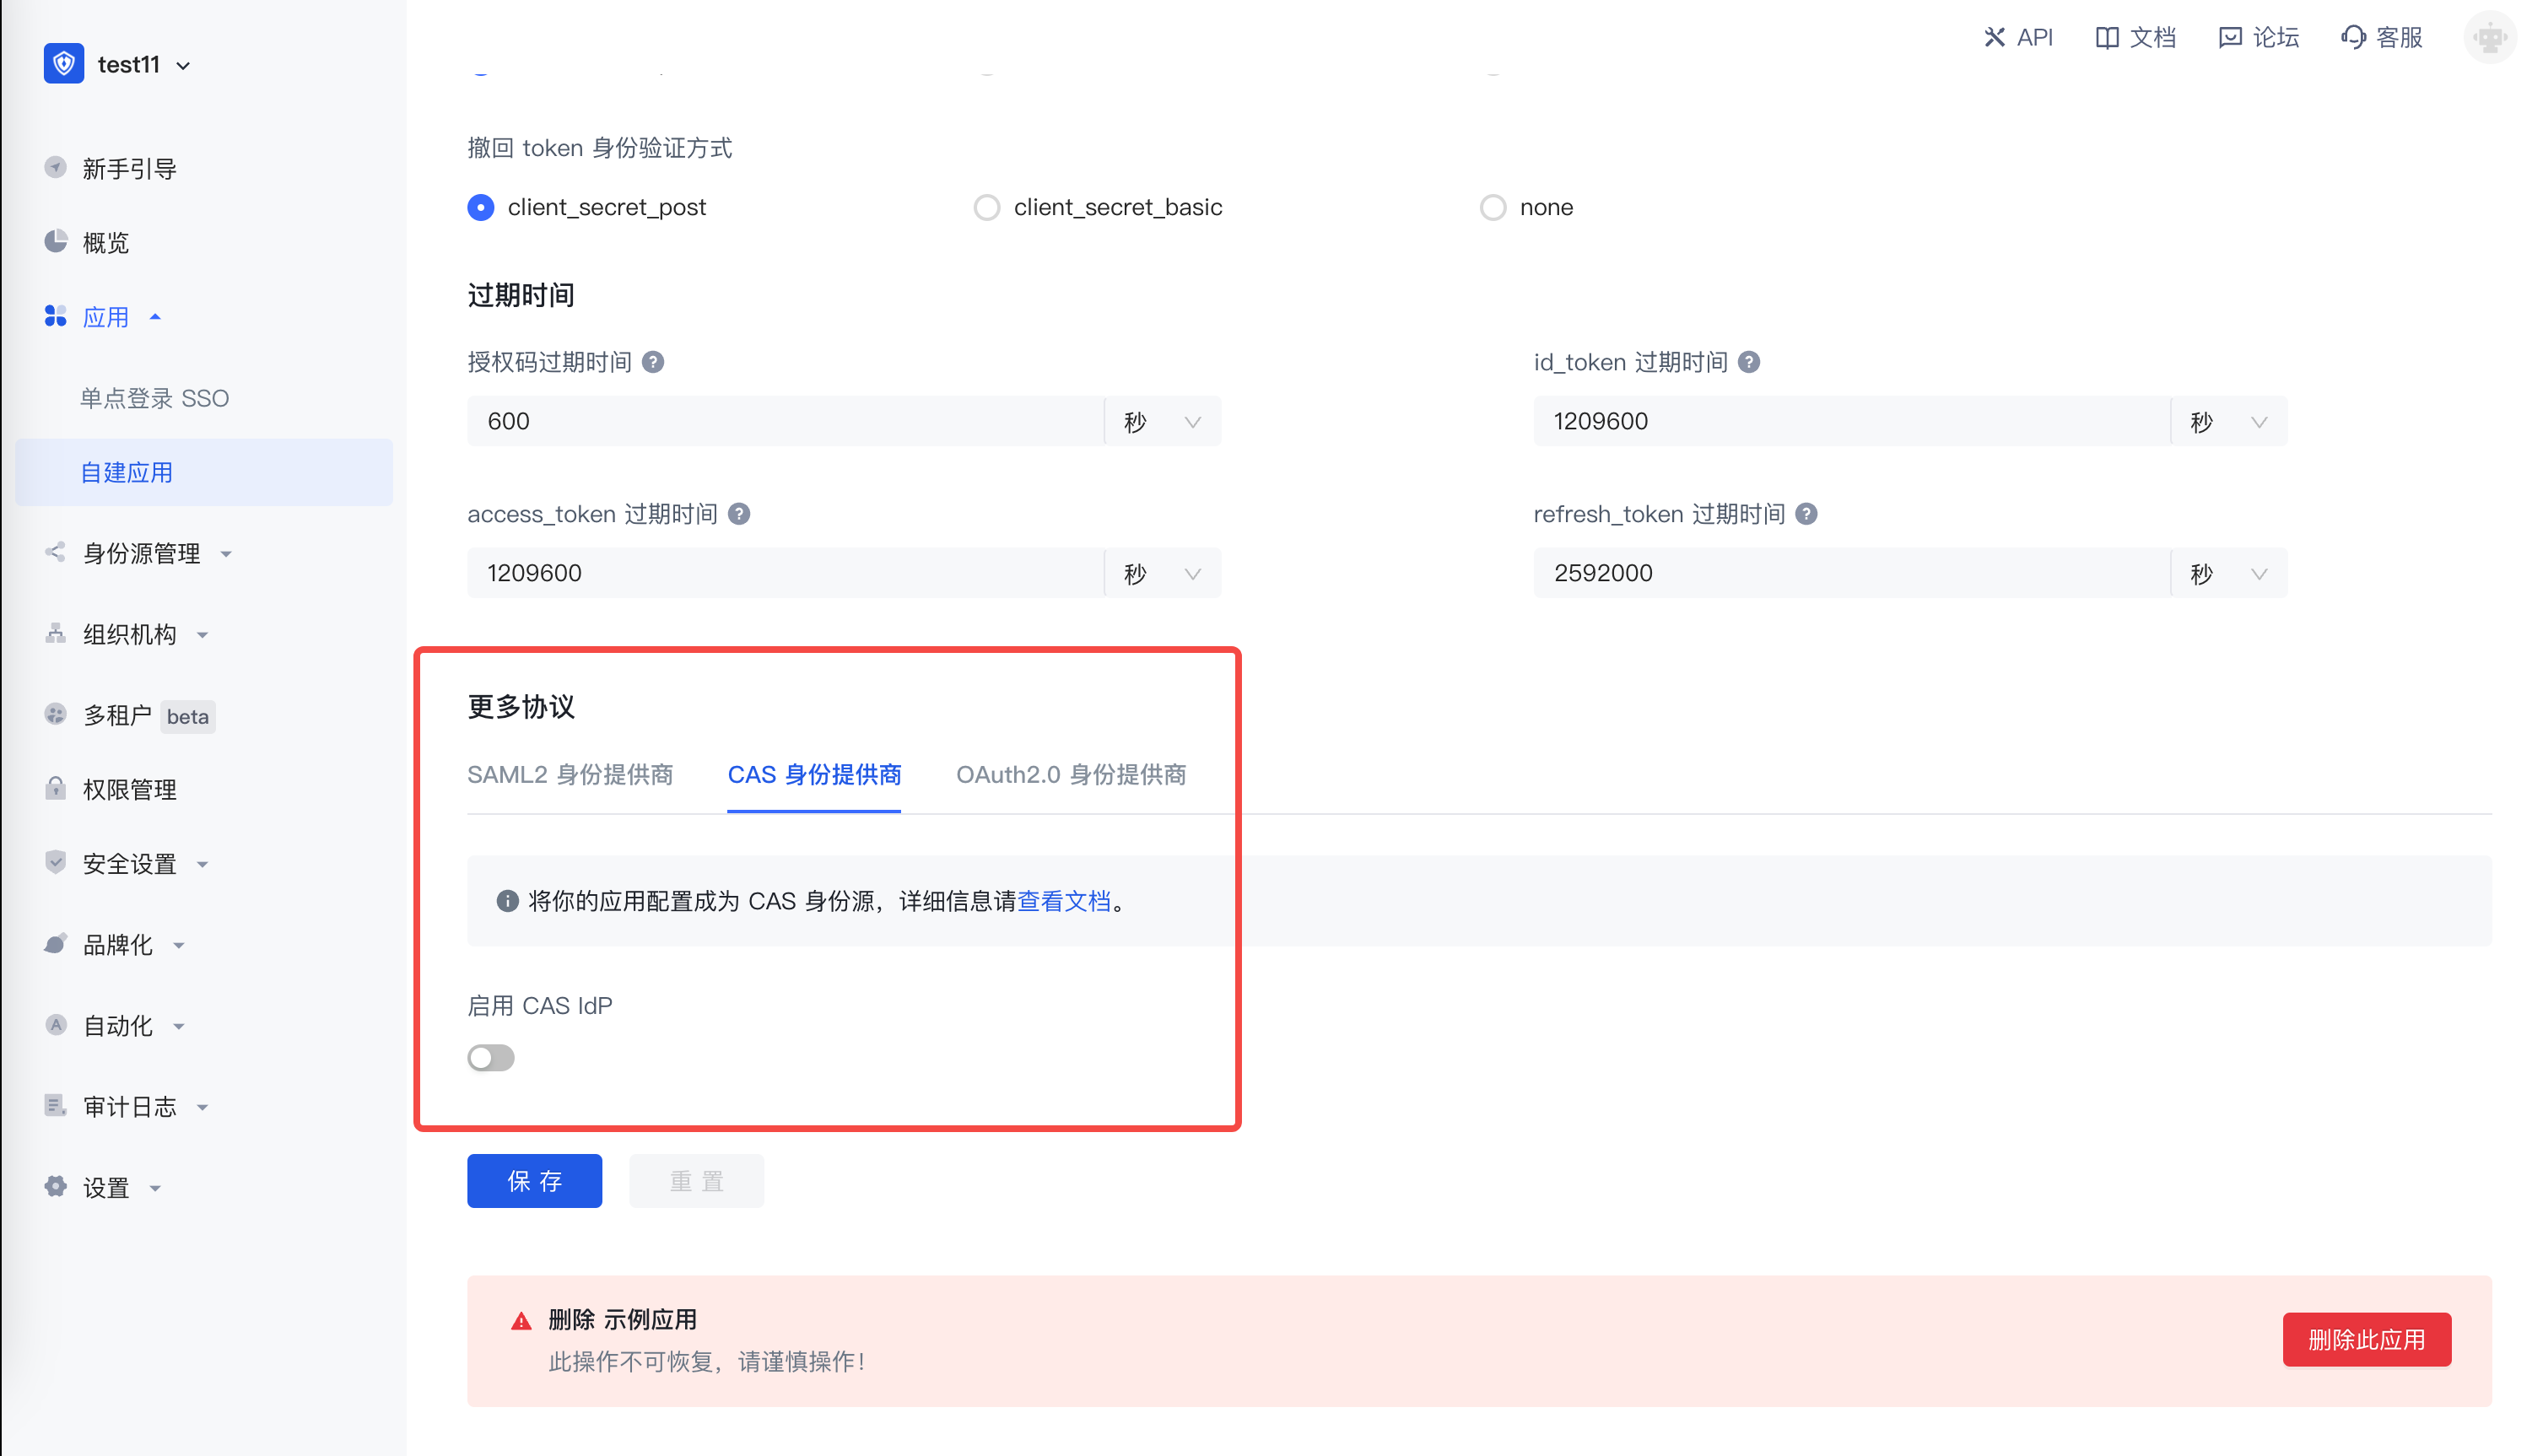
进入到更多身份协议详细页,切换到 CAS 身份提供商,启用 CAS IdP,记录登录端点、登出端点、service ticket 检验端点(CAS 2.0)的地址, 后面搭建项目需要用到这些信息。 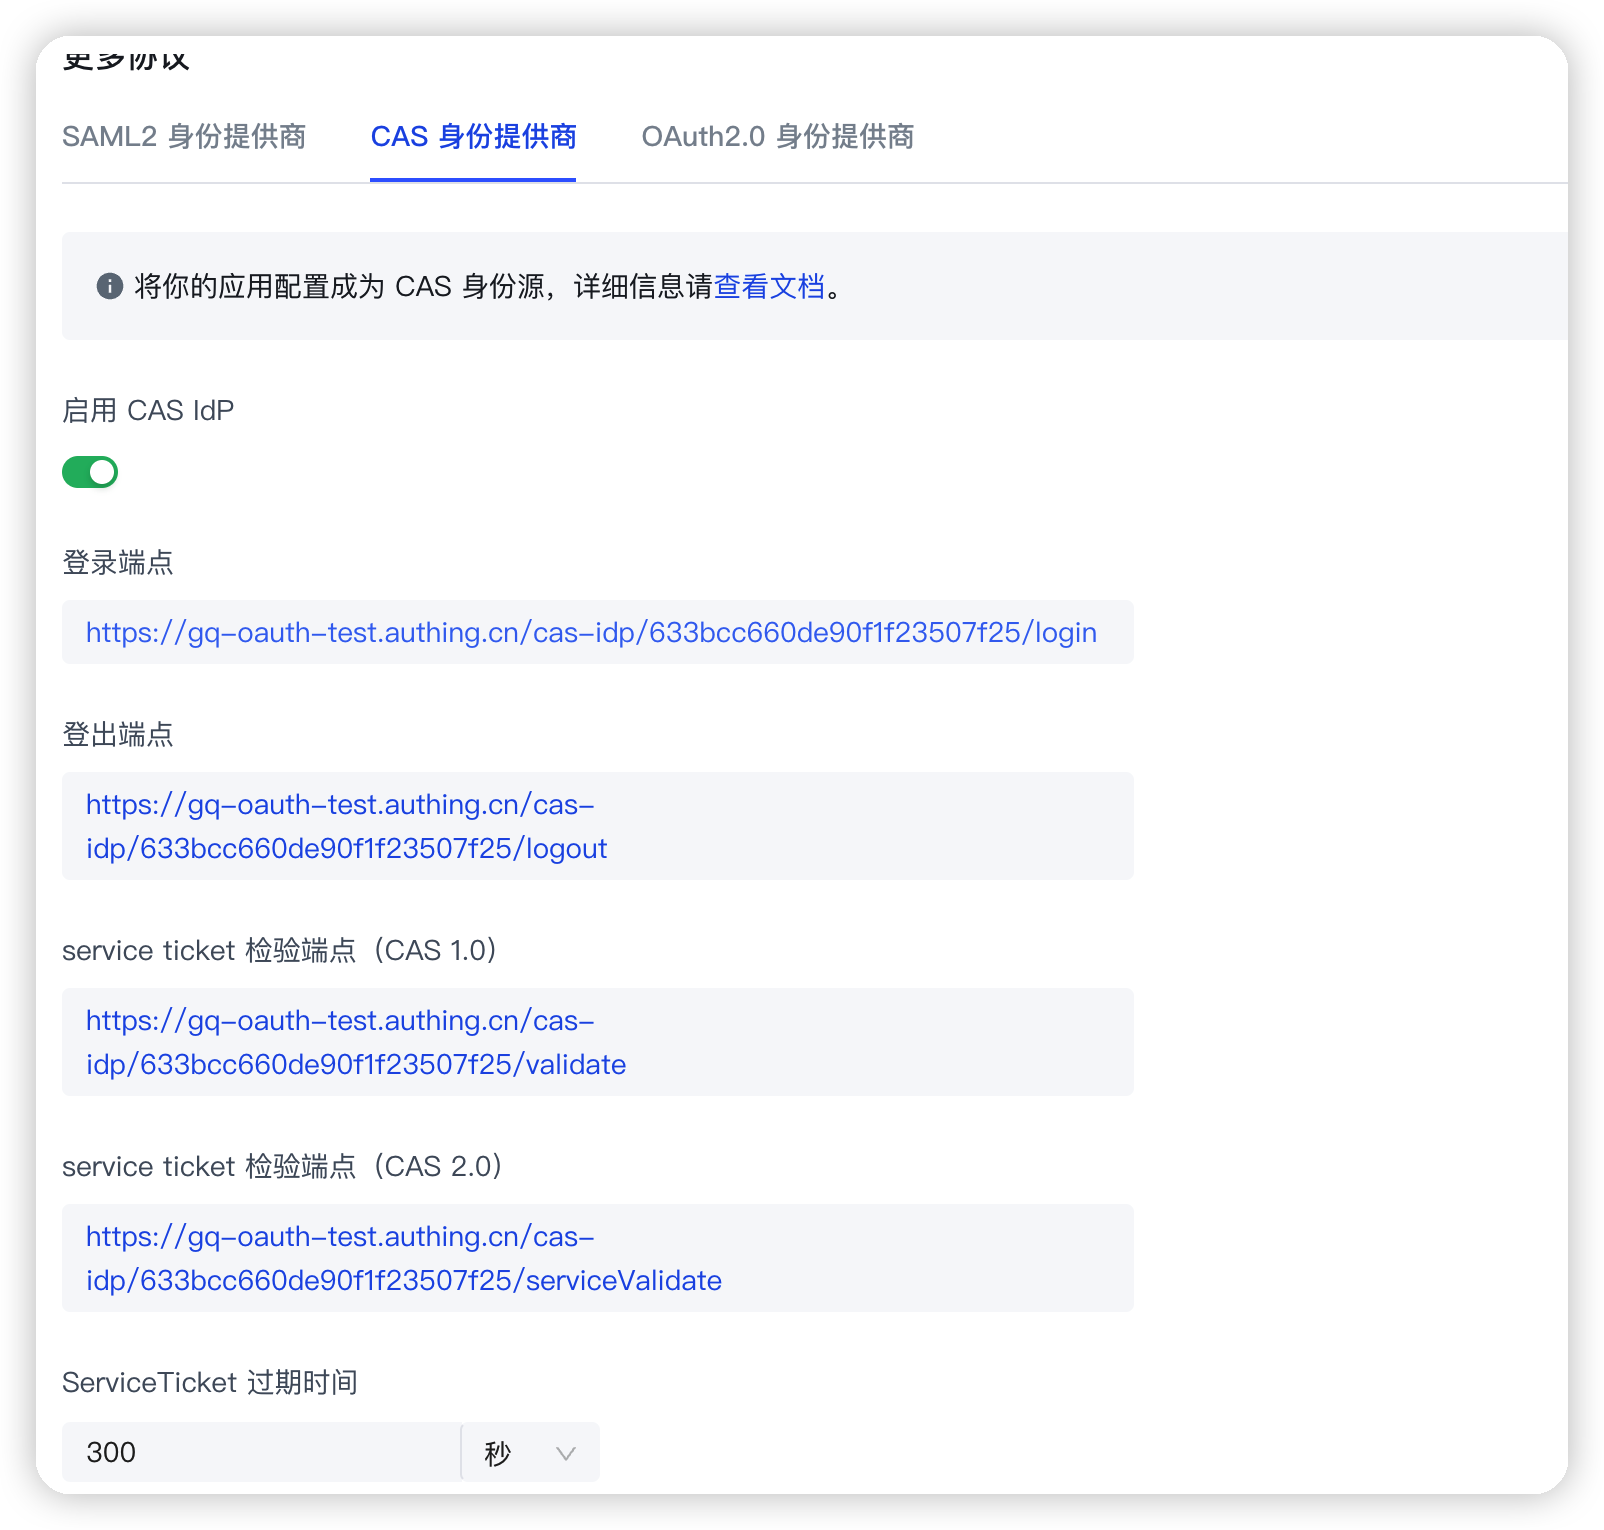
¶ 项目搭建
¶ 快速构建项目
打开 IDEA,点击 New Project 创建一个新项目,选择 Spring Initializr 创建一个 Spring Boot 项目,输入项目的 Group 以及 Artifact 信息 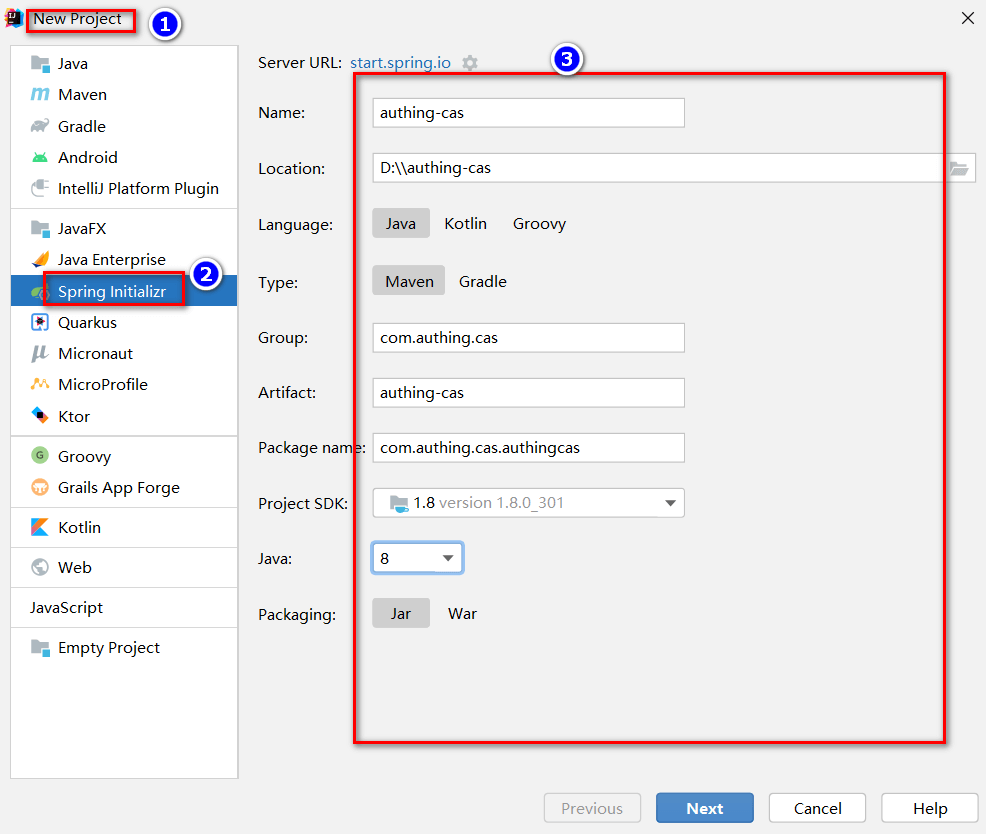
集成过程中需要在 pom.xml 中添加一些其他的依赖包,如下:
<dependencies>
        <dependency>
            <groupId>org.springframework.boot</groupId>
            <artifactId>spring-boot-starter-web</artifactId>
        </dependency>
        <dependency>
            <groupId>org.springframework.boot</groupId>
            <artifactId>spring-boot-starter-tomcat</artifactId>
        </dependency>

        <dependency>
            <groupId>net.unicon.cas</groupId>
            <artifactId>cas-client-autoconfig-support</artifactId>
            <version>2.3.0-GA</version>
        </dependency>

        <!--远程调用接口使用-->
        <dependency>
            <groupId>cn.hutool</groupId>
            <artifactId>hutool-all</artifactId>
            <version>5.7.11</version>
        </dependency>
    </dependencies>
其中,hutool 工具包的作用是远程调用接口,当收到回调请求时,会使用该工具包远程调用 CAS Service Ticket 的 serviceValidate 接口,检验端点的合法性,后续自动回调接口编码会使用到。
最后,需要在启动类中添加 @EnableCasClient 注解,开启 CAS client 的支持,如下:
@SpringBootApplication(exclude = DataSourceAutoConfiguration.class)
@EnableCasClient
public class AuthingCasApplication {

    public static void main(String[] args) {
        SpringApplication.run(AuthingCasApplication.class, args);
    }

}
¶ 配置项目中的配置文件
找到 src/main/resources/application.properties,将其重命名为 application.yml,并添加如下内容:
server:
  port: 9999

cas:
  server-url-prefix: {替换为你的 server-url-prefix,如:https://cjtjls-demo.genauth.ai/cas-idp/61319680ea8b30c9ca9ca071}
  server-login-url: {替换为你的 server-url-prefix,如:https://cjtjls-demo.genauth.ai/cas-idp/61319680ea8b30c9ca9ca071/login}
  client-host-url: {替换为你的 client-host-url,如:http://localhost:9999/}
  validation-url-patterns:
    - /**
需要将这里的 {server-url-prefix}、{server-login-url}、{client-host-url} 替换成上一步应用配置中的实际信息
¶ 自动回调接口编码
在项目下新建一个 package,然后新建一个 CallBackController,此接口作用是通过 CAS 的 ticket 获取用户信息。 注意,下面的参数 service,ticket 都是 GenAuth CAS 的标准,不能乱改,这也是标准协议的规定,service 参数所对应的值也就是之前在 GenAuth 平台应用所配置的那些
package com.authing.cas.authingcas.controller;
import cn.hutool.http.HttpUtil;
import org.springframework.http.MediaType;
import org.springframework.stereotype.Controller;
import org.springframework.web.bind.annotation.GetMapping;
import org.springframework.web.bind.annotation.ResponseBody;
import java.util.HashMap;

@Controller
public class CallbackController {

    @GetMapping(value = "/", produces = MediaType.APPLICATION_XML_VALUE)
    @ResponseBody
    public String getTicket(String ticket) {
        HashMap<String, Object> paramMap = new HashMap<>();
        paramMap.put("service", "http://localhost:9999/");
        paramMap.put("ticket", ticket);
        String result = HttpUtil.get("https://cjtjls-demo.genauth.ai/cas-idp/61319680ea8b30c9ca9ca071/serviceValidate", paramMap);
        return result;
    }

}
¶ 测试项目
一切准备就绪了,现在启动项目并访问 http://localhost:9999,即可看到 GenAuth 登录窗口 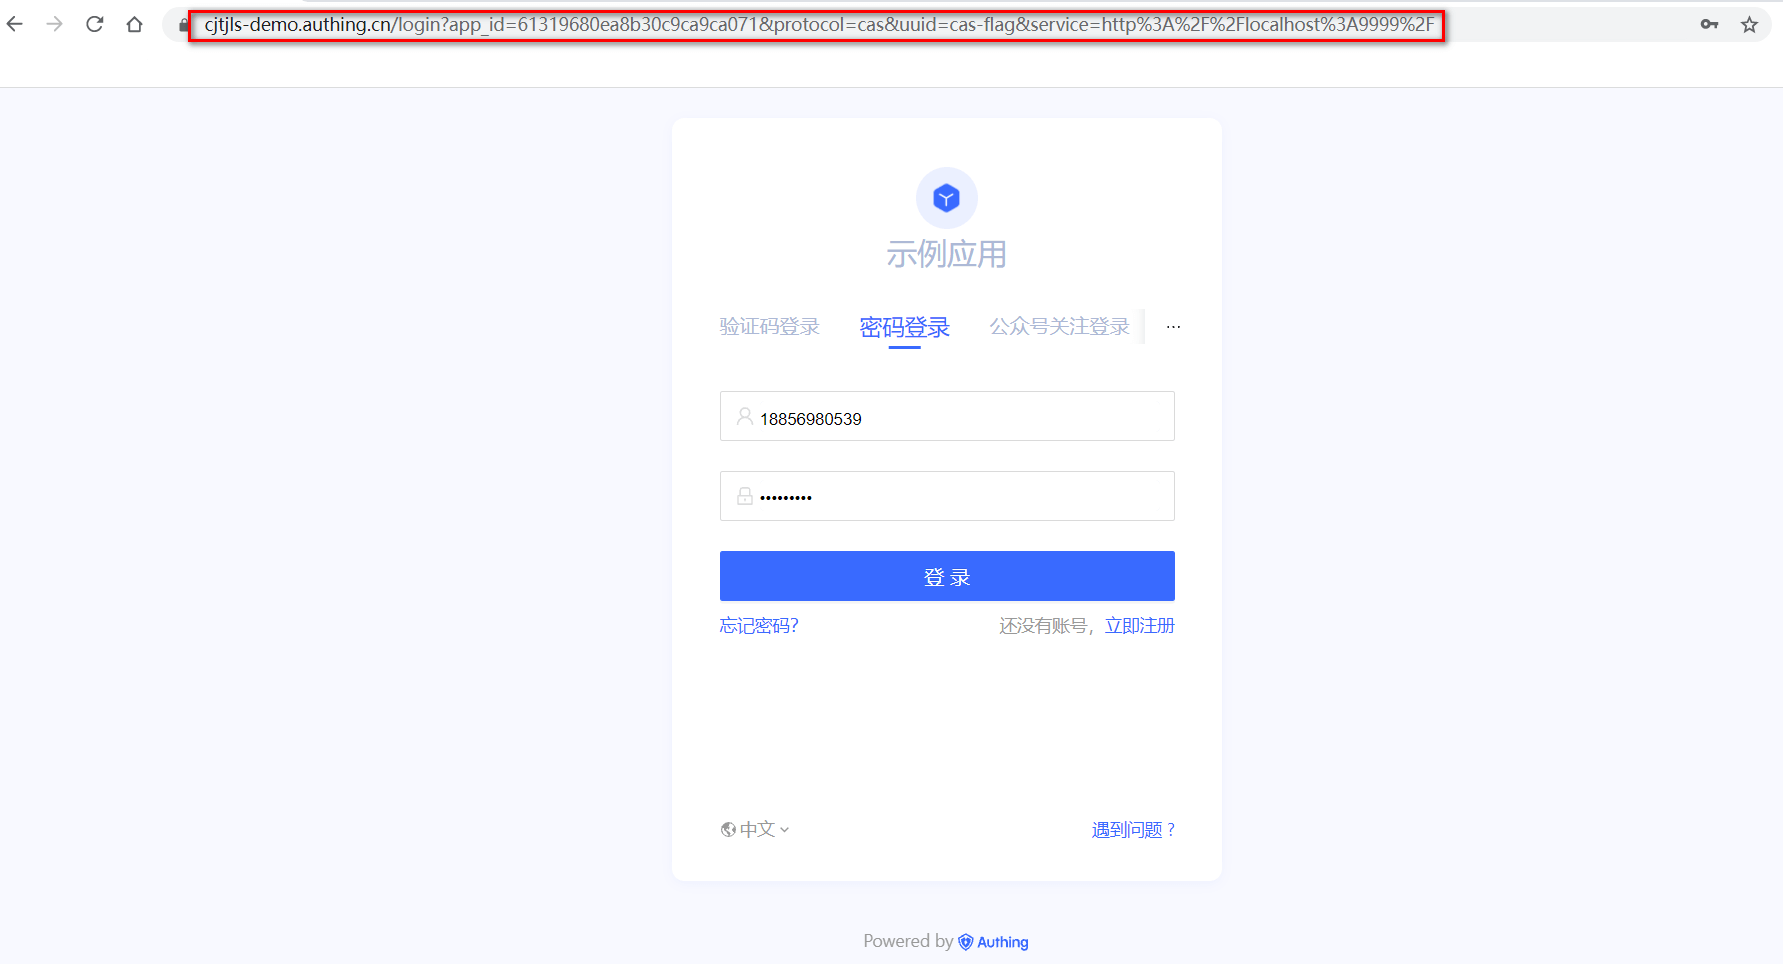
接下来,可以输入用户名、密码来进行登录,查看登录后的结果 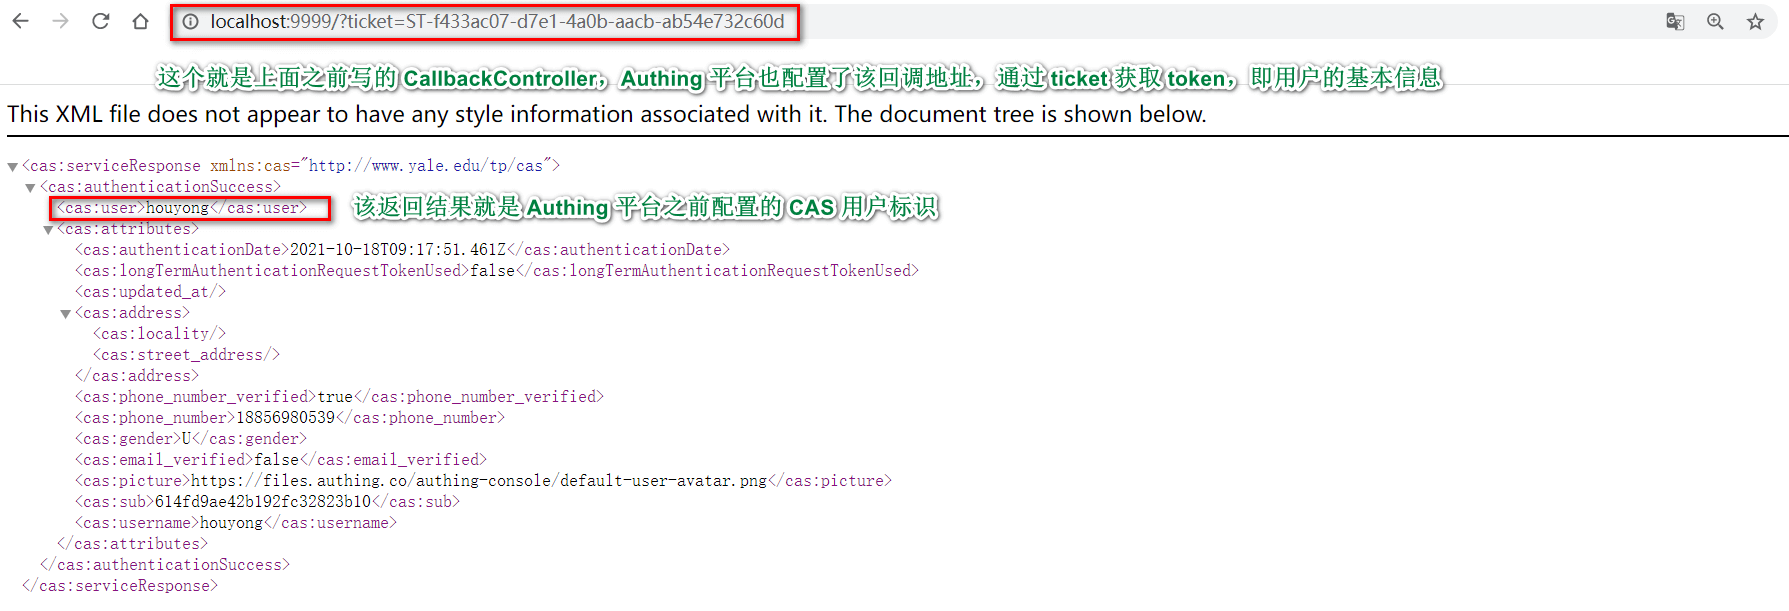
<cas:serviceResponse xmlns:cas="http://www.yale.edu/tp/cas">
  <cas:authenticationSuccess>
    <cas:user>用户名</cas:user>
    <cas:attributes>
      <cas:authenticationDate>2021-07-20T10:04:14.044Z</cas:authenticationDate>
      <cas:longTermAuthenticationRequestTokenUsed>false</cas:longTermAuthenticationRequestTokenUsed>
      <cas:updated_at/>
      <cas:address>
        <cas:locality/>
        <cas:street_address/>
      </cas:address>
      <cas:phone_number_verified>false</cas:phone_number_verified>
      <cas:gender>U</cas:gender>
      <cas:email_verified>false</cas:email_verified>
      <cas:picture>https://files.authing.co/authing-console/default-user-avatar.png</cas:picture>
      <cas:sub>60a5e57cfaa50e4850dd12b0</cas:sub>
    </cas:attributes>
  </cas:authenticationSuccess>
</cas:serviceResponse>
此外,GenAuth 还会保存用户的登录态,用户短时间内再次登录无需进行认证。 另外,如果 ticket 验证失败,GenAuth 将返回格式如下的 xml 文档
<cas:serviceResponse xmlns:cas="http://www.yale.edu/tp/cas">
  <cas:authenticationFailure code="INVALID_TICKET">Ticket 不存在</cas:authenticationFailure>
</cas:serviceResponse>
恭喜 🎉🎉🎉 ,到此你已经学会了 Spring Security 5 集成 GenAuth CAS 认证授权
¶ 其他知识学习
¶ 什么是单点登录
单点登录:Single Sign On,简称 SSO,SSO 使得在多个应用系统中,用户只需要登录一次就可以访问所有相互信任的应用系统。
¶ 什么是 CAS
CAS 框架:CAS(Central Authentication Service,即:统一认证服务)是实现 SSO 单点登录的框架。
¶ CAS 术语
Ticket Granting ticket (TGT) :可以认为是 CAS Server 根据用户名密码生成的一张票,存在 Server 端
Ticket-granting cookie (TGC) :其实就是一个 Cookie,存放用户身份信息,由 Server 发给 Client 端
Service ticket (ST) :由 TGT 生成的一次性票据,用于验证,只能用一次。相当于 Server 发给 Client 一张票,然后 Client 拿着这个票再来找 Server 验证,看看是不是 Server 签发的
¶ 接下来你可能需要
使用 Spring Security 集成 OAuth 2.0
Resources on this pageExpress 学习
Express Integration OIDC Single Sign-On Guide使用 Spring Security 集成 OIDC
Resources on this page