¶ Become an OpenID Connect identity source
This article describes how to make GenAuth an OIDC identity source. Other systems can access GenAuth as an identity provider through the OIDC protocol.
The OpenID Connect protocol, referred to as OIDC, is a lightweight, secure identity authentication and authorization protocol. OIDC is a superset of the OAuth 2.0 protocol.
The OpenID Connect protocol has the following authorization modes, namely
- [Authorization code mode](#Authorization code mode)
- [Implicit mode](#Implicit mode)
- [Hybrid mode](#Hybrid mode)
- Client Credentials mode
- [Password mode](#Password mode)
After becoming an OpenID Connect identity source, other applications can use the corresponding mode process to complete user authentication and authorization.
You can understand the OIDC protocol in depth here.
¶ Create an application
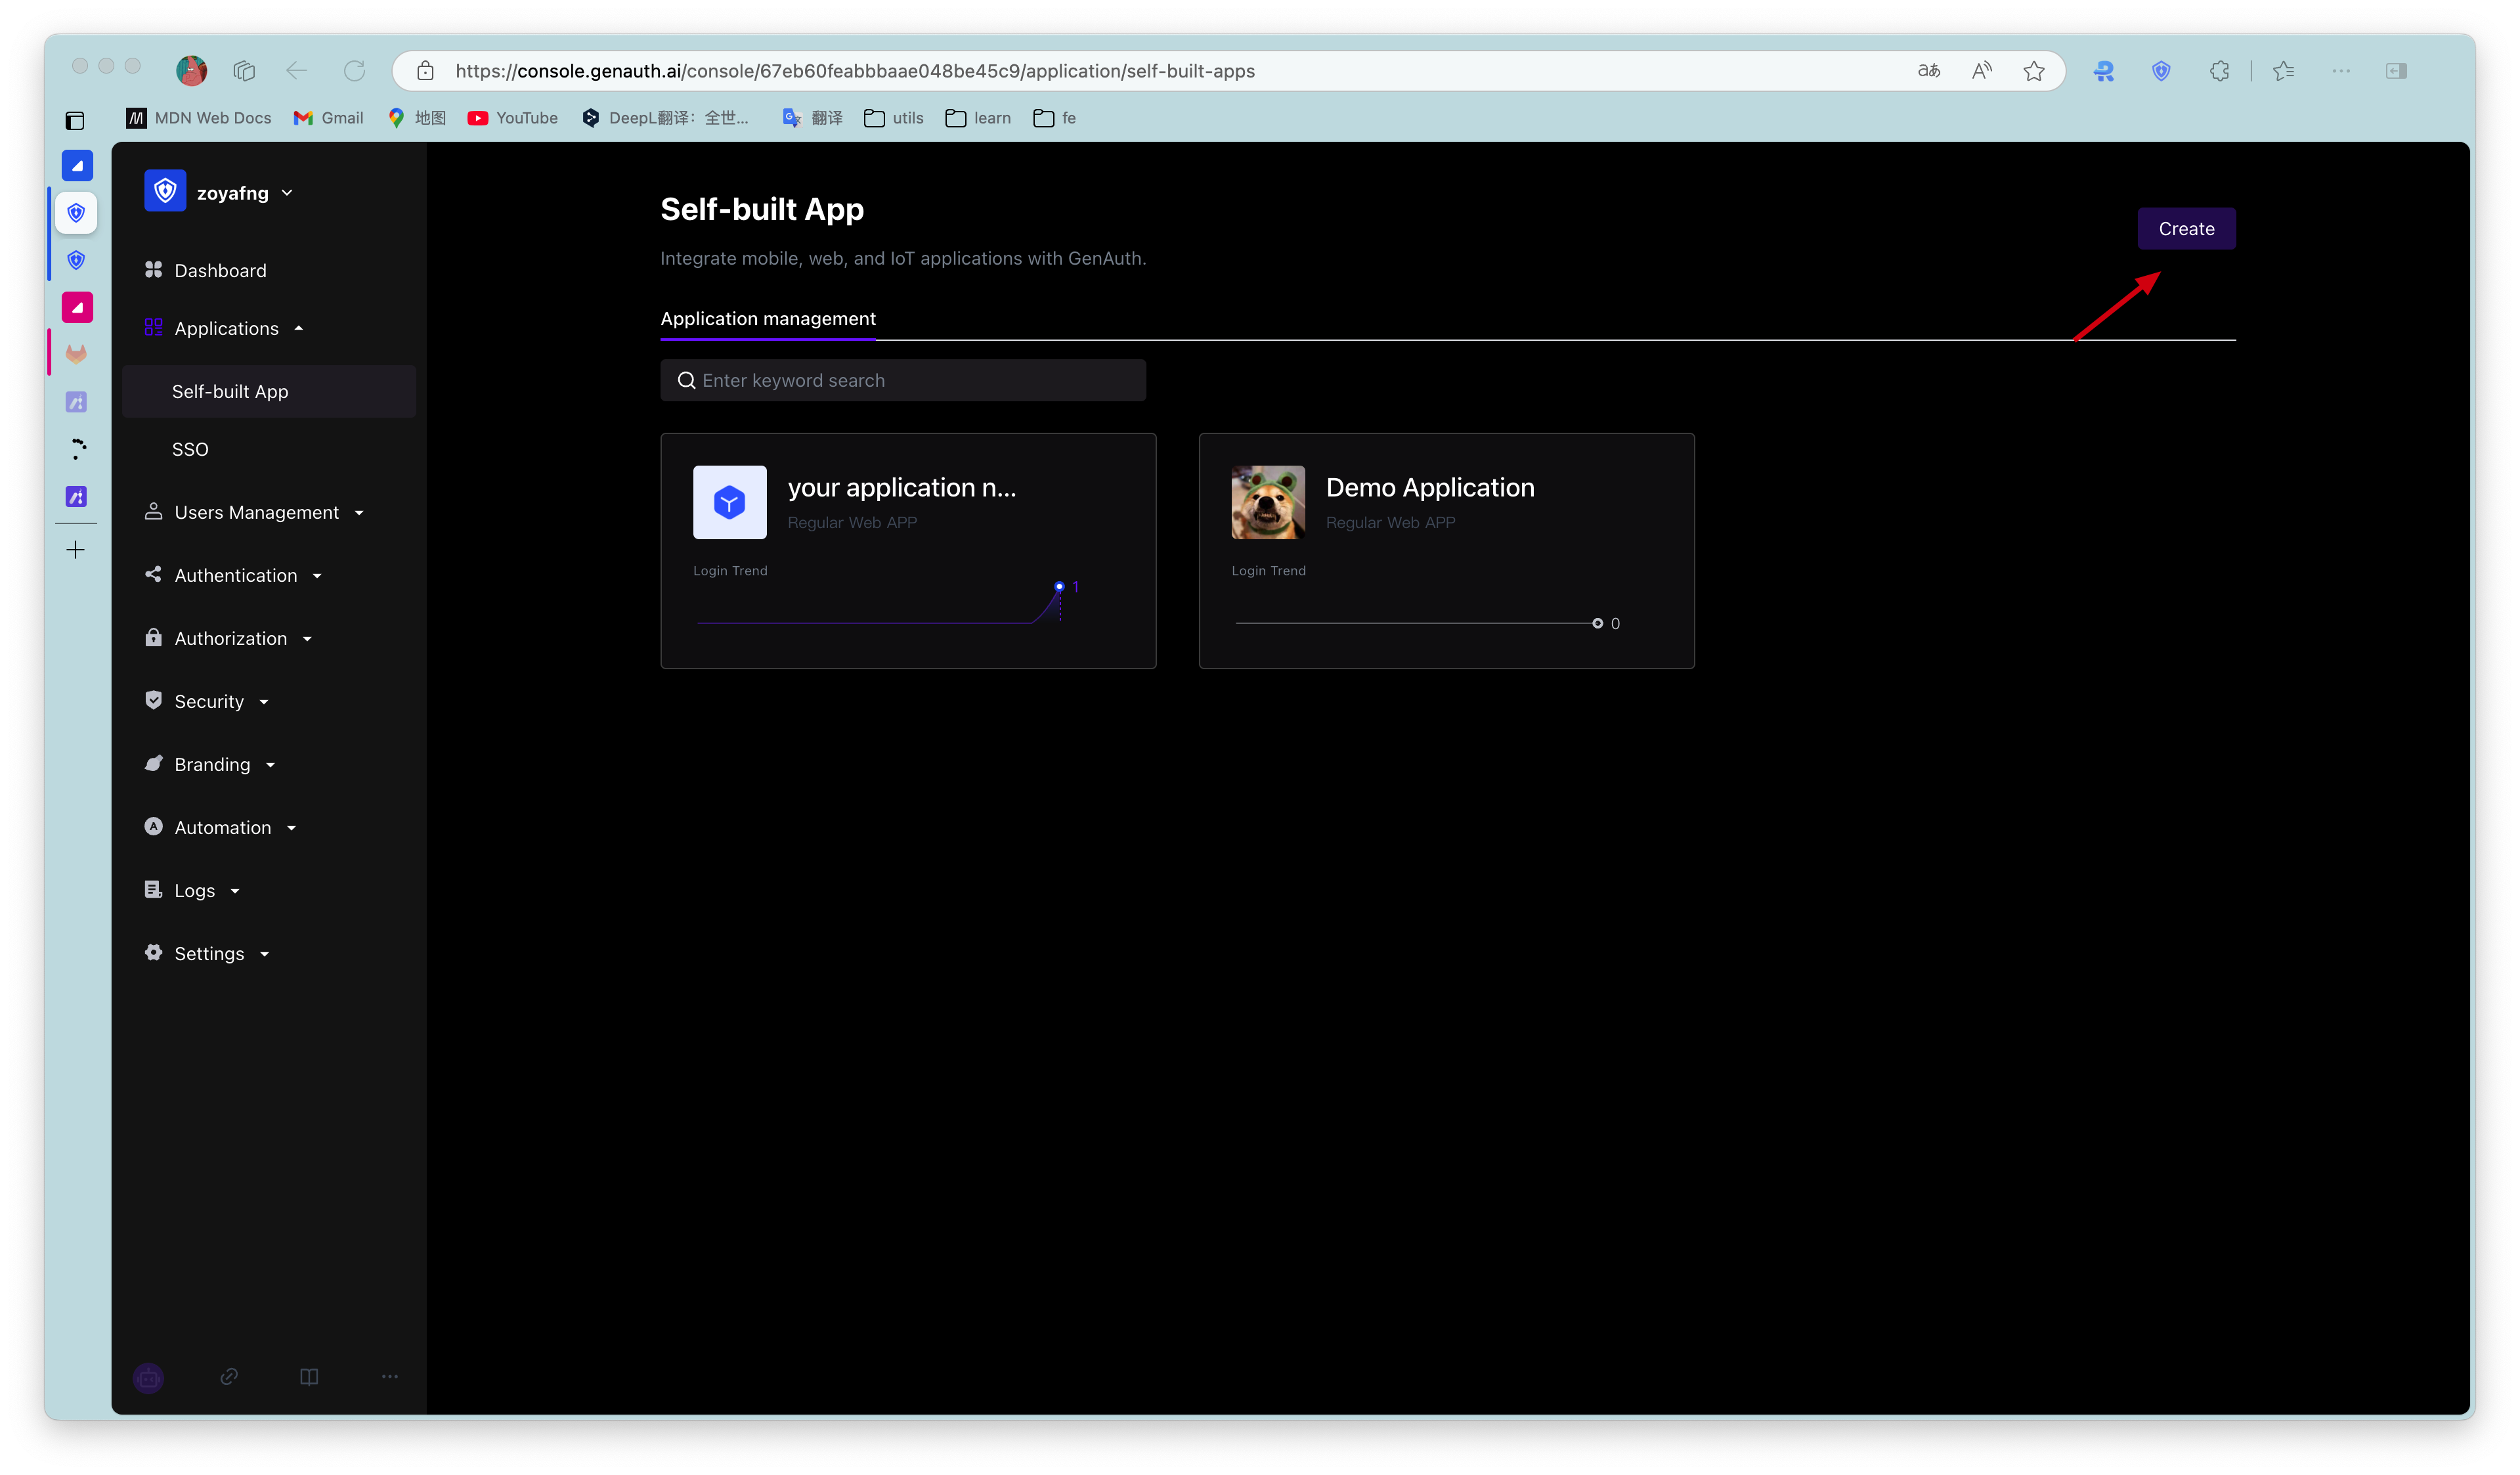
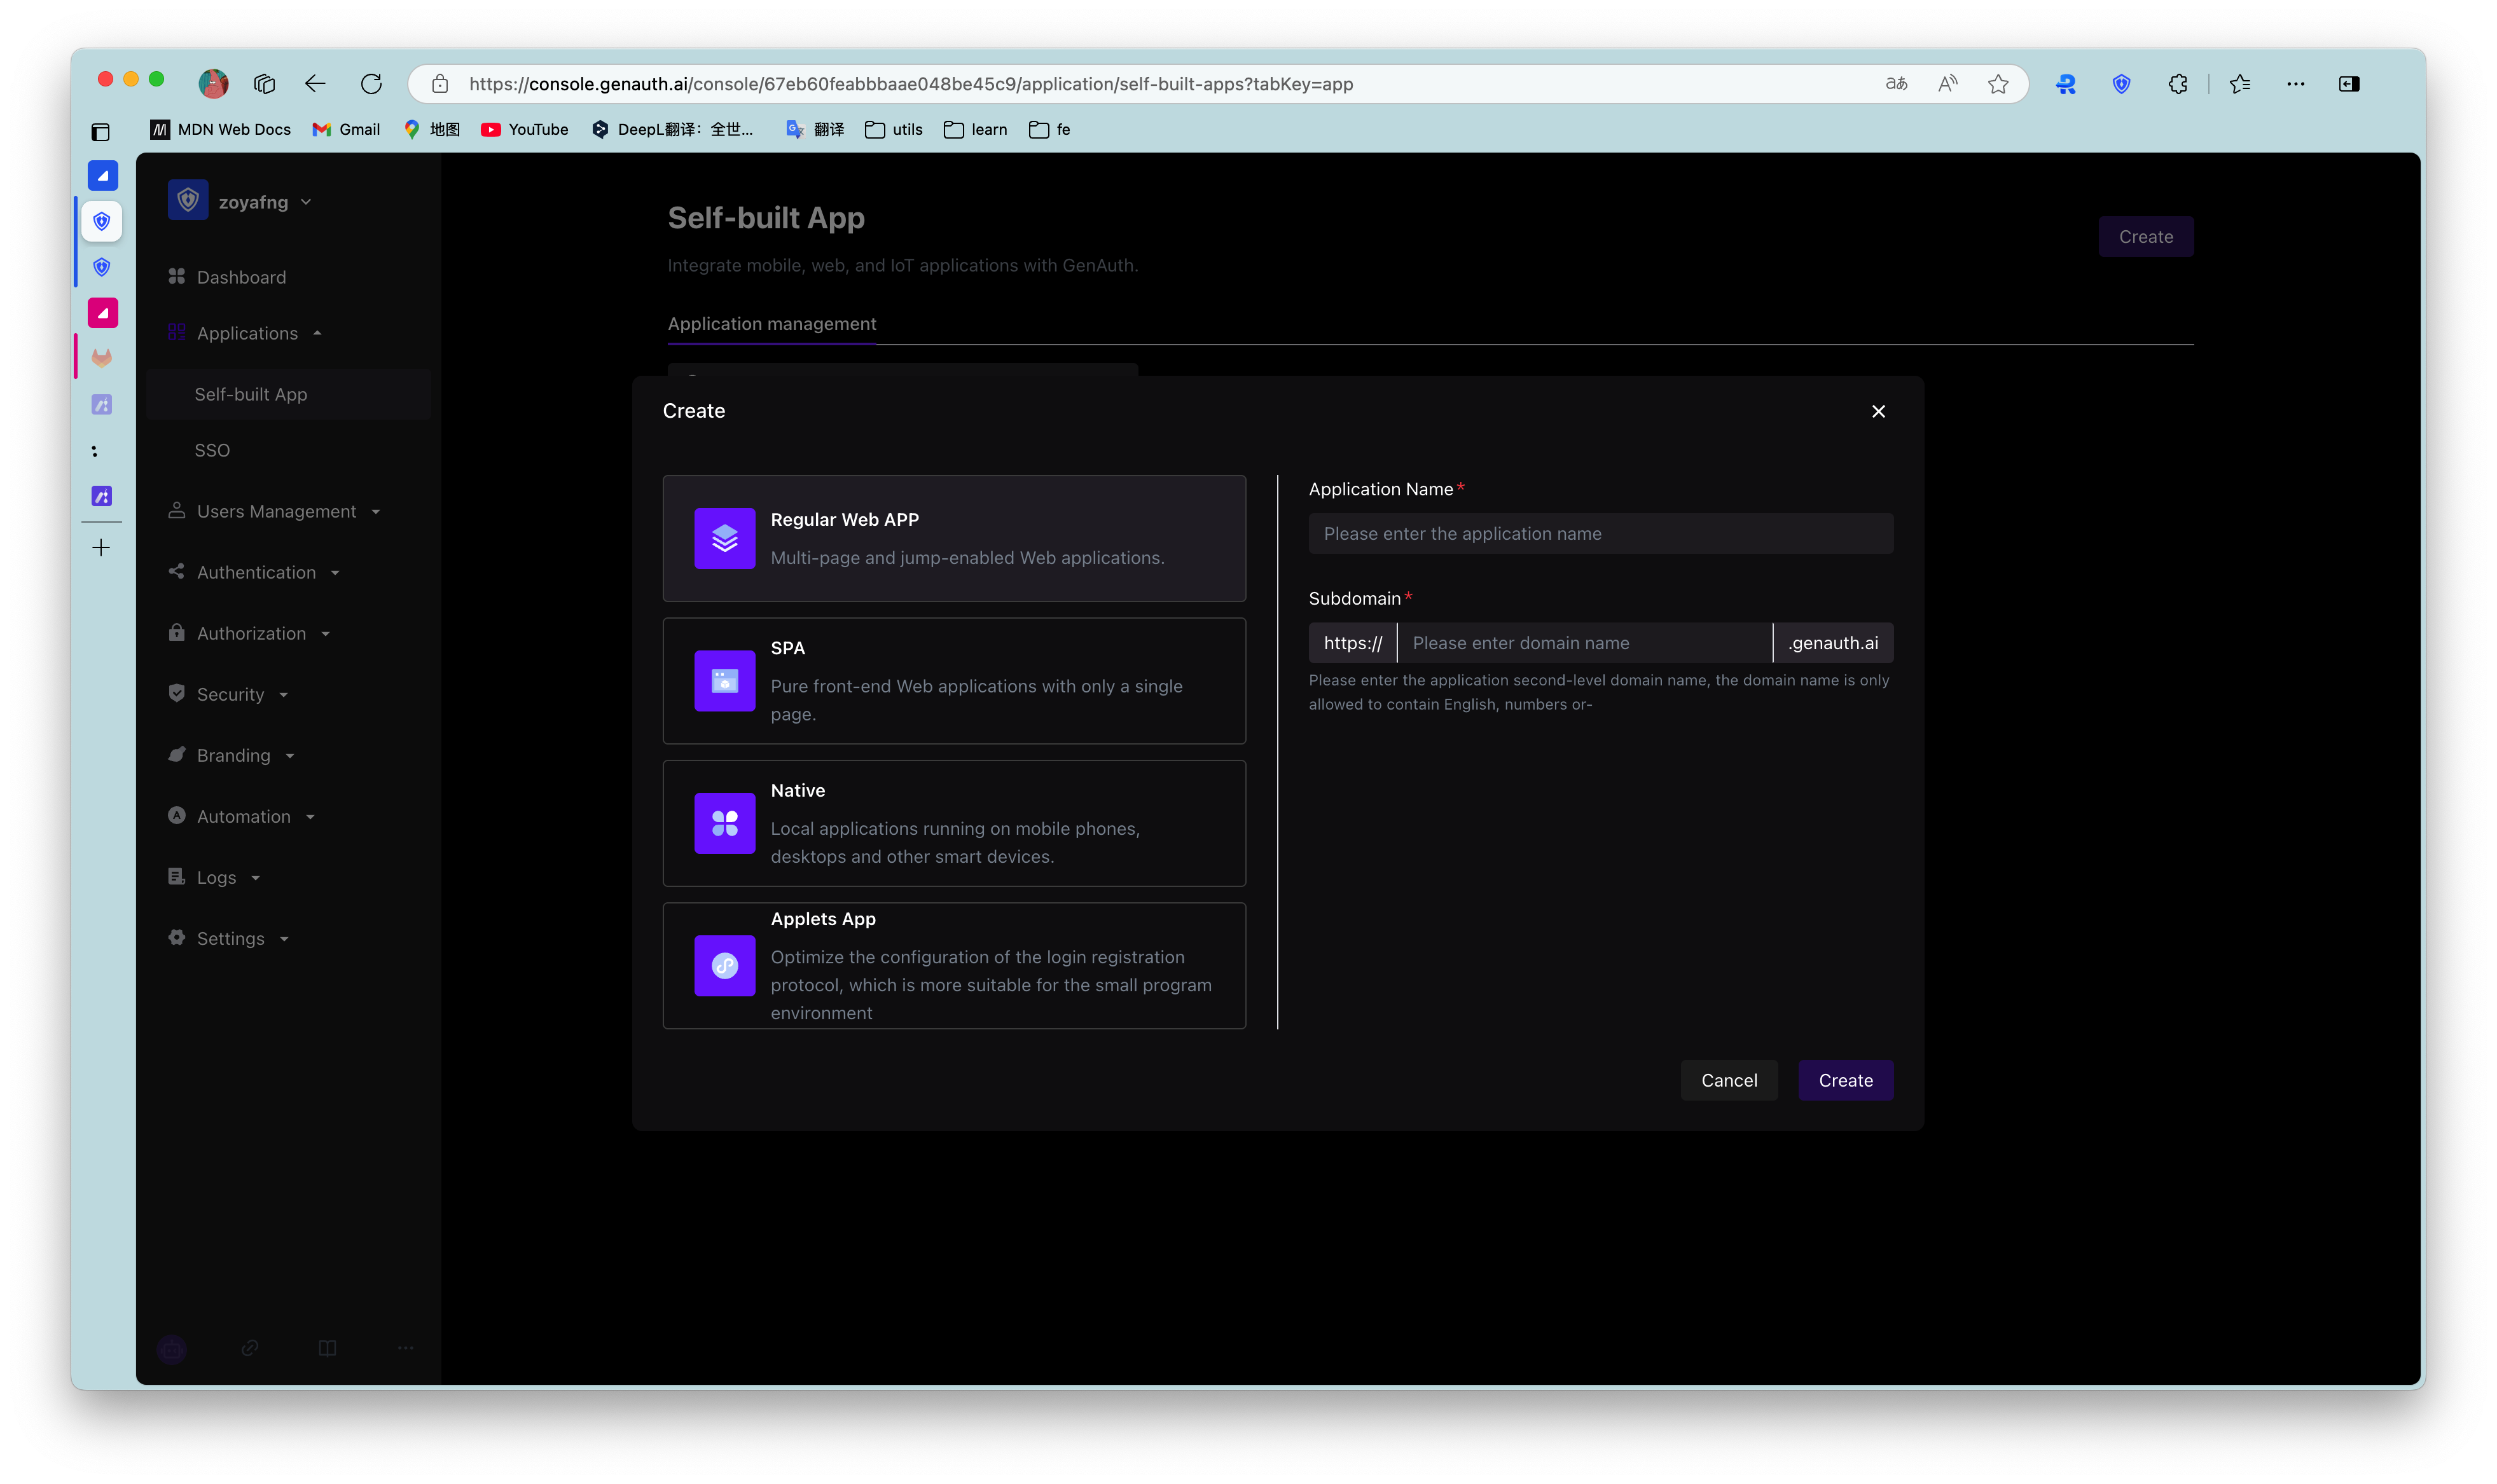
In order to enable your application to have identity authentication capabilities, you need to create an application in GenAuth. It is recommended to fill in the name of your actual application project. Go to Console > Application > Application List and click Create Application:
Fill in your Application Name, for example: Network Notes Project, and specify an Authentication Address for your project, where your users will complete authentication in the future.
Callback Link Fill in your project Backend Route, where GenAuth will send user information (to be exact, an authorization code) to this address. Finally, click Create.
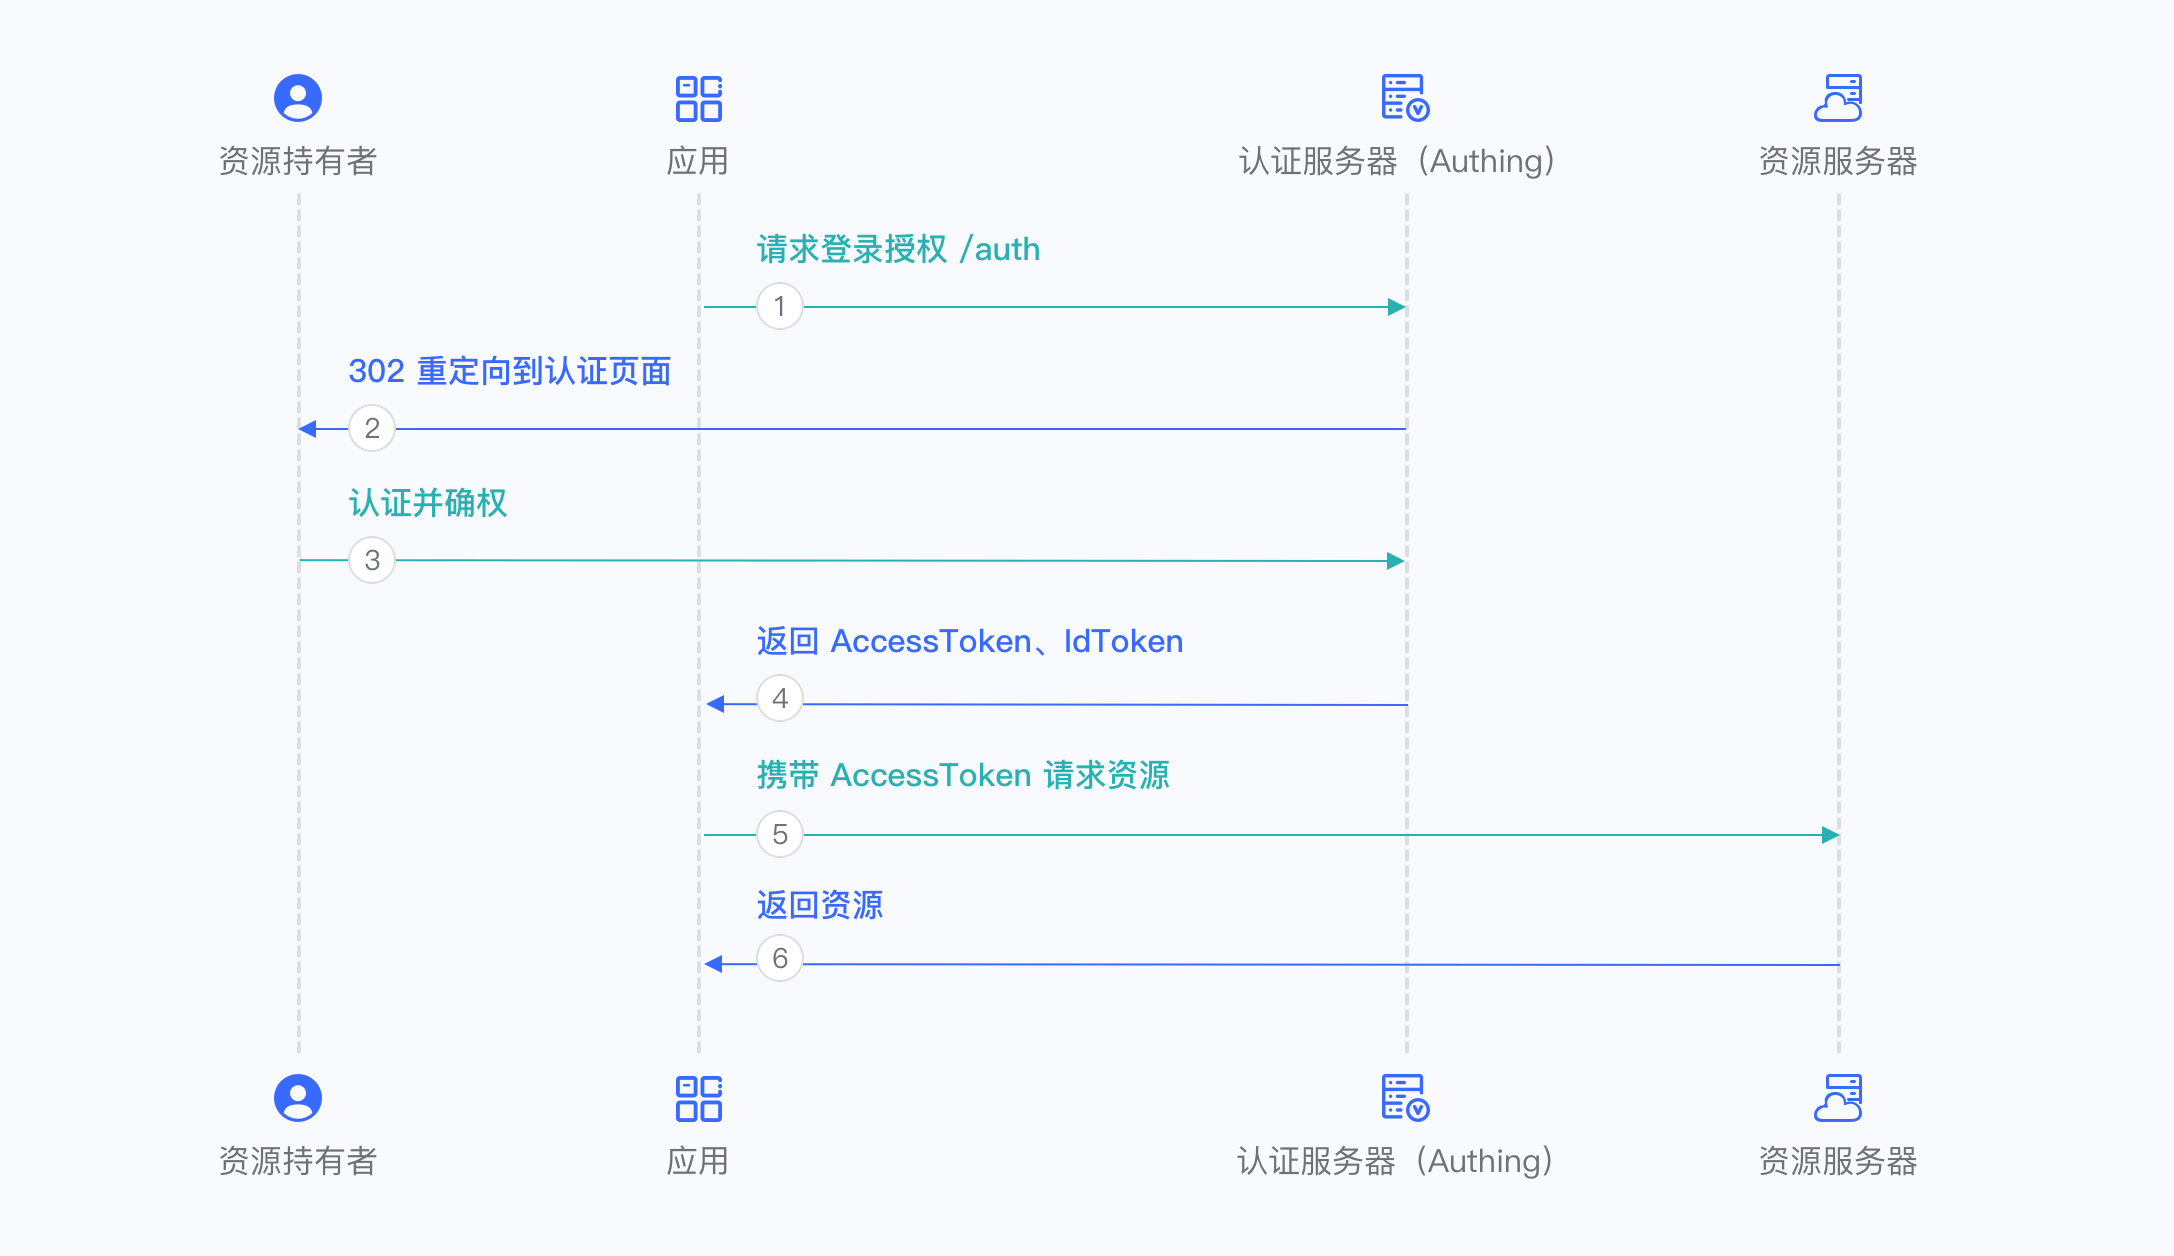
¶ Authorization Code Mode
If your application project has a backend service that can store keys securely, it is recommended to use the Authorization Code Mode.
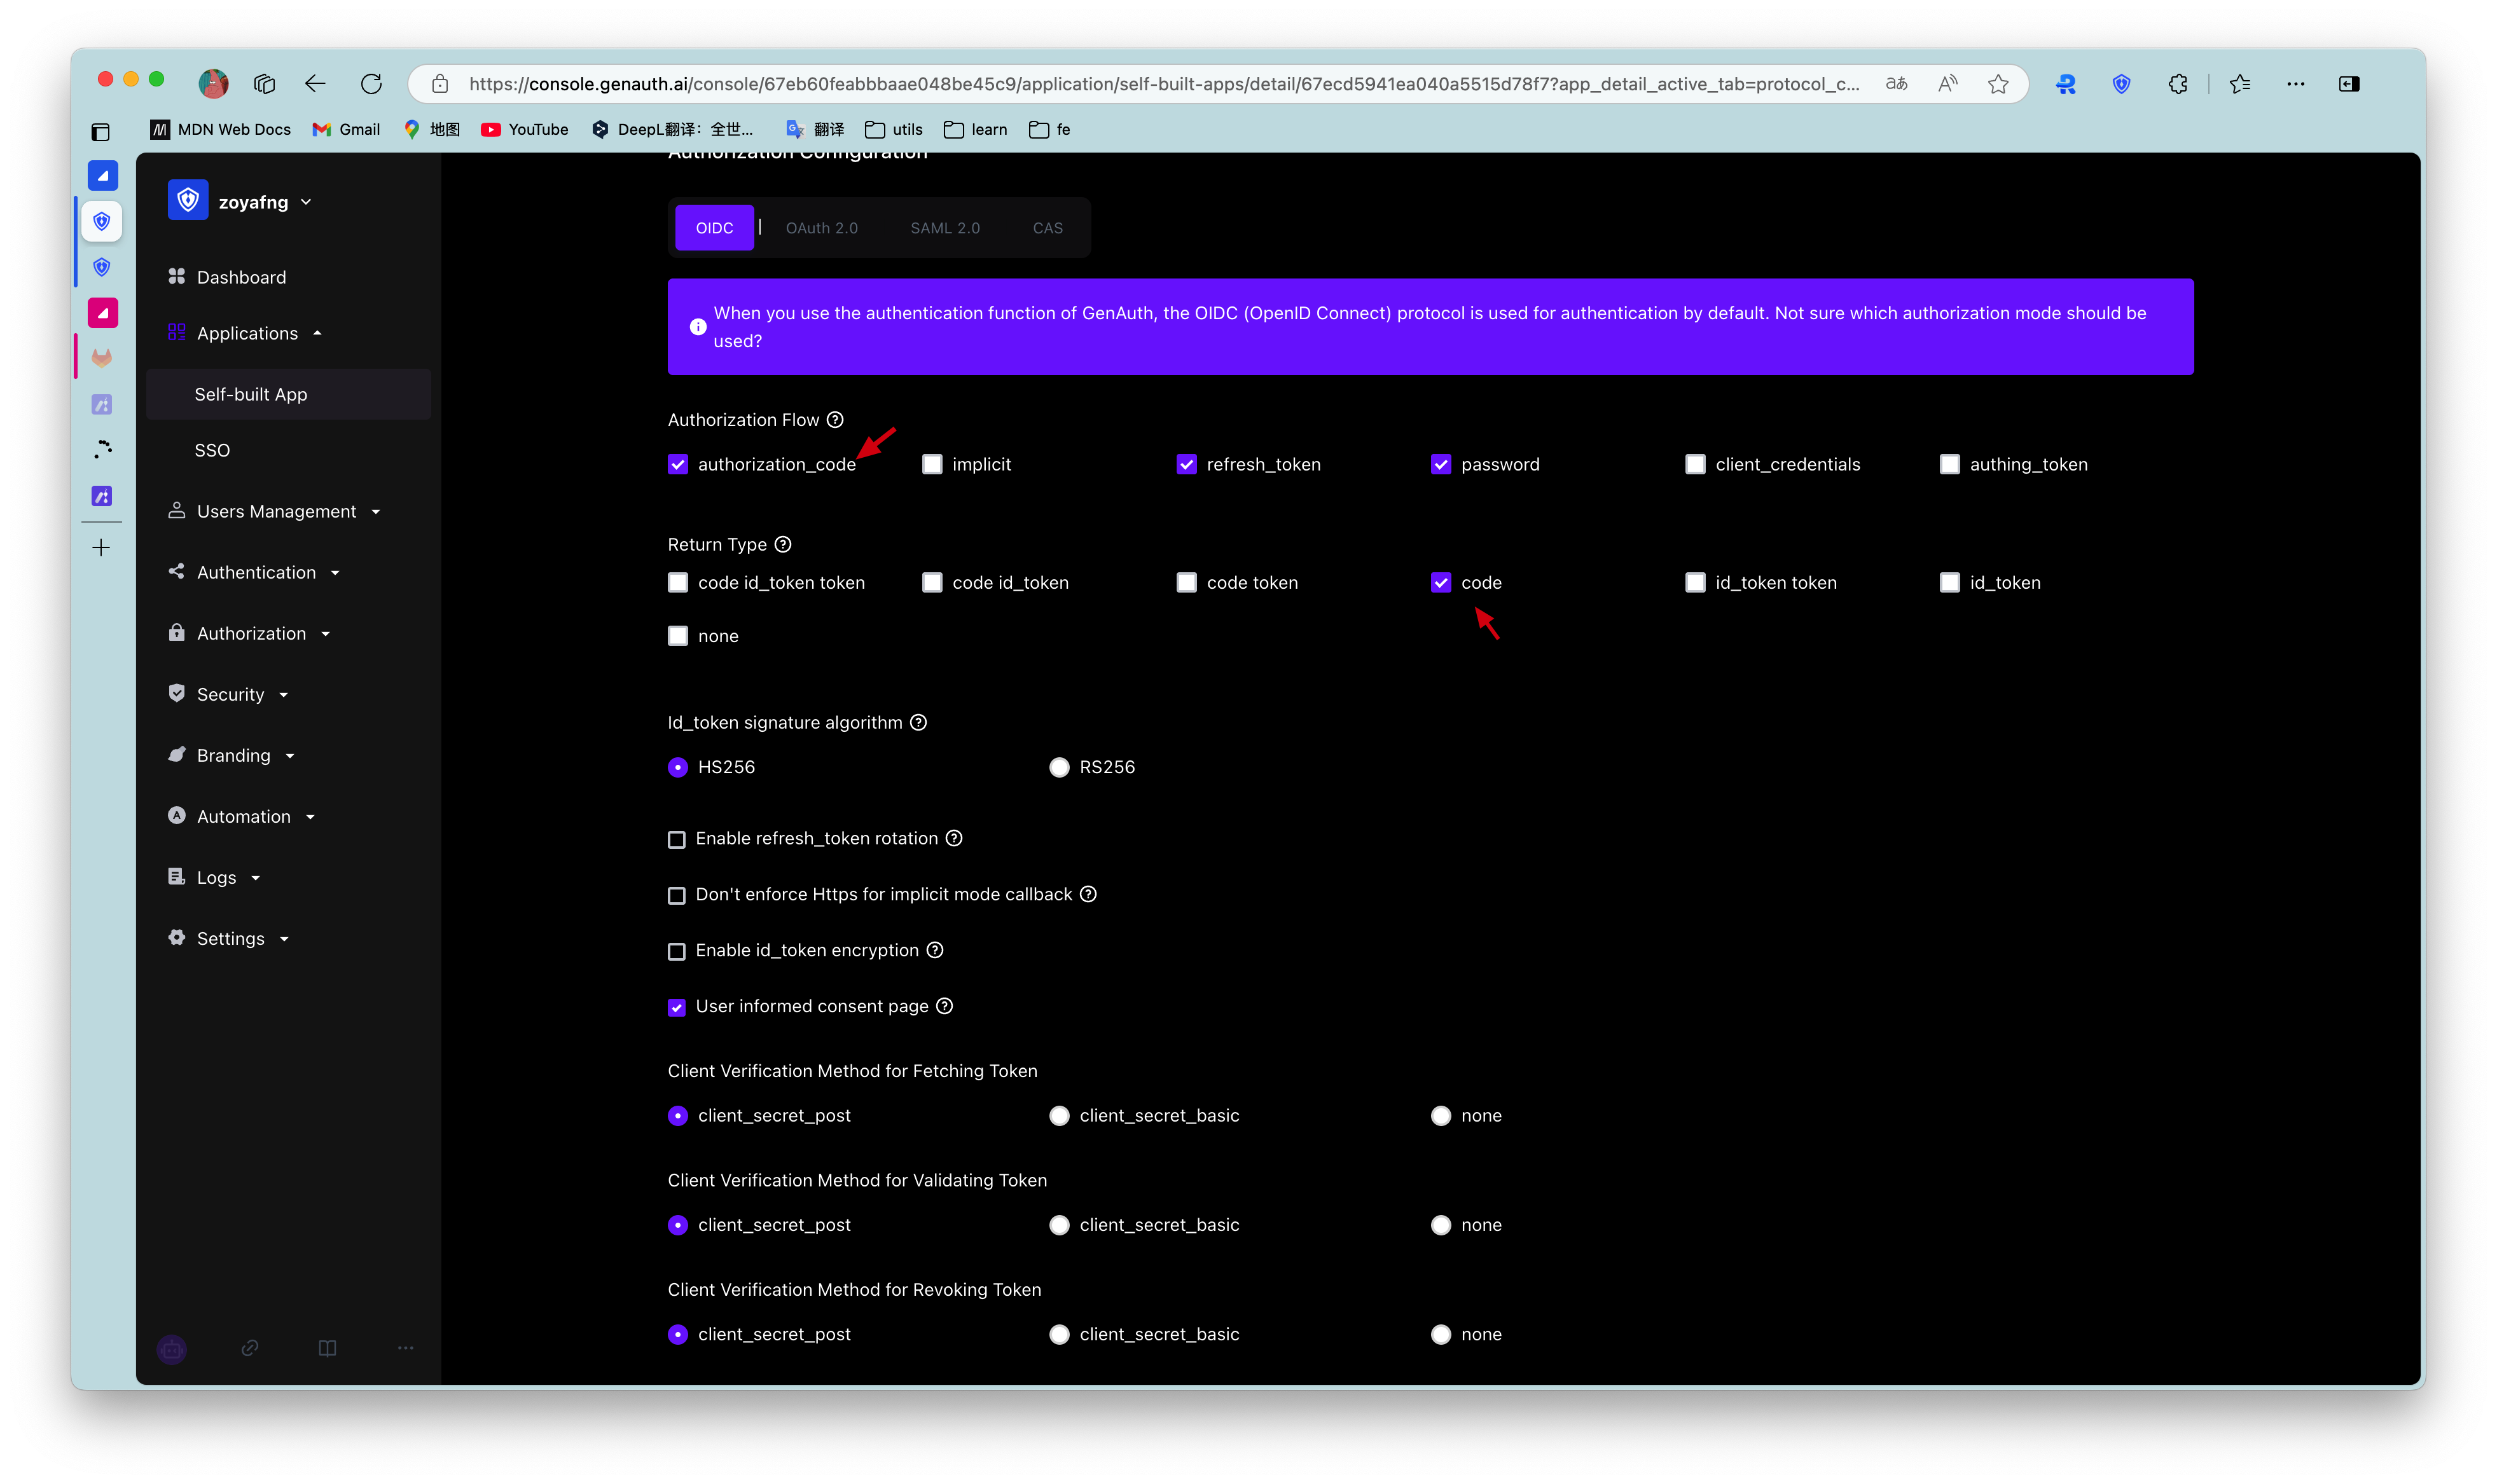
First, go to Console > Application, find your application, enter the application details, and in the "Authorization" card below, check authorization_code in the authorization mode, check code in the return type, and then click Save.
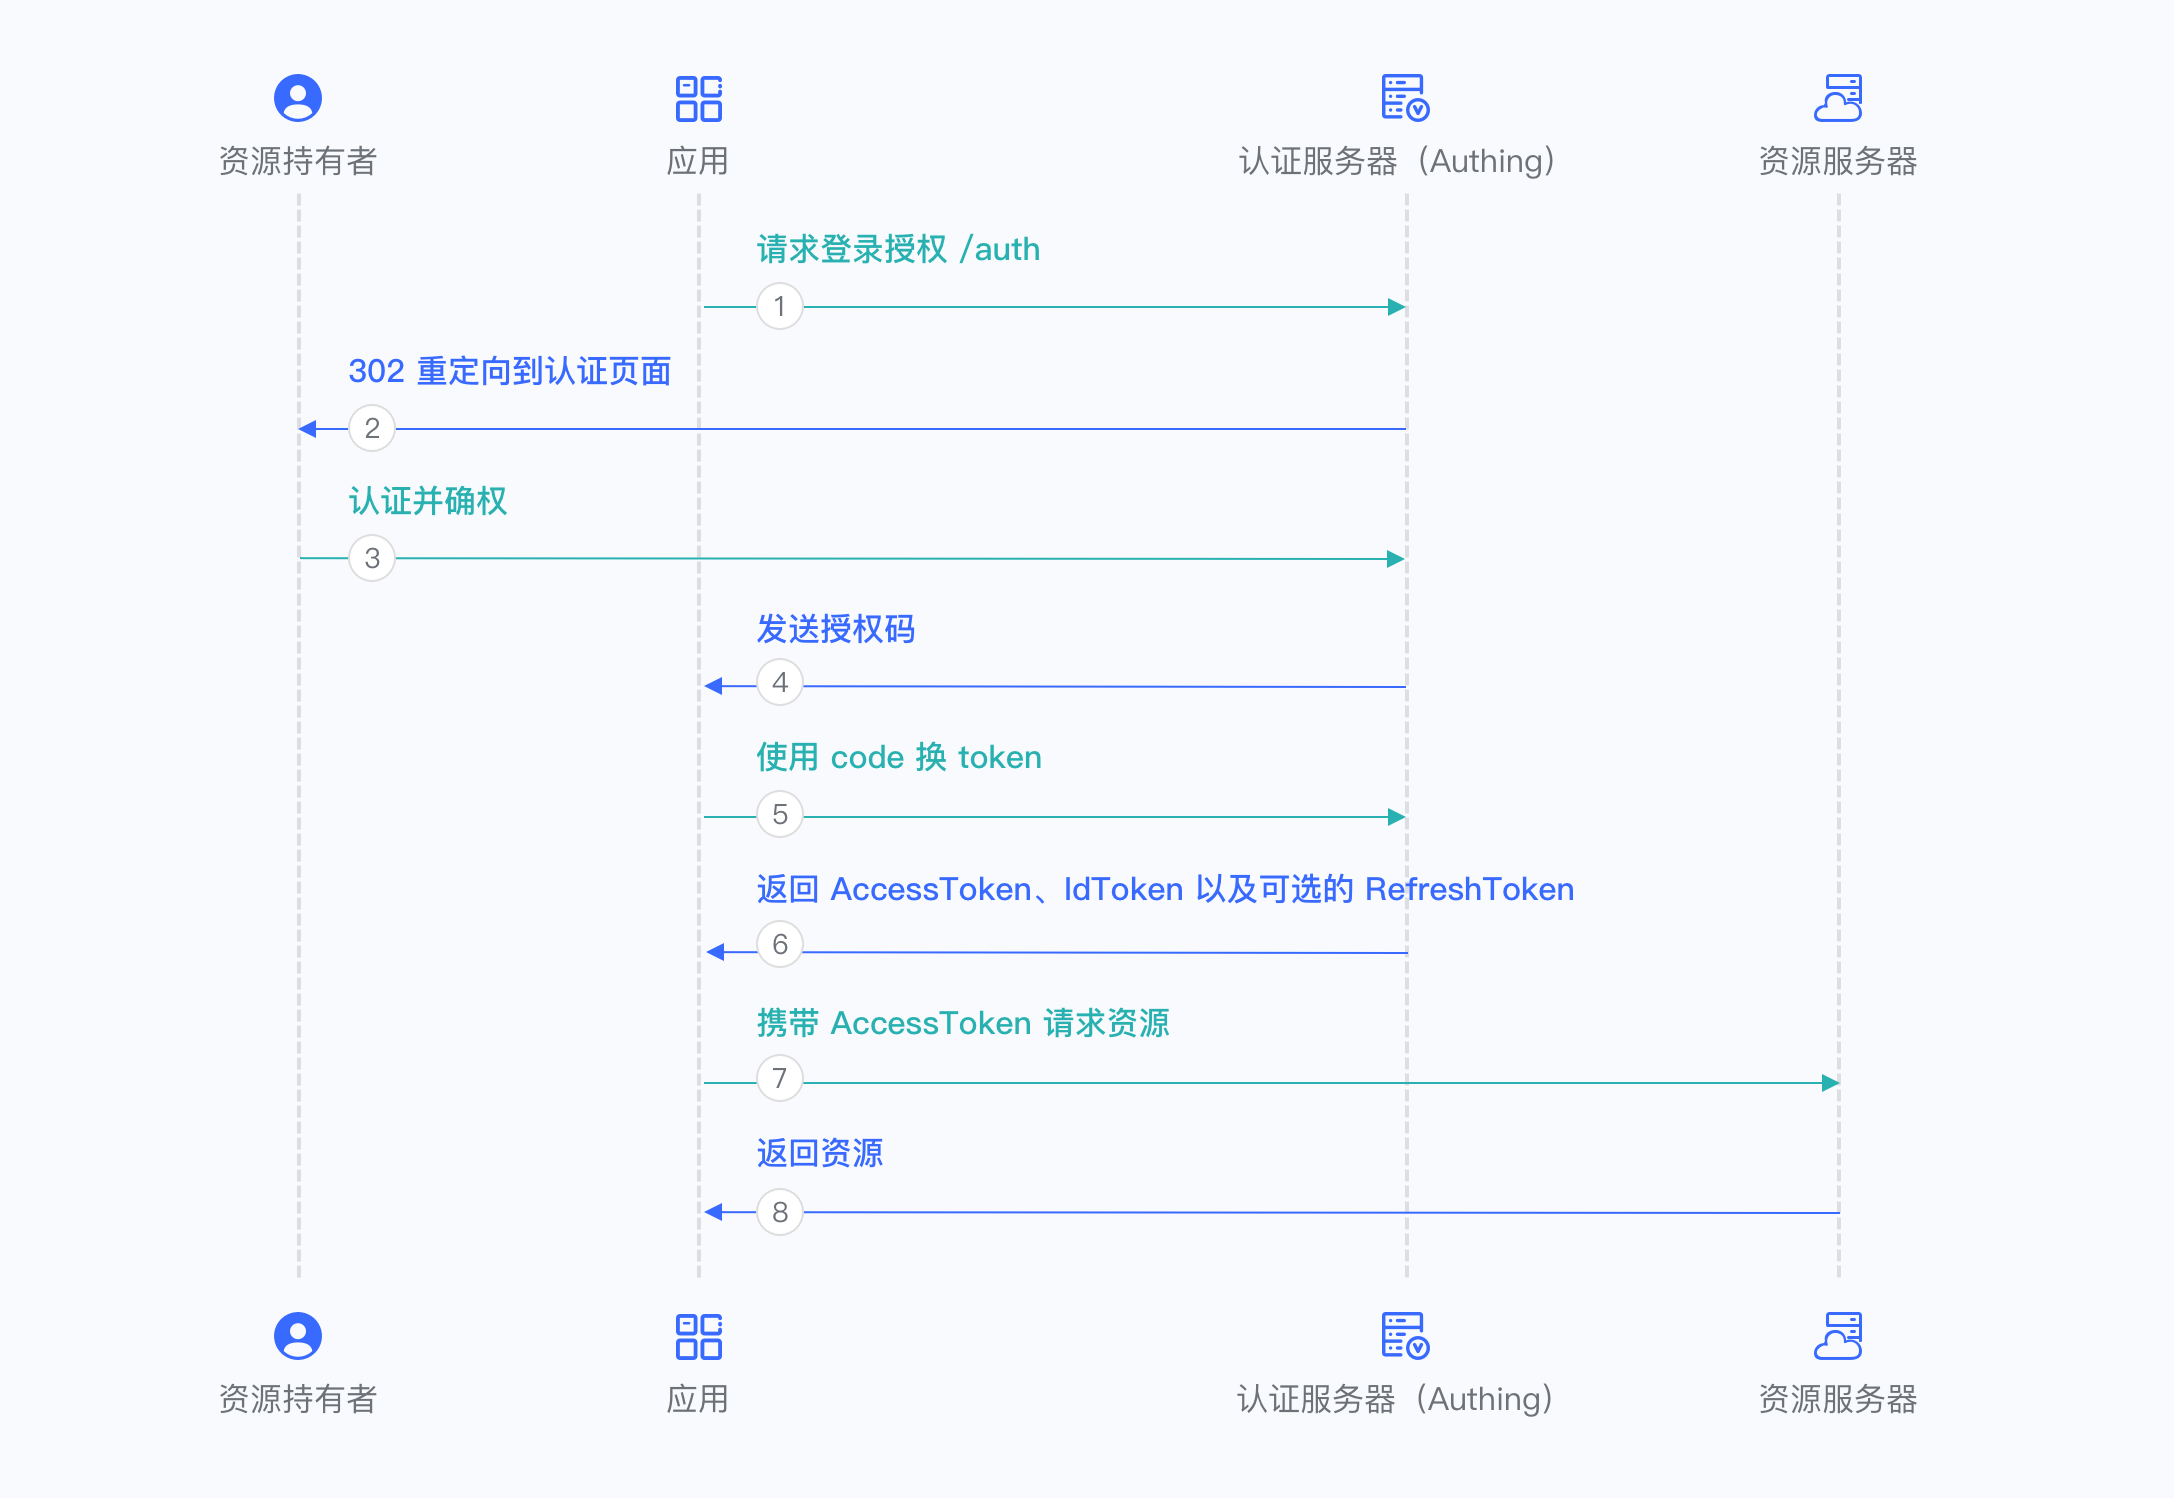
Overall, there are the following processes:
- In your application, let the user visit the login link, the browser jumps to GenAuth, and the user completes authentication in GenAuth.
- The browser receives an authorization code sent from the GenAuth server.
- The browser sends the authorization code to your application backend through redirection.
- Your application service sends the authorization code to GenAuth to obtain AccessToken and IdToken, and returns a refresh token if necessary.
- Your application backend now knows the user's identity, and can subsequently save user information, redirect to other front-end pages, use AccessToken to call other APIs of the resource party, and so on.
The flow chart is as follows:
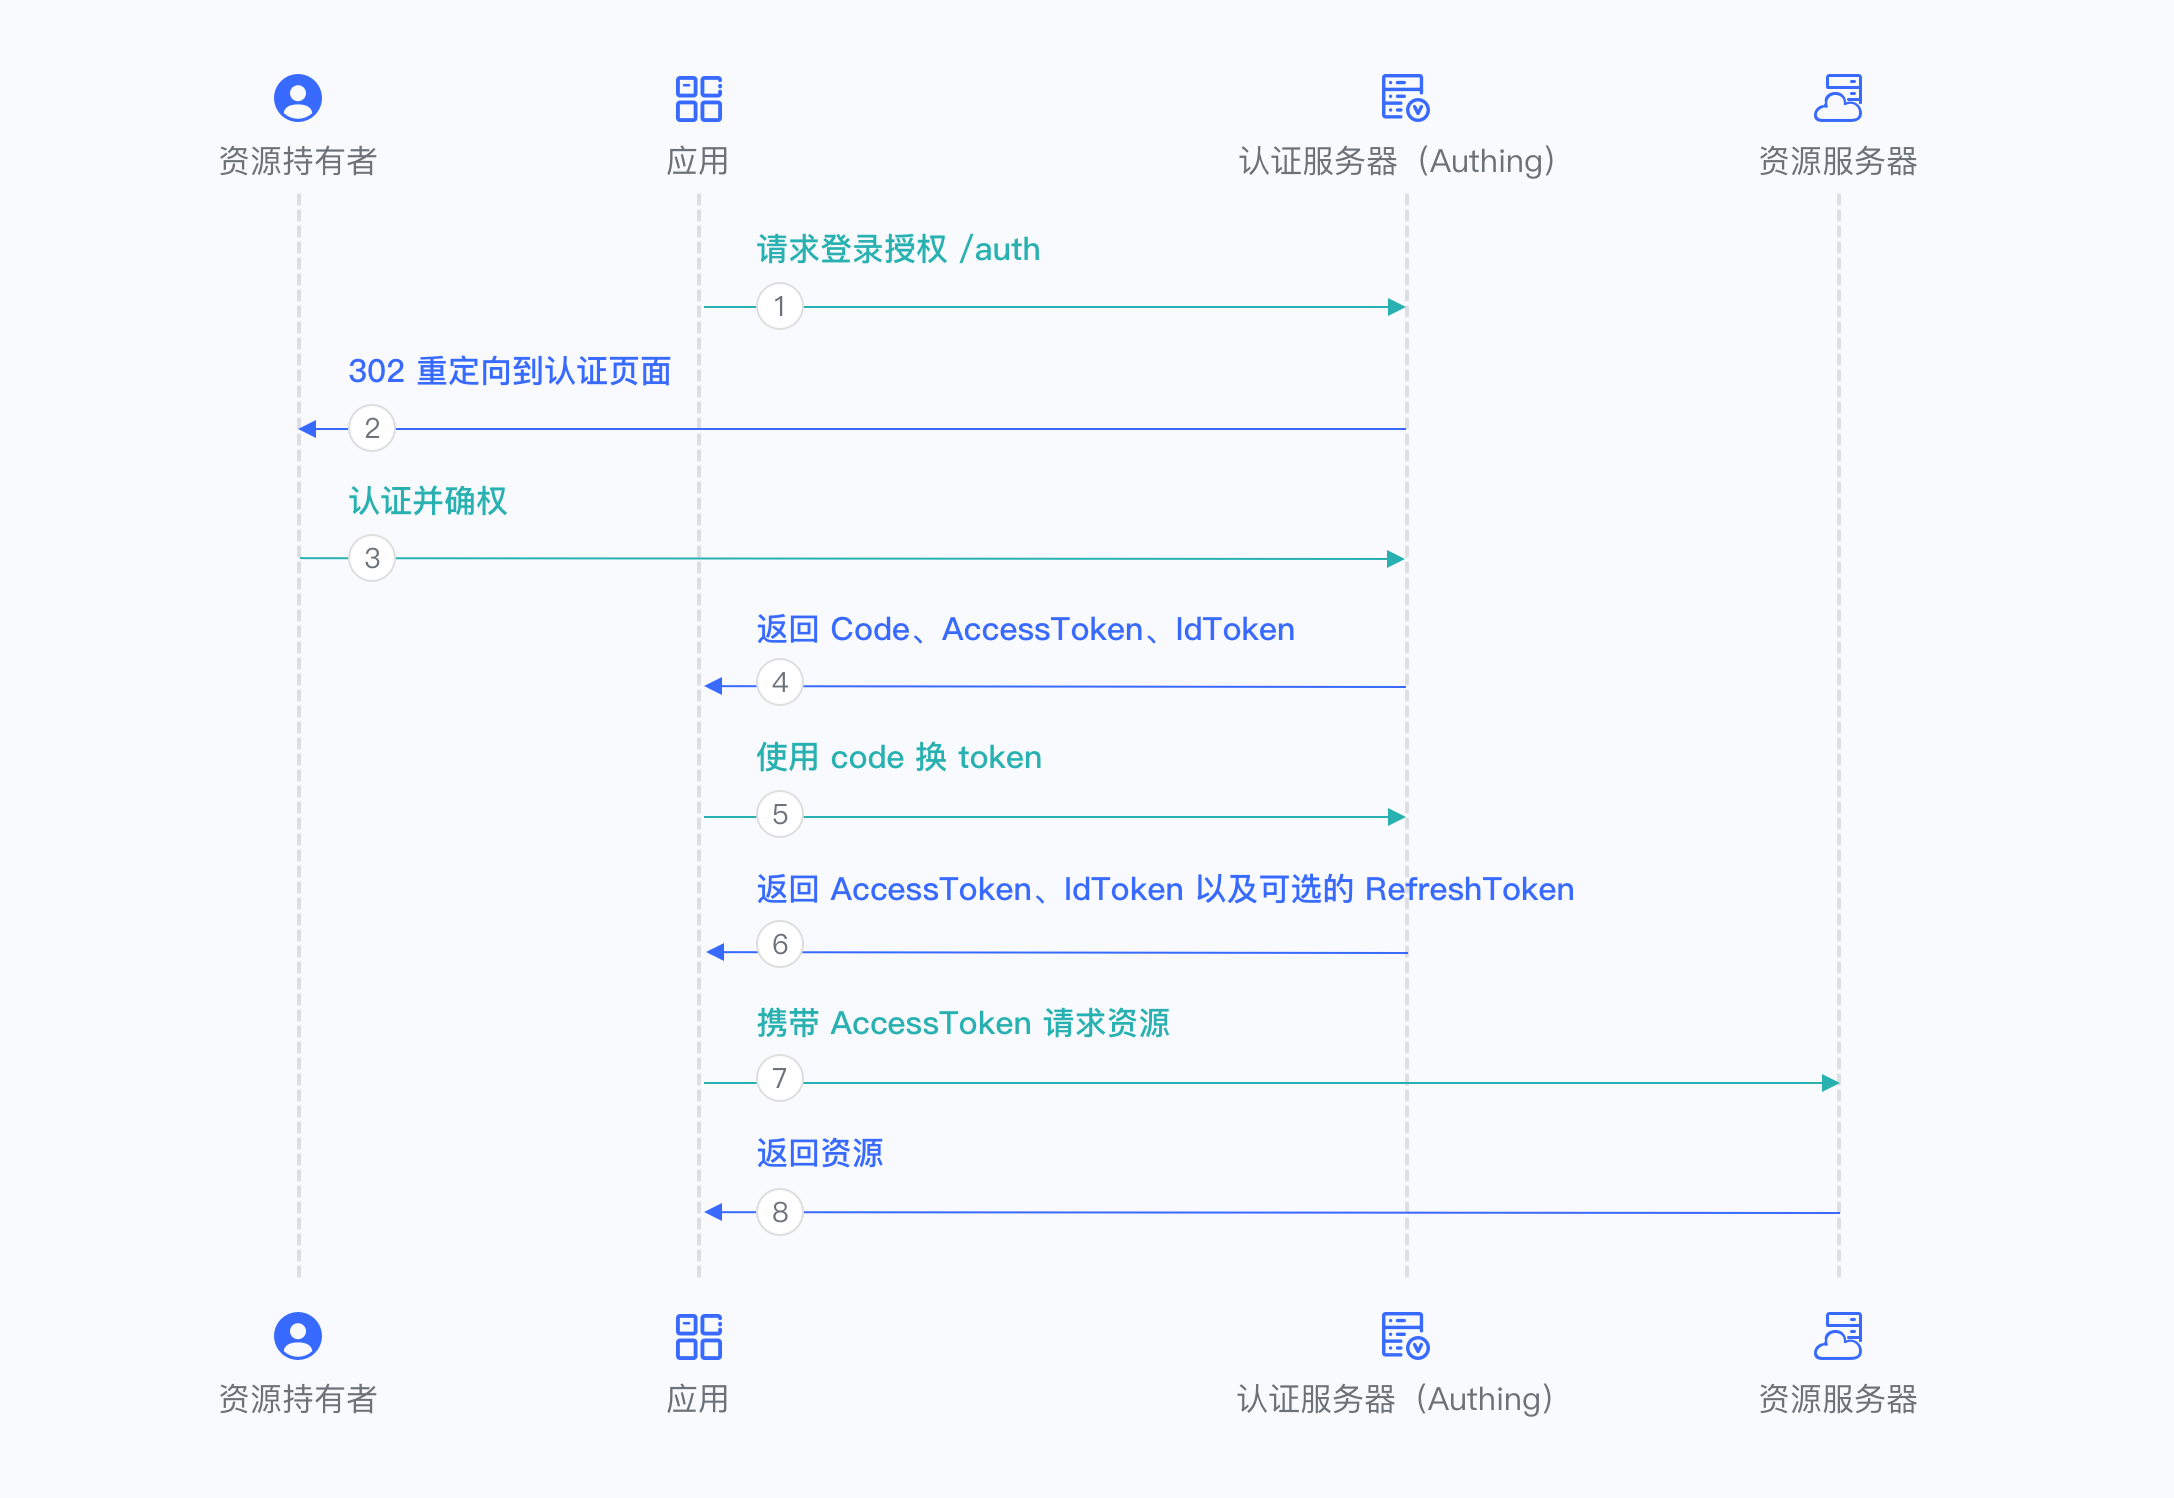
¶ Authorization code + PKCE mode
If your application is a SPA front-end application or mobile app, it is recommended to use Authorization code + PKCE mode to complete user authentication and authorization. Authorization code + PKCE mode is suitable for scenarios where keys cannot be stored securely (such as front-end browsers).
First, in Console > Application, find your application, enter the application details, in the "Authorization" card below, check authorization_code in the authorization mode, check code in the return type, and click Save. In the "Security" card, select none for the exchange token authentication method, the verification token authentication method, and the withdrawal token authentication method, and then click Save.

Overall, there is the following process.
- In your application, let the user visit the login link, the browser jumps to GenAuth, and the user completes authentication in GenAuth.
- The browser receives an authorization code sent from the GenAuth server.
- The browser sends the authorization code to your application frontend through redirection.
- Your application sends the authorization code and verification code to GenAuth to obtain AccessToken and IdToken, and returns Refresh token if necessary.
- Your application frontend now knows the user's identity, and subsequently uses Access token to exchange for user information, redirect to other frontend pages, use AccessToken to call other APIs of the resource party, and so on.
The flow chart is as follows:

¶ Implicit mode
If your application is a SPA front-end application and does not have back-end services, it is recommended to use implicit mode to complete user authentication and authorization. Implicit mode is suitable for scenarios where keys cannot be stored securely (such as front-end browsers). In implicit mode, the application does not need to use code to exchange tokens, and does not need to request the /token endpoint. AccessToken and IdToken will be returned directly from the authentication endpoint.
Because implicit mode is used in scenarios where keys cannot be stored securely, implicit mode does not support obtaining Refresh Token.
First, go to Console > Application, find your application, enter the application details, and in the "Authorization" card below, check implicit in the authorization mode, check id_token token and id_token in the return type, and then click Save.

Overall, there is the following process.
- In your application, let the user visit the login link, the browser jumps to GenAuth, and the user completes authentication in GenAuth.
- GenAuth redirects the browser to your application callback address, and passes AccessToken and IdToken as URL hash.
- Your application extracts the token from the URL.
- Your application can save AccessToken and IdToken for subsequent use, such as carrying AccessToken to access the resource server, and carrying IdToken to request the server so that the server can identify the user.
The flow chart is as follows:
¶ Hybrid mode
In some scenarios, you may want to obtain both the token directly from the authentication endpoint and the authorization code for subsequent refresh token acquisition. It is recommended to use hybrid mode. In hybrid mode, the application will receive both the token and the code. The application can choose to send the code to the backend service to obtain the user's AccessToken, IdToken, and refresh token from the /token endpoint.
First, in Console > Application, find your application, enter the application details, and in the "Authorization" card below, check authorization_code and implicit in the authorization mode, check code id_token token, code id_token, and code token in the return type, and then click Save.
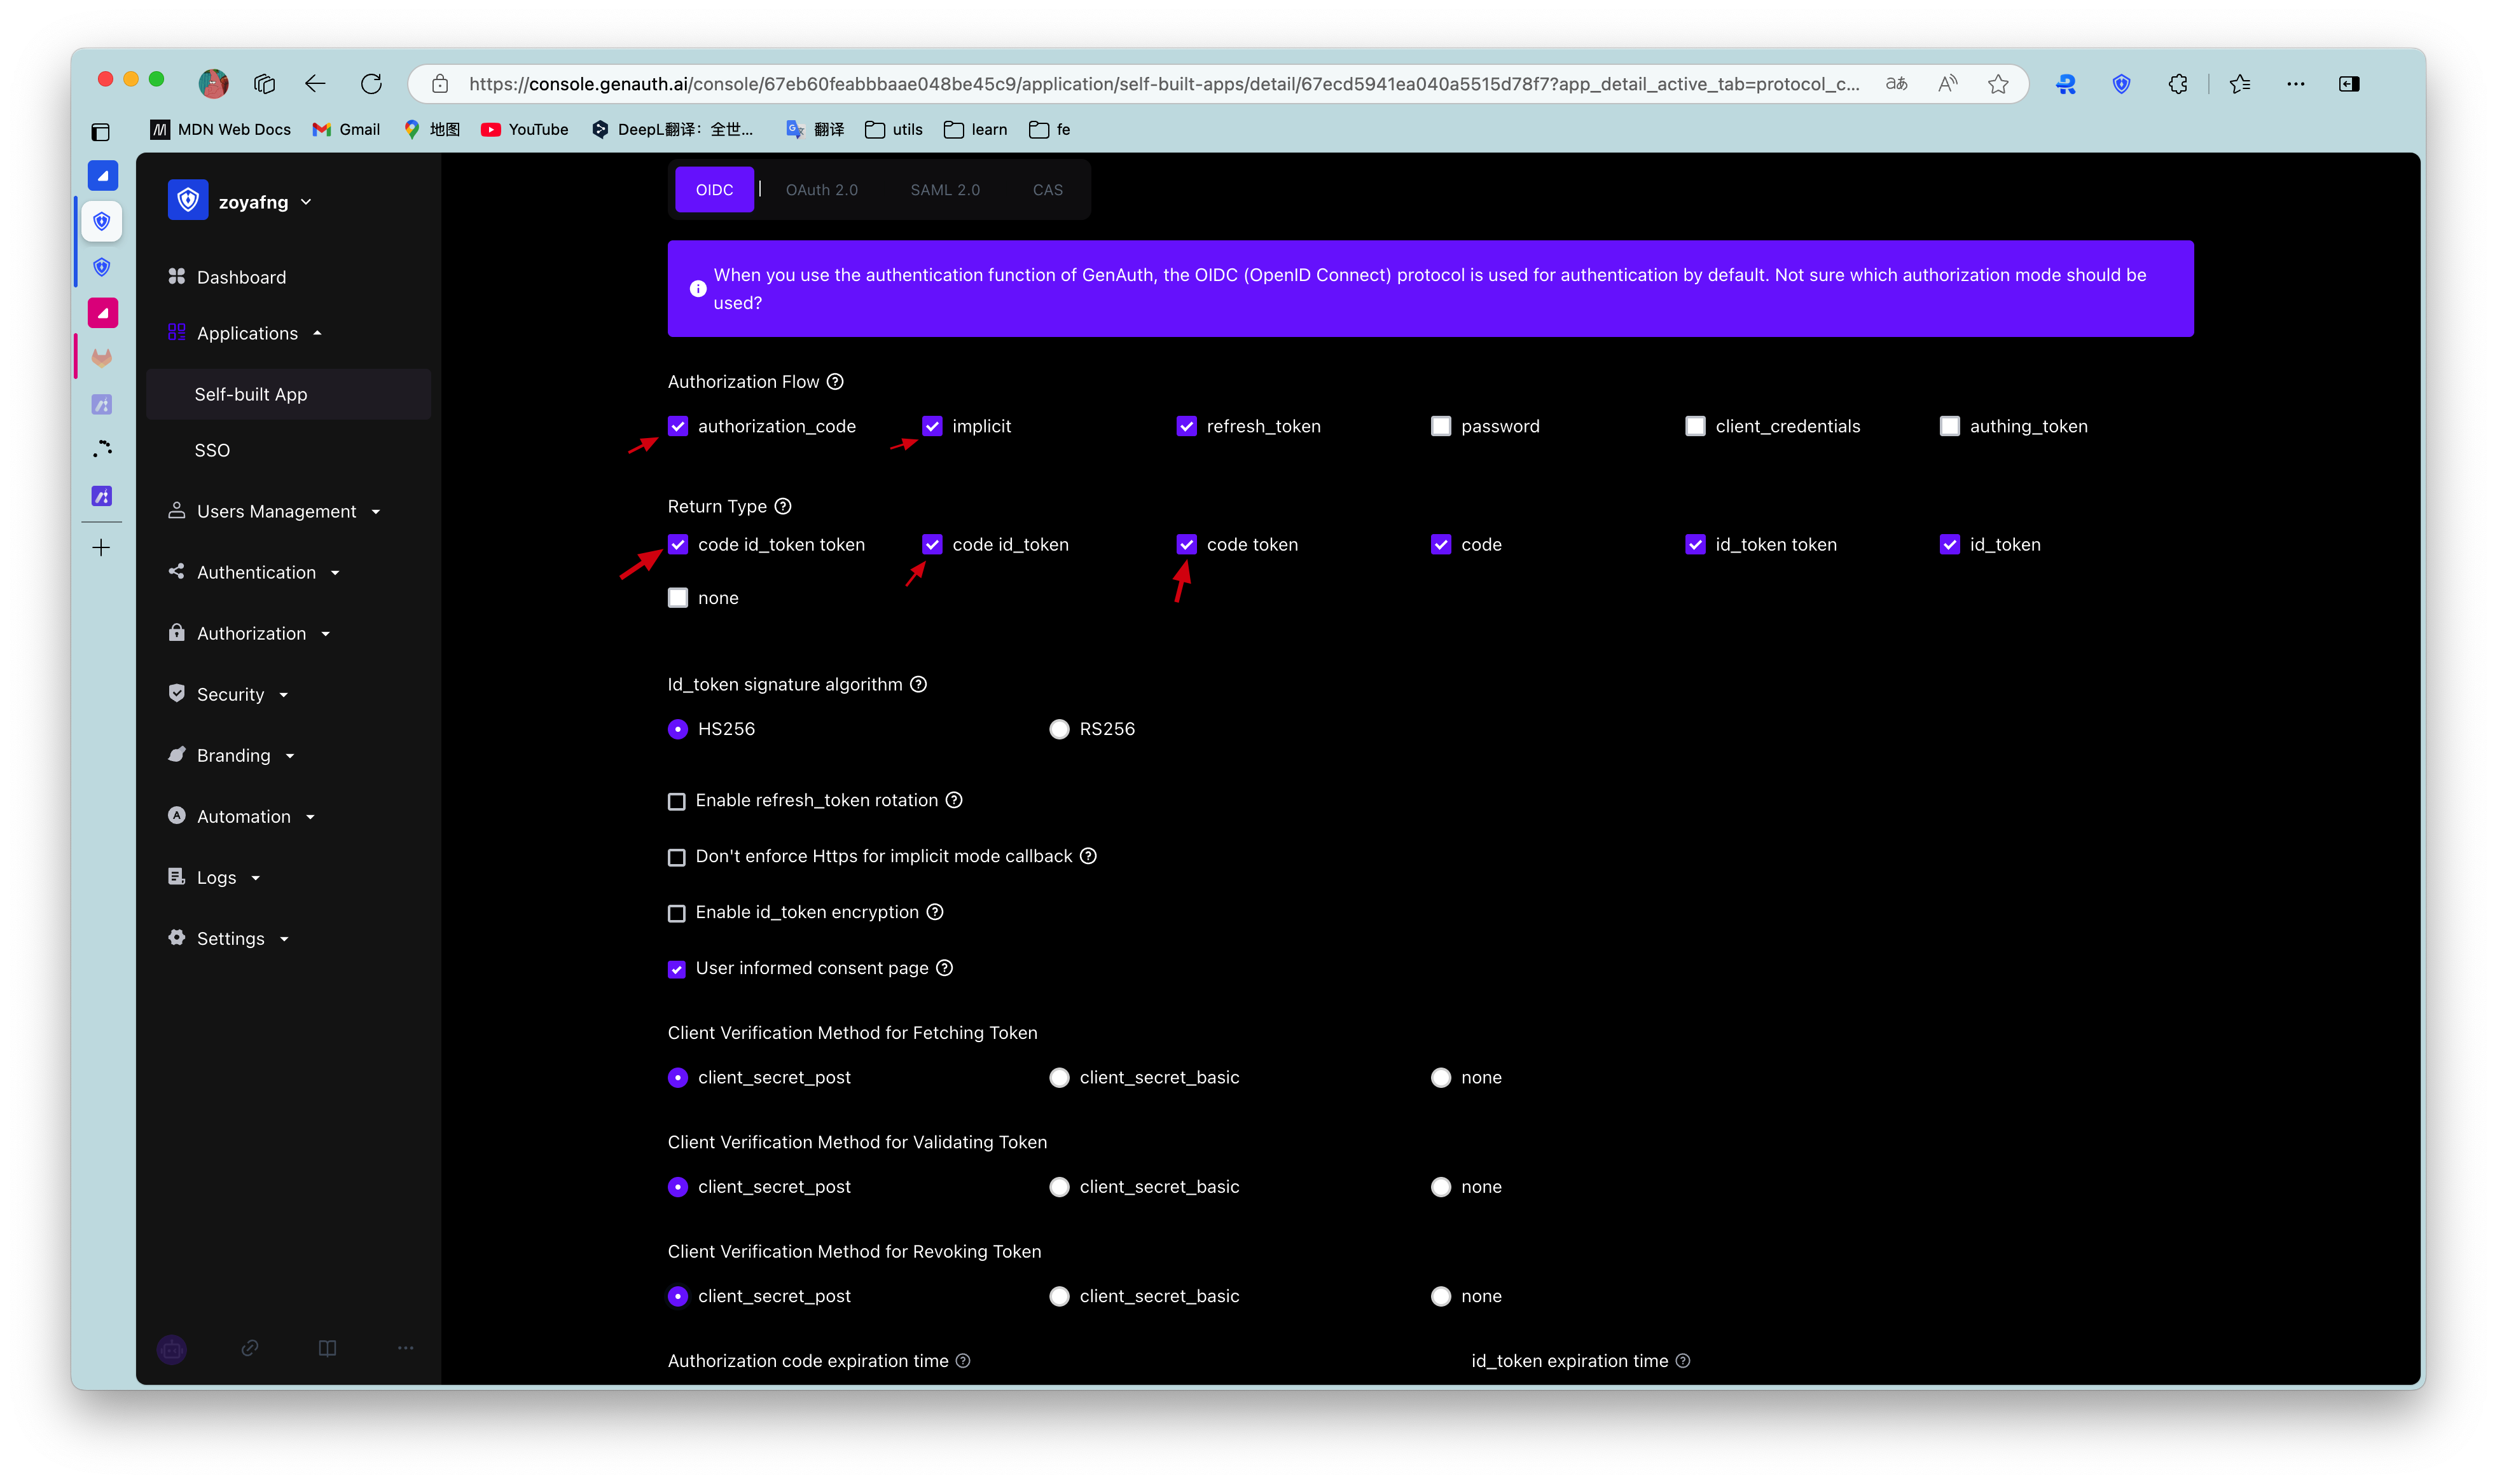
Overall, there is the following process.
- In your application, let the user access the login link, the browser jumps to GenAuth, and the user completes authentication in GenAuth.
- GenAuth redirects the browser to your application callback address, and passes the code, AccessToken, and IdToken as URL hash.
- Your application extracts the code and token from the URL.
- Your application can save the AccessToken and IdToken for subsequent use, such as accessing the resource server with the AccessToken and requesting the server with the IdToken so that the server can identify the user.
- Your application can send the code to the backend.
- The application backend can use the code to obtain the user's AccessToken, IdToken, and refresh token. After that, you can save the user information, use the AccessToken to call other APIs of the resource party, and so on.
The flow chart is as follows:
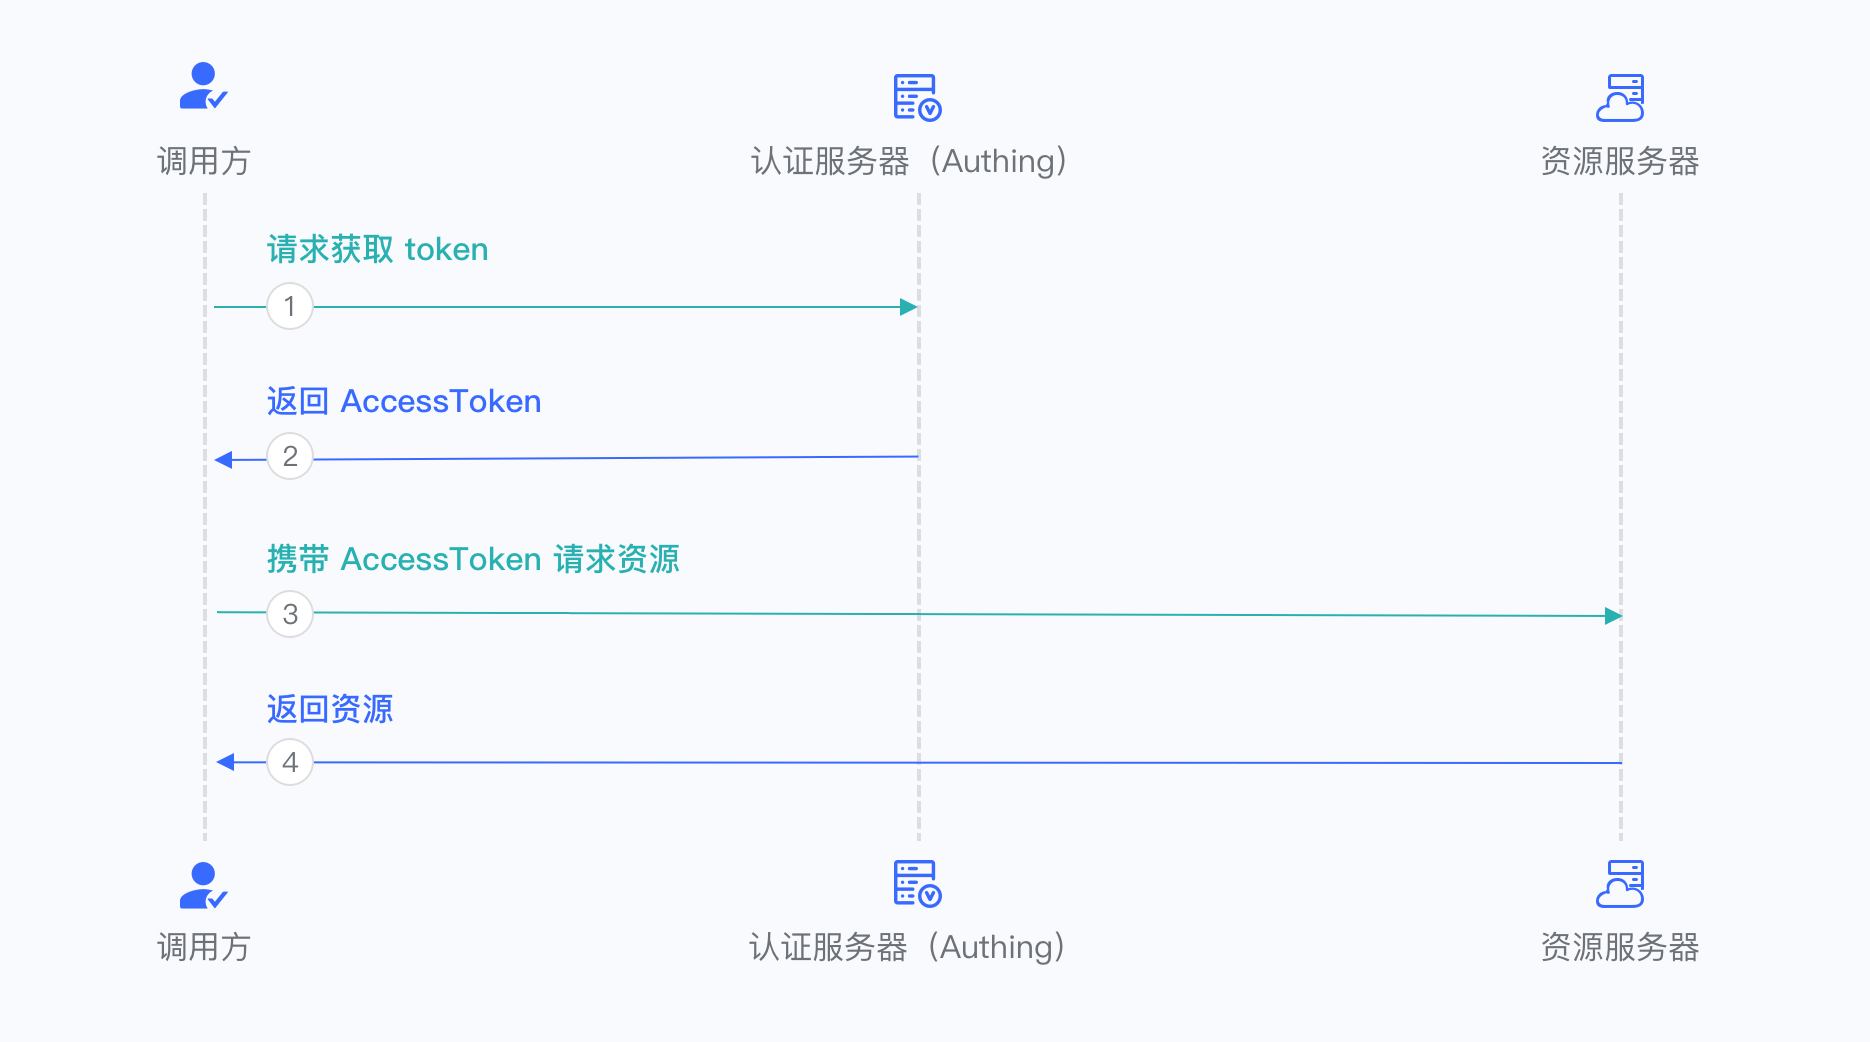
¶ Client Credentials mode
Client Credentials mode is used for server-to-server authorization (M2M authorization) without user participation. You need to create a programmatic access account and give the AK and SK key pairs to your resource caller.
First, go to Console > Application, find your application, enter the application details, and in the "Authorization" card below, id_token signature algorithm Select RS256, check client_credentials in the authorization mode and click Save.

Overall, there is the following process.
- The resource caller sends his credentials AK, SK and the requested scope to the GenAuth authorization endpoint.
- If the credentials are correct and the caller has resource permissions, GenAuth issues an AccessToken for it.
The flow chart is as follows:
¶ Password mode
This mode is not recommended. Try to use other modes. Only consider using password mode when other modes cannot solve the problem. If you use password mode, make sure your application code logic is very secure and will not be attacked by hackers, otherwise it will directly leak the user's account and password. It is generally used to transform and integrate very old applications, otherwise never make it your first choice.
First, in Console > Application, find your application, enter the application details, and in the "Authorization" card below, check password in the authorization mode and click Save.

Overall, there is the following process.
- Your application asks the user to enter the account and password information.
- Your application sends the user's account and password to GenAuth.
- If the account and password are correct, GenAuth returns a token.
The flow chart is as follows:

¶ Refresh Access Token
Refresh Token is needed to refresh Access Token. You can learn about Refresh Token here. Refresh Token is used to obtain new Access Token and keep the user logged in.
¶ Get Refresh Token
If you want to get Refresh Token, you need to send a request to GenAuth to get Refresh Token.
Only Authorization Code Mode and Password Mode support Refresh Token.
When the authorization mode and Scope parameter combination shown in the table below are sent to the Token endpoint, GenAuth will return Refresh Token.
| Authorization Mode | Scope |
|---|---|
| refresh_token | offline_access |
| password | offline_access |
Note ⚠️⚠️⚠️: When using the Authorization Code Mode, you must carry the scope parameter when requesting the Authorization Endpoint (/oidc/auth), and the value must include offline_access, and must carry the prompt parameter, and the value must be consent. Otherwise, GenAuth will not return any Refresh Token.
¶ Get Refresh Token in Authorization Code Mode
When using the Authorization Code Mode, you first need to access the Authorization Endpoint (/oidc/auth), carry the scope parameter, the value must include offline_access, and must carry the prompt parameter, and the value must be consent, to obtain an Authorization Code. Then send the authorization code to the Token endpoint, and GenAuth will return the Access Token, Id Token, and Refresh Token. See Using the OIDC Authorization Code Mode for more information.
¶ Example of getting the authorization code and refresh token
The following request example can get the authorization code and refresh token. Note the offline_access content in the scope parameter.
https://{your application domain}/oidc/auth?client_id={application ID}
&response_type=code
&scope=openid%20profile%20email%20phone%20address%20offline_access
&redirect_uri={callback address}
&state=4756806
¶ Examples of getting Access Token, Id Token and Refresh Token
The following request example can get Access Token, Id Token and Refresh Token from the Token endpoint. The value of the code parameter is the authorization code returned from the authentication endpoint in the previous step.
POST https://${your application domain}/oidc/token?grant_type=authorization_code
&redirect_uri={callback address}
&code={authorization code}
&client_id={application ID}
&client_secret={application key}
¶ Response example
{
  "access_token": "eyJhbGciOiJSUzI1NiIsInR5cCI6IkpXVCIsImtpZCI6IlRmTE90M0xibjhfYThwUk11ZXNzYW1xai1vM0RCQ3MxLW93SExRLVZNcVEifQ.eyJqdGkiOiJZUHB4NUVEWGlQWVJvNUFQWXAzci0iLCJzdWIiOiI1ZmY3MDFkODQ2YjkyMDNlMmY2YWM2ZjMiLCJpYXQiOjE2MTQwOTE0OTksImV4cCI6MTYxNDA5NTA5OSwic2NvcGUiOiJvZmZsaW5lX2FjY2VzcyBwcm9maWxlIG9wZW5pZCIsImlzcyI6Imh0dHBzOi8vb2lkYzEuYXV0aGluZy5jbi9vaWRjIiwiYXVkIjoiNWYxN2E1MjlmNjRmYjAwOWI3OTRhMmZmIn0.ZN_SlfVg1oNMz7uAK-5K84dqqqmlZehmAPOLytOR9HnLHImKJ9VO5u1hRsAjGCob0kMUV5wVxQhX3EFks7FtMamiX2Jvn-NYh4V_5T6l3LFf4uoKF6AykAg483nG3EEENuGgQo15bBszsoCGqFnNmUd0T4Cgxx0zbxXPxMdp_dcE14KzmNz1w-Qg3yVeYmSTZFdcLtZA2BYnVEa7LYA2yA3DgawwAcRmrlyEfnvCO3uY2TcsTKEAfQ-QgVIGRWOfyUE5f-_X3TolliO1fXnwZBdxEKMXLGW5E2bPVcePyiV0upYbUnQ079UxBlEiWlgeW_rpkTPXDxHAgiE488gtlg",
  "expires_in": 3600,
  "id_token": "eyJhbGciOiJIUzI1NiIsInR5cCI6IkpXVCJ9.eyJzdWIiOiI1ZmY3MDFkODQ2YjkyMDNlMmY2YWM2ZjMiLCJiaXJ0aGRhdGUiOm51bGwsImZhbWlseV9uYW1lIjpudWxsLCJnZW5kZXIiOiJVIiwiZ2l2ZW5fbmFtZSI6bnVsbCwibG9jYWxlIjpudWxsLCJtaWRkbGVfbmFtZSI6bnVsbCwibmFtZSI6bnVsbCwibmlja25hbWUiOm51bGwsInBpY3R1cmUiOiJodHRwczovL2ZpbGVzLmF1dGhpbmcuY28vYXV0aGluZy1jb25zb2xlL2RlZmF1bHQtdXNlci1hdmF0YXIucG5nIiwicHJlZmVycmVkX3VzZXJuYW1lIjpudWxsLCJwcm9maWxlIjpudWxsLCJ1cGRhdGVkX2F0IjoiMjAyMS0wMi0yM1QxNDo0NDoxOC4wODVaIiwid2Vic2l0ZSI6bnVsbCwiem9uZWluZm8iOm51bGwsImF0X2hhc2giOiIxaWRJSUxaWExpZkRscXJMY3ZNeV9BIiwiS0VZIjoiVkFMVUUiLCJhdWQiOiI1ZjE3YTUyOWY2NGZiMDA5Yjc5NGEyZmYiLCJleHAiOjE2MTQwOTUwOTgsImlhdCI6MTYxNDA5MTQ5OSwiaXNzIjoiaHR0cHM6Ly9vaWRjMS5hdXRoaW5nLmNuL29pZGMifQ._H59237sqpsY0OgyY_RM7CvuG6cFo1x03y-DBhd5hik",
  "refresh_token": "3T49f4Y48szoMmwBXragjqLwQZC4QhgnsM5Oy2WfmU-",
  "scope": "openid offline_access profile",
  "token_type": "Bearer"
}
¶ Get a Refresh Token in Password Mode
In password mode, you will only use the Token endpoint. See Using Password Mode for more information.
Include offline_access in the request scope parameter for password mode.
POST https://${your application domain}/oidc/token?grant_type=password
&client_id={application ID}
&client_secret={application key}
&username={user name}
&password={password}
&scope=openid%20offline_access
¶ Response example
{
  "access_token": "eyJhbGciOiJSUzI1NiIsInR5cCI6IkpXVCIsImtpZCI6IlRmTE90M0xibjhfYThwUk11ZXNzYW1xai1vM0RCQ3MxLW93SExRLVZNcVEifQ.eyJqdGkiOiJZUHB4NUVEWGlQWVJvNUFQWXAzci0iLCJzdWIiOiI1ZmY3MDFkODQ2YjkyMDNlMmY2YWM2ZjMiLCJpYXQiOjE2MTQwOTE0OTksImV4cCI6MTYxNDA5NTA5OSwic2NvcGUiOiJvZmZsaW5lX2FjY2VzcyBwcm9maWxlIG9wZW5pZCIsImlzcyI6Imh0dHBzOi8vb2lkYzEuYXV0aGluZy5jbi9vaWRjIiwiYXVkIjoiNWYxN2E1MjlmNjRmYjAwOWI3OTRhMmZmIn0.ZN_SlfVg1oNMz7uAK-5K84dqqqmlZehmAPOLytOR9HnLHImKJ9VO5u1hRsAjGCob0kMUV5wVxQhX3EFks7FtMamiX2Jvn-NYh4V_5T6l3LFf4uoKF6AykAg483nG3EEENuGgQo15bBszsoCGqFnNmUd0T4Cgxx0zbxXPxMdp_dcE14KzmNz1w-Qg3yVeYmSTZFdcLtZA2BYnVEa7LYA2yA3DgawwAcRmrlyEfnvCO3uY2TcsTKEAfQ-QgVIGRWOfyUE5f-_X3TolliO1fXnwZBdxEKMXLGW5E2bPVcePyiV0upYbUnQ079UxBlEiWlgeW_rpkTPXDxHAgiE488gtlg",
  "expires_in": 3600,
  "id_token": "eyJhbGciOiJIUzI1NiIsInR5cCI6IkpXVCJ9.eyJzdWIiOiI1ZmY3MDFkODQ2YjkyMDNlMmY2YWM2ZjMiLCJiaXJ0aGRhdGUiOm51bGwsImZhbWlseV9uYW1lIjpudWxsLCJnZW5kZXIiOiJVIiwiZ2l2ZW5fbmFtZSI6bnVsbCwibG9jYWxlIjpudWxsLCJtaWRkbGVfbmFtZSI6bnVsbCwibmFtZSI6bnVsbCwibmlja25hbWUiOm51bGwsInBpY3R1cmUiOiJodHRwczovL2ZpbGVzLmF1dGhpbmcuY28vYXV0aGluZy1jb25zb2xlL2RlZmF1bHQtdXNlci1hdmF0YXIucG5nIiwicHJlZmVycmVkX3VzZXJuYW1lIjpudWxsLCJwcm9maWxlIjpudWxsLCJ1cGRhdGVkX2F0IjoiMjAyMS0wMi0yM1QxNDo0NDoxOC4wODVaIiwid2Vic2l0ZSI6bnVsbCwiem9uZWluZm8iOm51bGwsImF0X2hhc2giOiIxaWRJSUxaWExpZkRscXJMY3ZNeV9BIiwiS0VZIjoiVkFMVUUiLCJhdWQiOiI1ZjE3YTUyOWY2NGZiMDA5Yjc5NGEyZmYiLCJleHAiOjE2MTQwOTUwOTgsImlhdCI6MTYxNDA5MTQ5OSwiaXNzIjoiaHR0cHM6Ly9vaWRjMS5hdXRoaW5nLmNuL29pZGMifQ._H59237sqpsY0OgyY_RM7CvuG6cFo1x03y-DBhd5hik",
  "refresh_token": "3T49f4Y48szoMmwBXragjqLwQZC4QhgnsM5Oy2WfmU-",
  "scope": "openid offline_access profile",
  "token_type": "Bearer"
}